3D Motion and Position of Text Characters with After Effects
Typography is one of the qualities upon which we base most of our design work, and the type animation engine in After Effects offers a gamut of ways to express typographic flair. One of my favorites is the ability to control the 3D motion and position of text characters. When combined with simple camera moves, depth of field, and some real-world studio tricks we use every day, the results can be—literally—powerful. Let’s get started.
1 CREATE PROJECT; ADD BACKGROUND, TYPE
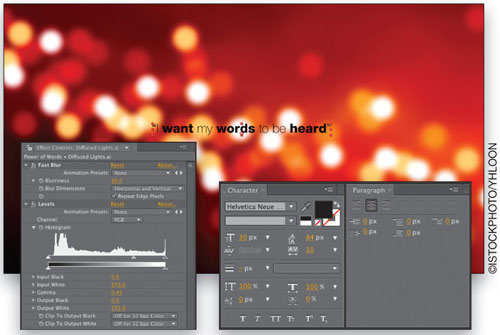
Create a New Composition, named “Power of Words,” at HDTV 1280×720 resolution with a 6-second duration, and then double-click the Project panel to import an image to use as a background. For this example, I purchased a vector illustration of blurry lights (#4292586 from www.istockphoto.com). Drag the image into the Timeline at 0 seconds and use any effects to adjust color or contrast, as well as an Effect>Blur & Sharpen>Fast Blur to soften focus. Go to Layer>New>Text, and enter the main text. We’ve styled ours using Helvetica Neue (85 Heavy and 35 Thin), 30-px size, Optical kerning, Tracking 10, black, and centered.

2 ADD AND EDIT 3D CAMERA
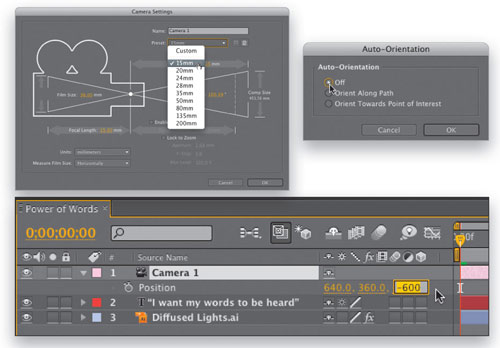
Now, go to Layer>New>Camera, choose 15mm from the Preset drop-down menu in the dialog, and click OK (if you get a 2D warning dialog, just ignore it for now). Press P on your keyboard to reveal the camera’s Position properties, and adjust the Z position value to –600 for the time being. Now go to Layer>Transform>Auto-Orient, choose Off, and click OK.

3 ADJUST 3D POSITIONS
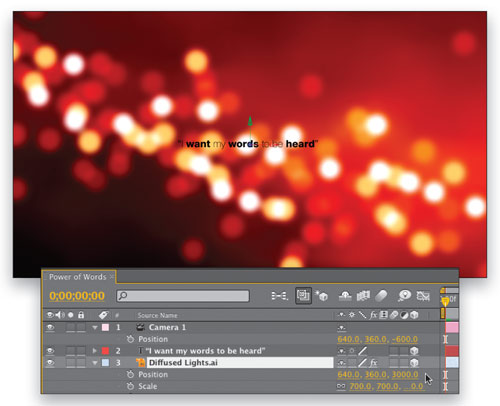
Click the 3D Layer switch next to both the text and background image layers in the Timeline, then select the background image layer, hit P, and set the Z position to 3000 in the far distance. Now, press Shift-S to show the Scale property also, and scale the background image until it touches the edges of the full composition.

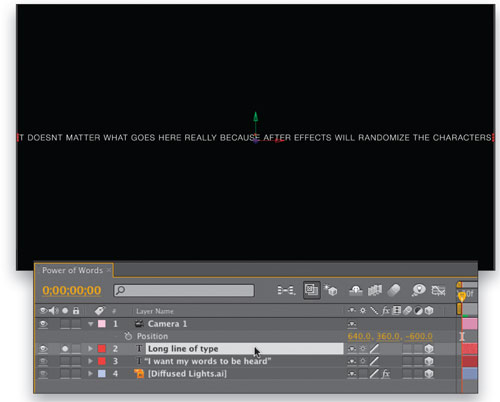
4 DUPLICATE AND ADJUST TEXT
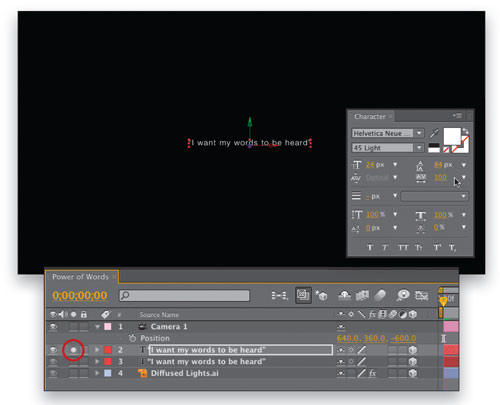
Twirl up the background image layer’s properties, select the text layer, and press Command-D (PC: Ctrl-D) to duplicate it. Click the Solo box on the left of the Timeline for that layer and in the Character panel, change its color to white. (Note: Go to Composition>Background Color and change the color to black so you can see your white text.) Now, change the Font family to be the same throughout—in this case Helvetica Neue 45 Light, the Size to 24 px, and the Tracking to 100.

5 EDIT TEXT; RENAME LAYER
Now, double-click the T icon next to the layer’s name, then type in a series of words or sentences of your choice. The longer the line, the better the finished 3D strings of text will be, so feel free to type and copy-and-paste to extend the lines. You’ll notice that the layer’s name becomes rather awkward to work with, so when finished, click on the name of the layer, press Return (PC: Enter), and rename it to “Long line of type” or something short to that effect.

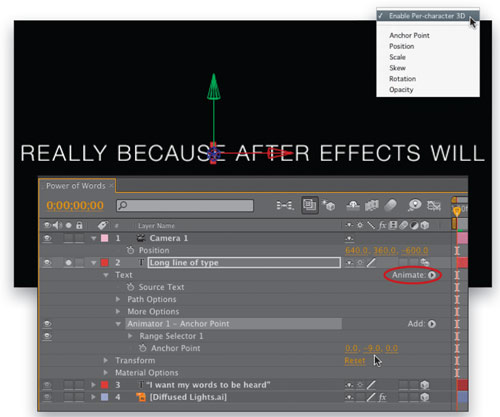
6 ADD FIRST TEXT ANIMATOR
Now for the animators! Twirl down the Long line of type layer, twirl down Text, then click the arrow to the right of the word “Animate” and choose Anchor Point to add your first Animator. Click on the name of the Animator, press Return (PC: Enter), and rename it “Animator 1 – Anchor Point” for easy recognition. Go back to Animate and choose Enable Per-Character 3D from the menu, then adjust the Anchor Point Animator’s Y value to sit in the vertical middle of the type—in our example, around –9. This enables rotators we add later to spin from the center of the letters, not their baseline.

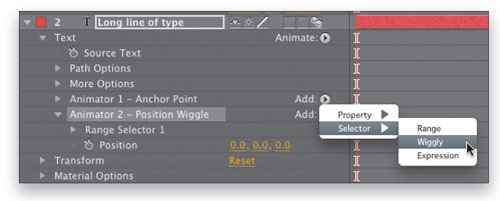
7 ADD SECOND TEXT ANIMATOR
Twirl up and deselect Animator 1, then go back to the Animate menu and choose Position, which adds a second animator. Rename it “Animator 2 – Position Wiggle,” then next to the new name, click Add and choose Selector>Wiggly. This is where the fun and creativity really begin!

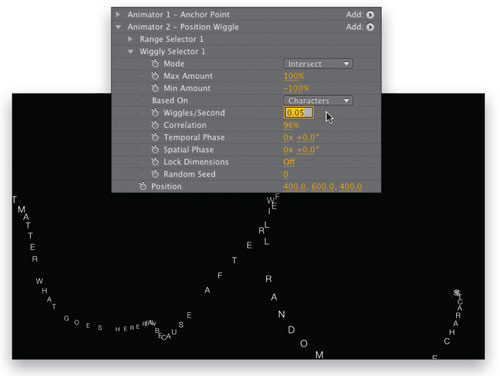
8 ADJUST POSITION AND WIGGLE VALUES
In the Position value within the animator, adjust the XYZ values to 400, 600, 400, respectively. As you can see, this blows the characters far apart easily. And if you scrub the Timeline, it looks crazy too—but this is easy to control. Twirl down Wiggly Selector 1, set the Wiggles/Second to 0.05 (it will show 0.1 when you press Return [PC: Enter]), and most importantly, set the Correlation to 96%. This causes the letters to remain more in line with each other, forming a gently rippling line of type.

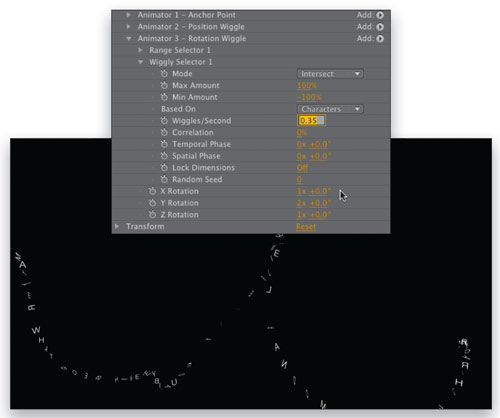
9 ADD THIRD TEXT ANIMATOR
Deselect all, go back to the Animate menu, select Rotation, and next to the new animator, click Add and choose Selector>Wiggly. Rename this animator “Animator 3 – Rotation Wiggle,” then adjust the X, Y, and Z Rotation selectors to 1x, 2x, 1x, respectively. Now twirl down Wiggly Selector 1 and adjust the Wiggles/Second to 0.35 and the Correlation to 0%, and scrub the Timeline. This correlation value allows the random rotation to apply to the characters individually, which looks very cool.

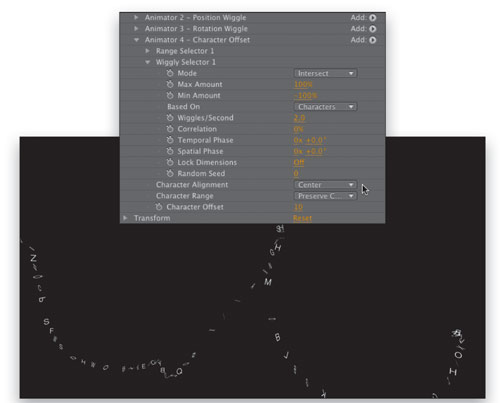
10 ADD FINAL ANIMATOR
Deselect all, go back to the Animate menu, choose Character Offset, and then add a Wiggly Selector into that new animator. Rename this animator “Animator 4 – Character Offset,” then go to the newly added Character Offset value and set it to 10, and the Character Alignment to Center. Now adjust its Wiggles/Second to 2 and its Correlation to 0%, then view the results. Looking pretty cool!

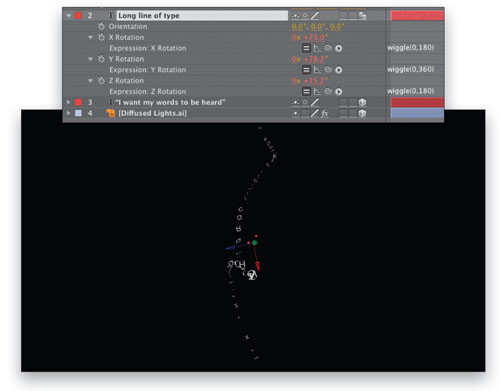
11 ADD RANDOM LAYER ORIENTATION
Now to adjust the entire layer’s rotation in anticipation of the next step, twirl up the entire text layer, then hit R to reveal its Rotation property. Hold down Option (PC: Alt), click on the Stopwatch for X Rotation to add an expression field, and type in wiggle(0,180), then hit Enter to confirm. This will randomly rotate the layer up to 180° on the x-axis, but with no motion. Now repeat this process to add expressions to both the y- and z-axes, using wiggle(0,360) and wiggle(0,180), respectively.

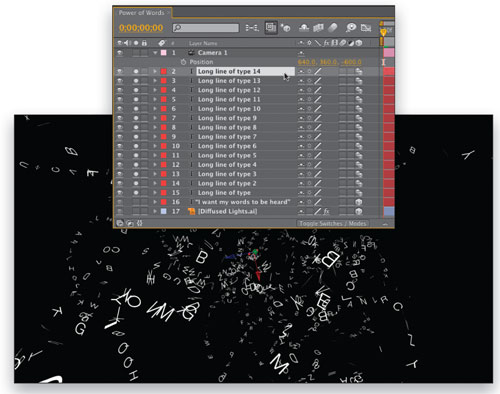
12 DUPLICATE, DUPLICATE, DUPLICATE
Everything we’ve created so far is referencing Wiggle values, which are created randomly in After Effects on a layer-by-layer basis, so if we duplicate this layer, we’ll get wildly different results. Twirl up the text layer, select it, then press Command-D (PC: Ctrl-D) to duplicate it. Not only do you see a new spread of text characters in completely different positions, but the layer name has added “2” to the end, which is why we renamed it. Now, duplicate as many times as you like to suit your design.

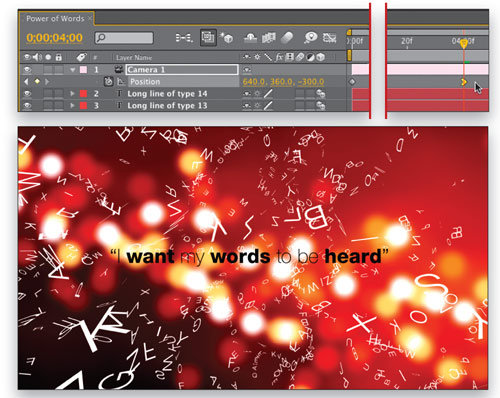
13 ADJUST AND ANIMATE CAMERA
Turn off the Solo icon for all of the type layers, then select the Camera 1 layer and change its Z Position value to –900. At 00:00 seconds, click the Position Stopwatch to add a keyframe, then scrub to 04:00 seconds and change the Z position value to –300. Select that second keyframe and go to Animation>Keyframe Assistant>Easy Ease In (PC: Shift-F9), or adjust the velocity to suit your own design.

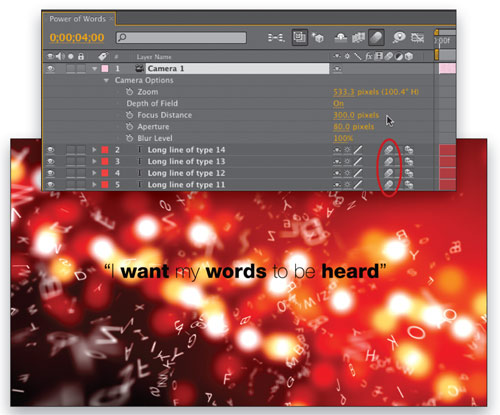
14 ADD DEPTH OF FIELD; MOTION BLUR
Finally, press AA to reveal the Camera Options, then turn Depth of Field to On. Change the Focus Distance to 300 and the Aperture to 80 pixels—this gives us perfect focus on the final wording line at 04:00. Feel free to turn on the Motion Blur switch for all of the text layers, then render your final movie.
A really powerful, and even slightly disturbing, motion piece created easily and quickly thanks to some careful planning, animators, wigglers, and expressions, and of course some good “Energi.” Enjoy!

ALL IMAGES BY STEVE HOLMES UNLESS OTHERWISE NOTED
Visitor Comments »
Comment by jim hines | September 17, 2009 @ 8:00 am
Hines
thanks for the good words! Very much appreciated! If you haven’t had a chance, you can also view the Podcasts we did (the first 15 are there) on iTunes:
http://itunes.apple.com/WebObjects/MZStore.woa/wa/viewPodcast?id=295971174
Thanks again Jim,
Comment by Steve Holmes | September 25, 2009 @ 5:48 pm
wow……thanx appreciate it
Comment by rishabh | October 7, 2009 @ 4:45 am
That is really cool, I just finished mine. Turned out cool. Thank You!
Comment by shane | October 8, 2009 @ 9:10 pm
Glad you like it! I enjoyed this one, a really nice process we use a lot for our work http://www.clickenergi.com and can be used in so many ways.
Enjoy, and thanks for the kind responses!
Steve
Comment by Steve Holmes | October 21, 2009 @ 7:00 pm
Can it work with CS3?
Comment by James Kamotho | November 2, 2009 @ 2:45 am
Fantastic Tutorial! I am a newbie to AE and I found this walk through solid! Awesome work.
Comment by Robbie | November 2, 2009 @ 4:47 pm
Glad you liked it Robbie! Thanks for the good words!
James – absolutely. All the features used in this animation are in CS3 too, so you should be able to follow no problem. There is always a danger than the item name or menu location of something can change between versions (although I don’t believe anything here has suffered that fate) but the features themselves have been in After Effects for a few versions now and you should be fine.
Any problems just drop me a line here and I’ll help out.
Thanks all,
Steve
Comment by Steve Holmes | November 3, 2009 @ 1:51 pm
The only problem is twirling. I was good to go until you started talking about twirling up and down. I have no idea what this means or how to do it, you also didn’t include a snapshot of you “twirling”, which would have been awesome. Other than that and my project being a waste of about 1 hour (not working), the rest of the tut was great and I appreciate it!
Comment by joe Humus | November 4, 2009 @ 5:35 am
good very interesting
Comment by SRI | November 4, 2009 @ 7:31 am
Hi there Joe,
Twirling is a standard term in most software programs, especially in After Effects, for the process of opening/revealing the animatable properties of a layer in the timeline.
For example, look at step 6 where it says twirl down the type layer, then twirl down Text. You’ll see next to every single layer in the timeline is a small triangle, and if you click that, it “twirls” open all the options in that layer (position, scale, rotation, etc). For a text layer, when you “twirl” the layer open, the next option visible is “Text” so you then “twirl” that open, and you see the animatable text properties. And so on.
Like if you add an effect, such as Gaussian Blur to a layer. If you want to the timeline, you would “twirl” open the layer to see the Properties and Effects, you would then “twirl” open the Effects, and you’d see Gaussian Blur, and then you’d “twirl” that open to see the options you can keyframe, etc.
I hope this makes sense and helps?
As for a screen shot of twirling, the shot in step 6 at least shows the “results” of twirling, as the steps mention in the text. The type layer is twirled open, the Text option is then twirled open, revealing the Animator 1 which has also been twirled open to reveal the little stopwatches to keyframe from.
Hope this helps, and that you can complete the tutorial now and enjoy the results. Let me know if you have any more questions.
All the best,
Steve
Comment by Steve Holmes | November 9, 2009 @ 1:33 pm
Hello Mr. Holmes.
I found you. I missed you at Artbeats. I am an avid follower of the Artbeats’ video tutorials by Steve Holmes. I enjoyed all yours useful and practical tutorials. I learned so much from you. For me, no AE book could give me so much useful information in 30 minutes. Mr. Holmes, the last Artbeats video tutorial from you was dated March 2009. Do you still consider posting tutorials at Artbeats in the near future or I can skip Artbeats and come here?? Thank Steve for all your tutorial and thank you, thank you.
Alex
Comment by Alex | November 13, 2009 @ 2:13 am
Thanks,
Great tutorial!!! Please post more.
Comment by Tyson | November 17, 2009 @ 8:07 pm
I was trying to download the movie to see the animation but it will not play in my quick time player… It says it cannot find the component it needs on the site… any suggestions?
Comment by Cory | November 18, 2009 @ 4:46 pm
Fantastic Holmes! I really appreciate the detail you put into the tuts..
Comment by JP Morgan | December 2, 2009 @ 11:21 am
Great & new but i prefare to make it by programming
![]()
Comment by Manshy | December 3, 2009 @ 10:50 am
amazing
Comment by manish | December 10, 2009 @ 2:18 am
thank you very much.. that was helpfull..
![]()
Comment by Adhe | December 20, 2009 @ 10:40 am
Hi teacher,
I am Theavy Ty, Cambodian guy. I really would like to study after affect, but I do not know where should start to learn it. And who can carry out the problem if I meet it. I hope you are my good teacher
for after affect. I have utilized only Sony Vegas and Adobe Premeire 6.00 and bit prememeire pro.
Thanks in advance.
Theavy
Comment by Theavy Ty | December 21, 2009 @ 1:41 am
very good job!
nice tutorial!!!
thanks!
Comment by 3kalos | January 2, 2010 @ 4:45 pm
[...] 3D Motion and Position of Text Characters with After Effects Typography is one of the qualities upon which we base most of our design work, and the type animation engine in After Effects offers a gamut of ways to express typographic flair. One of favorite is the ability to control the 3D motion and position of text characters. When combined with simple camera moves, depth of field, and some real-world studio tricks we use every day, the results can be—literally—powerful. Let’s get started. [...]
Pingback by 50 Excellent Adobe After Effects Tutorials « Caintech.co.uk | January 8, 2010 @ 3:21 am
I am starting to learn all programs in AdobeCS3, I know 4 is out but I dont have that. I was so gratefu to see this site. Wow. You have taken out the ‘where do I even start in this program’ thoughts. I apprecaite that you introduce ’something’ in every program. It is greatly appreciated. Thank you. Steve. I will keep this site on my desktop and check back often.
Comment by Joyce Annette | January 9, 2010 @ 5:13 pm
Awesome !!!! thanks
Comment by Joe | January 25, 2010 @ 12:23 pm
[...] 3D Motion and Position of Text Characters with After Effects Typography is one of the qualities upon which we base most of our design work, and the type animation engine in After Effects offers a gamut of ways to express typographic flair. One of favorite is the ability to control the 3D motion and position of text characters. When combined with simple camera moves, depth of field, and some real-world studio tricks we use every day, the results can be—literally—powerful. Let’s get started. [...]
Pingback by LeDesigne Studio - 50 Excellent Adobe After Effects Tutorials « LeDesigne Studio | January 26, 2010 @ 8:23 am
please give us the proyect file it´ll be easier to learn
Comment by Edwin Lopez | January 26, 2010 @ 2:45 pm
[...] Jungle Tutorial: 12.) [After Effects] Animierte Wirbel / Strudel Tutorial: 13.) [After Effects] 3D-Buchstaben überall Tutorial: 14.) [After Effects] Foto Collage Tutorial: 15.) [After Effects] Freerunner / Parkour animieren [...]
Pingback by Die besten After Effects Tutorials | Dunged | February 8, 2010 @ 3:20 pm
Hi Edwin,
This tutorial (with the exception of the background, which is only there for aesthetics) doesn’t have or require a project file. It’s a single line of text being animated, so hopefully you can follow the steps above to recreate it. By all means, if you have any questions, please feel free to post them here and I’ll get back to you as quickly as I can.
Steve
Comment by Steve Holmes | February 12, 2010 @ 3:20 pm
You are welcome Joyce. Be sure to check out the Artbeats website http://www.artbeats.com for tutorials we have posted there in the past (and a brand new written PDF one which launched 2 days ago) as well as our Facebook page where you can keep up to date with our work and other items.
http://www.facebook.com/energidesignSteve
Comment by Steve Holmes | February 12, 2010 @ 5:35 pm
very good tutorials!! thanks!! works very well!!
i´m new in After Effects, and now i want to continue with another words and images coming like this first one saying “i want my words to be heard” how should i do that?
Comment by Paul | February 15, 2010 @ 11:53 am
Hi Paul,
The main line of type (the readable black words) are a layer in 3D space which the camera is animating towards. To introduce new sentences, all you need are new lines positioned further away down the Z axis away from the camera, and then animate your camera to keep moving forward on the Z axis (through the current text until it disappears behind you) until you get closer to the next line of type and it comes into focus.
Does that make sense in a nutshell-kind-of-way? Let me know. Hope it helps.
Steve
Comment by Steve Holmes | February 15, 2010 @ 3:32 pm
this is the first tutorial i have ever done, and it was great and very easy to follow. Thanks a bunch!
Jack Isaacs
Newbie After Effects geek![]()
Comment by jaisaacs | February 16, 2010 @ 10:50 am
Glad you enjoyed it, Jack!
![]()
Steve
Comment by Steve Holmes | February 16, 2010 @ 2:52 pm
Hi Steve, I just wanted to thank you for your time and effort that you put in to give us these fantastic and very well explained tutorials!
I have just completed this one for the first time very quickly and without issues in undertsanding the process and I have only started using AE yesterday!. This has brought a whole new world to my photoshop work and I cant wait to get on and try your other tutorials.
keep up the good work and all the best to you
Kind regards Cal
Comment by Cal | February 18, 2010 @ 7:58 am
Hi Cal,
Thank you so much for such compliments, and I’m glad that tutorials such as these can assist you in learning After Effects (and well done in your achievements in one day!!), and energize you to take your static work to the next level.
I’ve also got a selection of video tutorials and podcasts over on the Artbeats site, and just did a written tutorial PDF file for them (titled “Simply Colorful”) which you can get from the link on our Facebook page: http://www.facebook.com/energidesign, and there will be more.
Thank you again for writing, very much appreciated
![]()
All the best,
Steve
Comment by Steve Holmes | February 19, 2010 @ 3:28 am
This tutorial is fantastic. Thank you so much
Comment by Erika | March 2, 2010 @ 6:33 pm
Steve,
Thank you again, and I must say that I really love the BG you used to create this tutorial. That’s pity – I can’t afford myself to buy this one on istockphoto so I wanted to ask, maybe you know different sites where I could get something like this for free? Besides my video doesn’t look like yours
My camera zooms after 4-5 seconds only and all that flying sentences are so far in the beggining. I don’t know what I have done wrong, ’cause I checked all steps of your tutorial and made it twice, but still, I can’t get that awesome result you did.
Please help.
Thanks. Erika
Comment by Erika | March 3, 2010 @ 5:32 pm
Really really great tutorial!!
Thanks for posting it. It’s great for beginners in AE like me!=)
Comment by Nicole | March 7, 2010 @ 6:09 am
You are more than welcome, Nicole!
![]()
Steve
Comment by Steve Holmes | March 8, 2010 @ 5:49 pm
Hi Erika,
I apologize, I didn’t receive an email from the Layers server telling me of your problems on this tutorial… I only just saw your comment now.
The background, you can always find free backgrounds online, just do a search for something like blurry city lights, or out of focus night lights or something, I am sure you’ll find an image. The one we used, despite coming from iStockphoto, could (and was, by the creator) be entirely created inside Illustrator… A gradient mesh backdrop, a series of circles with Blur filters applied… Would take a little time, but would get the same result.
As for the camera moves and sentence timing, I am not sure what the problem is from your description as there are any number of steps which could affect the outcome. If you wish to shoot me over your AE project file to info (at) clickenergi.com, I’d be happy to take a look for you?
Hope this helps,
Steve
Comment by Steve Holmes | March 8, 2010 @ 6:09 pm
Steve,
I though that You may not understand, because I am not English or American and it is hard for me to explain technical side
Well that would be awesome (if you would check my project OR the rendered result). Really I made your tutorial three times already and the result was always the same, although I checked every step that you made. So what’s more comfortable for You – project, or rendered video?
Erika
Comment by Erika | March 10, 2010 @ 8:21 pm
Hi Erika,
No problem at all, we’ll figure it out for you. No need to worry about explaining the technical stuff, usually better to look at the file. If you can send the Project file to the email address mentioned above, I’ll take a look. In the email, please let me know if you start encountering problems at one of the steps, or not until the very end. Trying to find WHERE the problem happened is part of the solution…
Thanks again
Hope to hear from you soon,
Steve
Comment by Steve Holmes | March 10, 2010 @ 8:43 pm
I am very sorry, Mister Holmes, but I can’t find Your email anywhere :0
Erika
Comment by Erika | March 13, 2010 @ 8:28 am
Leave us a comment

- Dragging an Object Between Documents
- TV Scanline Effect
- Trick to the Glossy Effect
- 3D Text
- Changing Type on a Path


Photoshop
Illustrator
Indesign
Dreamweaver
Fireworks
Premiere
Flash
After Effects
Lightroom
Acrobat


