PDF forms can be edited easily in Acrobat 8, including adding eight types of custom form fields. Once you have your form just the way you want, you can distribute and track it, then when the completed form is returned, you can also use Acrobat 8 to collect, compile, and review your form’s data.
1 ACTIVATE THE FORMS TOOLBAR
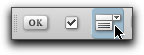
Acrobat 8 allows you to create eight varieties of custom fields in your form. Activate the Forms toolbar (Tools>Forms>Show Forms Toolbar), which contains all the tools you need to edit, preview, and distribute your PDF forms. The toolbar’s left side contains eight tools: Button, Checkbox, Combo Box, List Box, Radio Button, Text Field, Digital Signature, and a Barcode. The right side contains the Edit Layout/Preview (depending on the current state of your form), and Distribute tools.

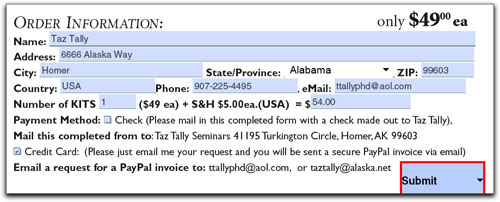
2 RESIZE OR DELETE FIELDS
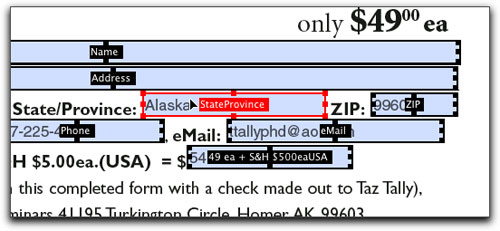
Open a copy of the form you want to edit (we’re using the form we created in Part 1, Layers magazine, Jan/Feb 2008, p. 76). Click on the Edit Layout tool (all the fields are highlighted with corner and side control points). To activate a field, roll your mouse over the field. To resize the field, click-and-drag on any corner or side control point. In our example, we’re going to click on the State/Province field and then press Delete to remove this field. We’re going to replace this with a Combo Box containing a list of states and provinces.
3 CREATE A COMBO BOX
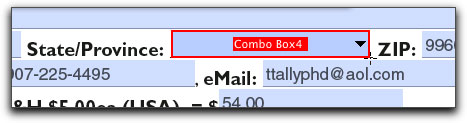
Click on the Combo Box tool (third from the left on the toolbar). Drag your cursor over the area to the right of the State/Province entry in the form and a Combo Box field is placed on the form. The Combo Box Properties dialog appears (see Step 4).
Note: Whenever you create a new custom form field, a properties dialog like this will appear. Its content will vary depending upon the type of form field created.
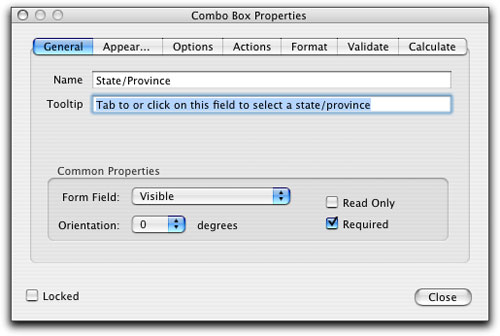
4 CONFIGURE THE COMBO BOX
Click on the General tab. Type in a name for this field—for example, State/Province. Next, type in a Tooltip that you want to appear when a user rolls their mouse over this field. In our example, we used “Tab to or click on this field to select a state/province.” Click on the Form Field menu and choose your preferred option—we selected Visible. If you want this to be a required field, check the Required box. To make sure the list of choices will be available, be sure Read Only is not checked.
5 ASSIGN COMBO BOX APPEARANCE
Next, click on the Appearance tab and click on either the Border Color swatch or Fill Color swatch to choose a color, or No Color. If you assign a border color, then configure the Line Thickness and Line Style to control the border’s appearance. Under Text, assign a Font, Font Size, and Text Color. Tip: Keep it simple; for example, san serif fonts display more legibly onscreen, particularly at small point sizes.

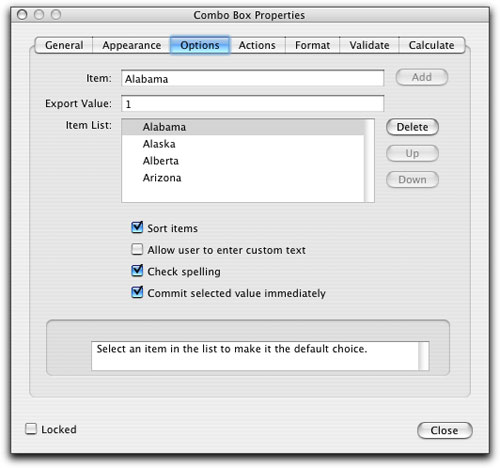
6 CREATE YOU LIST
Click the Options tab and type in the name of a state/province in the Item field, then click Add to add this choice to the Item List. Repeat this for each list entry you want. You can assign an Export value to each item, typically an alpha/numeric value, if you want to track statistics on this field. For our example, we want to know how many form fillers were from Alabama. Check the Sort Items box to automatically sort the list alphabetically and turn on the Commit Selected Value Immediately box to prevent multiple selections.
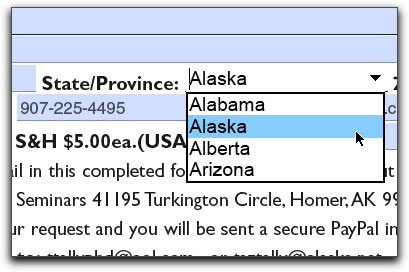
7 TEST YOUR COMBO BOX
Close your Combo Box Properties dialog to apply all your settings. Now select the Hand tool and either tab or click on your newly created State/Province combo box. Click on the down-facing arrow to the right of the first item, then use your Up and Down Arrow keys (or the alpha keys) to navigate the list. Press the Return (PC: Enter) key to apply your list choice.
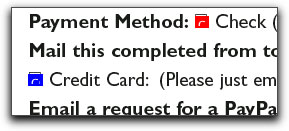
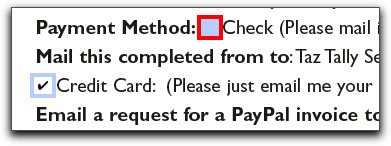
8 REPLACE CHECKBOXES WITH RADIO BUTTONS
When either/or items need to be created, such as Payment Method in our example, use radio buttons. For multiple choices, checkboxes are appropriate. During our automatic forms creation process in Part 1, Acrobat automatically recognized our Payment Method checkboxes and replaced them with Acrobat forms checkboxes. Because this is an either/or option, we need to replace the boxes with radio buttons. Click on the Edit Layout tool, select the Check and Credit Card checkboxes, and delete them.
9 CREATE CHECK RADIO BUTTON
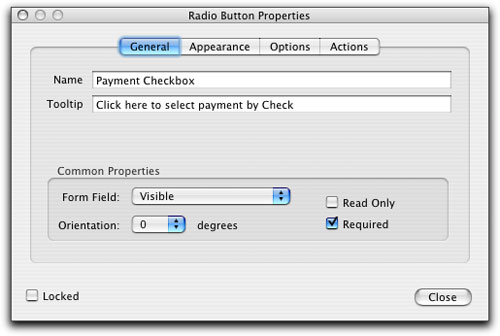
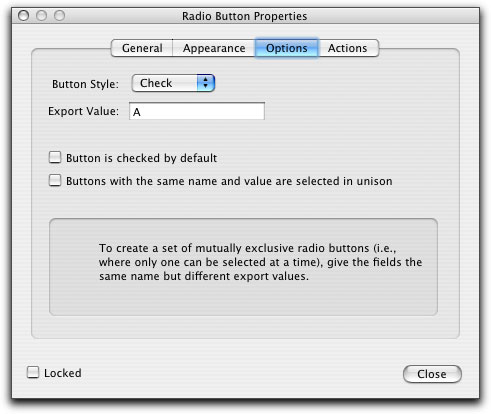
Select the Radio Button tool, then click-and-drag over the Check checkbox, and the Radio Button Properties dialog appears. Under the General tab, type “Payment Checkbox” in the Name field and “Click here to select payment by check” in the Tooltip field, and turn on the Required checkbox. Next click on the Options tab and select Check from the Button Style menu. Now type “A” in the Export Value field, and Close the dialog to create the Radio Button.
10 CREATE CREDIT CARD RADIO BUTTON
Press the Option (PC: Alt) key as you drag the Check Radio Button over the top of the Credit Card checkbox, making a duplicate copy. Double-click on this new button and under General, keep the same Name “Payment Checkbox” but for Tooltip, type in “Click here to select payment by credit card via PayPal.” Click on the Options tab and type “B” in the Export Value field—by having the same name but different export values, users may check only one of these boxes. Also check the Button Is Checked By Default box to make this the default.

11 TEST YOUR RADIO BUTTONS
After you’ve clicked the Close button to create your Credit Card Radio button, select the Hand tool. Click on the Check Card checkbox and then click on the Credit Card checkbox. When you click on the Credit Card checkbox, the Check checkbox should automatically uncheck. If this doesn’t happen, return to the Edit Layout mode and check the properties of both radio buttons to make sure they have the same Name (Payment Checkbox) but different Export values (A and B).
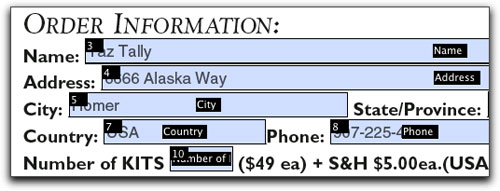
12 EDIT TAB ORDER
Click on the Edit Layout tool. Choose Forms>Edit Fields>Set Tab Order. You’ll get a message asking if Acrobat should set the tab order for you. Click No, and each data entry field will be labeled in the upper left with a tab order number. Note the Name field, should be #1, but it’s labeled 3 because of the two extra fields at the top created by the Auto Form Field Recognition in Part 1 (delete these at any time). To set the tab order, simply click the form fields in the order you want them to be activated.
13 TEST YOUR TAB ORDER
Select the Hand tool again, click on the Name field, and tab through the fields to make sure they’re in the order that you want. The tab order should finish up at the Submit button. If you haven’t removed the two extra auto-created tab fields, keep tabbing to find them. Return to the Edit Layout tool to select and delete them.
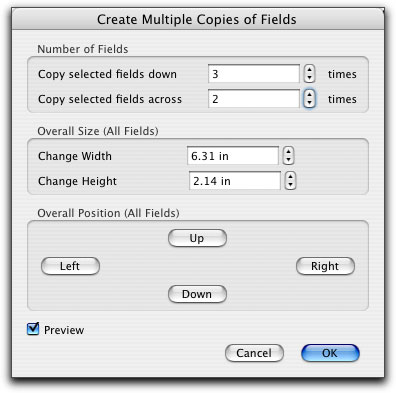
14 MULTIPLE FIELDS CREATION TIP
If you’re manually creating form fields with two or more identical fields, try this timesaver: Create your first field (ours is a Text field), then in Preview mode, select Forms>Edit Fields>Place Multiple Fields. In the Create Multiple Copies of Fields dialog, specify the Number of Fields, Overall Size, and Overall Position for the multiple fields you wish to create. Check the Preview checkbox to preview the setting results prior to clicking OK.