
Actually, this isn’t a contest of which is better; I just used the whole “versus” thing to lure you in. Libraries have been around for years in page layout as a way to keep commonly used elements in one easy-to-grab place. Snippets are the new kids on the block, and by using Snippets you’re not required to keep everything in one place. The beauty of this is that there’s room for both in your design world. So let’s take a look at how they work.
STEP 1 Create a Document with Content on the Page
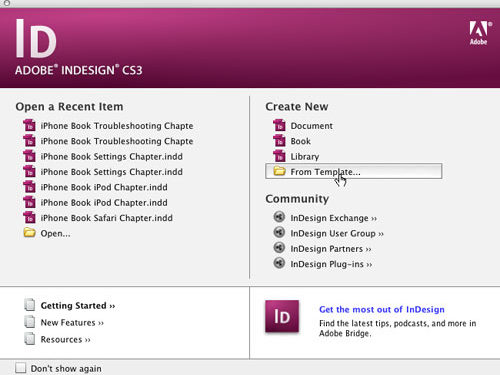
As with most InDesign tutorials, we need a document to get started. You can either open an existing document or create a new one. Either way, you’re also going to need some content on the page. We’re going to use one of the InDesign templates that ships with the application. You can too by choosing Create New from Template on the Welcome Screen (under the Help menu).

STEP 2 Create a New Library
We’re using the Brochure.indt file from the Hotel templates folder. With the document open, it’s time to create a new library file in which to store the content. Choose New>Library from the File menu. By default, InDesign will want to name this new library “Library.” You should choose a name that represents what you’re going to be putting into each library you create. Perhaps name the library after the client or project you’re working on, then save it wherever you like, and click OK.

PHOTO CREDITS: ©ISTOCKPHOTO/Skyline: JOHN W. DEFEO/Beds: TONY TREMBLAY/Pool: ADIVIN/Table: ALDRA
STEP 3 Add Something to the Library
After creating the library, a new panel will appear with the name you assigned to your library in Step 2. This is your library document. It’s important to note that libraries are not tied to the document you’re currently working on.
One way to add something to the library from your page is to drag it into the Library panel. Choose the Selection tool (V), select the logo on the right side of the trifold in the brochure template, and drag it into the Library panel.

STEP 4 When It’s Not Convenient to Drag-and-Drop
It won’t always be convenient to drag something into the Library panel, depending on how big your selection is. Also, because Libraries can contain more than just text and graphics (e.g., you may want to include guides), it may be easier to add items from the Library panel itself. Click-and-drag with the Selection tool to select everything in the middle part of the brochure. Then, click the New Library Item icon at the bottom of the Library panel. This will add the items you selected to the library all as one item.

STEP 5 Name Your Library Item
When you add a linked or embedded image to a library, InDesign simply gives the library item the same name as the linked or embedded image. However, when you add multiple items to the library, InDesign doesn’t know what to call them. Having a bunch of “Untitled” library items can become unwieldy, so let’s name this item. Double-click on it in the library and when the dialog appears, you can name the item and even give it a description. Then click OK.

STEP 6 Put Library Entries to Use
The whole point of creating a library and putting things into it is so you can use them in future documents or even throughout the existing document. Create a new document by choosing New>Document from the File menu. Our document is similar in layout to the brochure but it doesn’t have to be.

STEP 7 Drag from Your Library
As you might have suspected, when you created your new document, the library stayed open and on top, and now you can drag-and-drop from the library to your new document. We’re going to drag the logo from the library to the new document. You can drag as many copies out as you need. If the library item was a linked graphic in the original document, it will be a linked graphic in the new document. Libraries don’t actually store the graphics—they link to them.

STEP 8 Place Your Items
Using drag-and-drop is common when working with libraries, but sometimes you’ll want the item to be placed on the page in the exact location it was in the original document. In this case you can use the Place Item(s) command, which will attempt to place the contents on the page using the original coordinates of the library item (as long as the general layout of the new document is the same as the original document). Control-click (PC: Right-click) on the library item and choose Place Item(s).

STEP 9 Use List View
As you put more and more items in the library, it probably won’t be feasible to constantly scroll up and down looking for things by their thumbnails. So if you did a good job naming your library items, you can grab them quickly by using List View. To switch to List View, choose it from the Library panel’s flyout menu. Everything else will work the same. Your library file is a document, so you can close it now and open it in the future whenever you need it.

STEP 10 What about Snippets?
Think of snippets as library items without the library. Snippets were introduced in InDesign CS2 and, of course, are in InDesign CS3 as well. To create a snippet, use your Selection tool and select something on the page.

STEP 11 Export Your Snippet
The most structured way to create a snippet is to use the Export command from the File menu, because this will allow you to name your snippet and choose where to save it. In the Export dialog, make sure that your Format is set to InDesign Snippet. Name it, choose where you’d like to save it, and then click Save.

STEP 12 Yes, You Can Drag It out of InDesign
As I said, exporting snippets is more structured, but not necessarily the best way in all cases. You can also drag the selected items from your InDesign page directly to your desktop, a folder in your operating system, or an open window in Bridge. This will create a snippet in that location. If you drag it into a Bridge window as we did here, then you’ll see a nice preview of the item and, of course, you can rename the snippet in Bridge CS3.

STEP 13 Drag Your Snippet onto the Page
Now go back to that new document you created and drag your snippet onto the page from Bridge or from the folder in your operating system.

STEP 14 Place Your Snippets
Drag-and-drop from Bridge is cool, but it’s not efficient unless you have multiple displays. So just like any other content in Bridge, you can place snippets into InDesign from Bridge using the Place command from the Bridge File menu. You can also place snippets using the Place command in InDesign.

