Animated Swirls in Adobe After Effects
Animated swirls are all the rage in the motion graphics world, and there are some pretty cool things that can be done with them. But creating and animating such elements is really not as difficult and time-consuming as it would seem, even if the shapes are detailed and intricate. Bring on the swirls!
[To download a preview version of this swirls in after effects technique, follow this link. All files are for personal use only.]
1 CREATE ILLUSTRATOR SWIRL
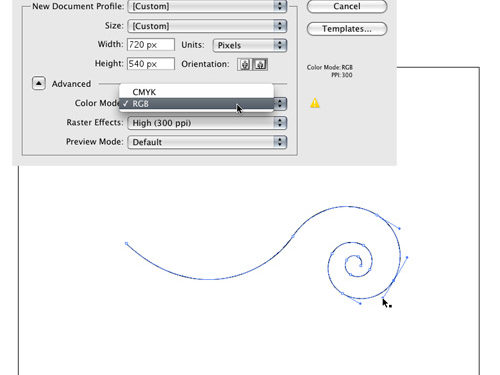
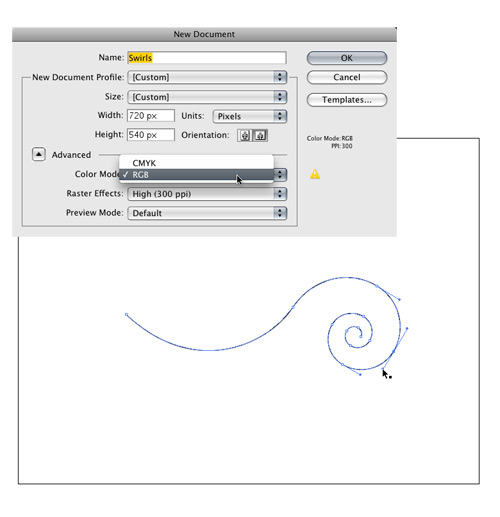
Let’s start out in Adobe Illustrator CS3, by far the best tool for creating such design elements—and as you’ll see, hugely important in providing the actual animation paths for us also (yes, you read that right!). Create a new document called “Swirls” at 720×540 pixels, and set the Color Mode to RGB. Click OK, then using the Pen tool, create the main stem for the left side of your design. Then switch to the Spiral tool to draw the swirl on the right. With the Direct Selection tool, select the right end point of the Pen tool path and the left end point of the swirl path and go to Object>Path>Join to create a single path.
2 ADJUST FILL; ADD LAYER & STROKE
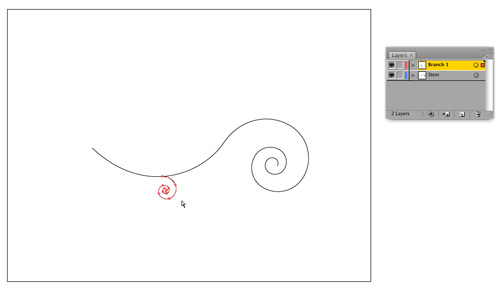
With the path selected, go to either the Toolbox or Color panel, click the Fill icon then the None icon to remove the default white fill, leaving only the black 1-point stroke (going to View>Show Transparency Grid can help confirm this is done). In the Layers panel, double-click Layer 1, rename it “Stem,” and click OK. Then click the Create New Layer icon, rename the new layer “Branch 1,” and use the Spiral tool to draw another swirl coming out from the stem, as shown above.
3 ADD LAYERS & STROKES
Continue the same steps (new layer, draw new branch swirl, check fill is None) for as many branches you would like to have coming from the main stem. Make sure the branches start at the stem as accurately as possible. (Note: To draw a swirl in the opposite direction, click once on the artboard with the Spiral tool and select the other Style in the Spiral dialog.) In this case, I’ve created a total of four extra branches. Save your document as Swirls.ai at this point, then go to Window>Brush Libraries>Default Brushes, and choose Basic RGB.
4 ADD BRUSH STROKE; ADJUST WIDTH
With the Selection tool, select all of the stem and branch elements, and click on the second brush graphic in the Basic RGB panel to apply that style. Feel free to use any of the other Brush Libraries, or indeed create your own, to suit your taste. In the Stroke panel, adjust the Stroke Weight accordingly to achieve the desired effect (1.5 pt in this example). Save the file once more, then switch to After Effects.
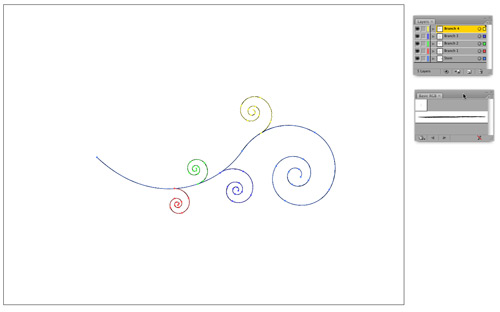
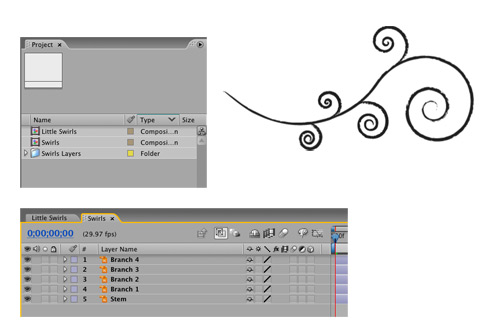
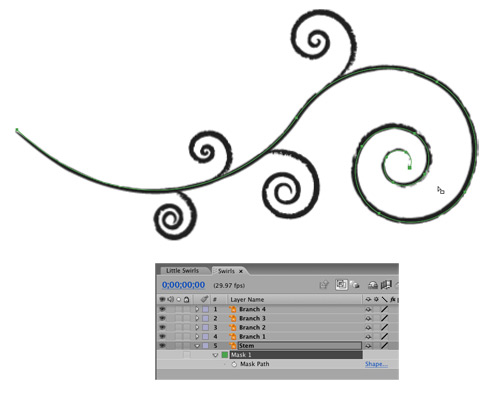
5 CREATE MASTER COMP; IMPORT SWIRLS
Click the Create a New Composition icon at the bottom of the Project panel, name it “Little Swirls,” and set it to NTSC D1 Square Pixel (720×540) for consistency. Set the length to 8 seconds or so, and click OK. Now, double-click in the Project panel to bring up the Import File dialog, locate Swirls.ai, choose Import As Composition – Cropped Layers, and click Open. Double-click the new Swirls comp in the Project panel to open it. Go to Composition>Background Color and choose white so you can see the swirl elements.
6 EDIT ORIGINAL IN ILLUSTRATOR
Believe it or not, you’ve done the hardest part of the project, and have also unknowingly created the animation paths that will “reveal” the strokes perfectly. Select the main Stem layer in the Timeline, then press Command-E (PC: Ctrl-E) to Edit Original back in Illustrator. Once in the program, go to View>Outline—this is how we want After Effects to see our path shape, as we’re going to copy and paste it. Due to the fact we have a custom brush applied, however, this will most likely not work. So…
7 REMOVE STROKES; COPY & PASTE
Press Command-A (PC: Ctrl-A) to Select All of the lines, go to the Color panel, click the Stroke icon, and click the None icon to remove the brush stroke. As long as we don’t save this document, our brush strokes won’t be affected. Now target just the Stem layer, and press Command-C (PC: Ctrl-C) to Copy the path into memory. Switch back to AE, and with the Stem layer still selected, press Command-V (PC: Ctrl-V) to Paste the path as a mask shape onto the layer. Double-click on the right side of the path in the Composition panel and drag to align with the brush stroke. Press Enter when you’re done.
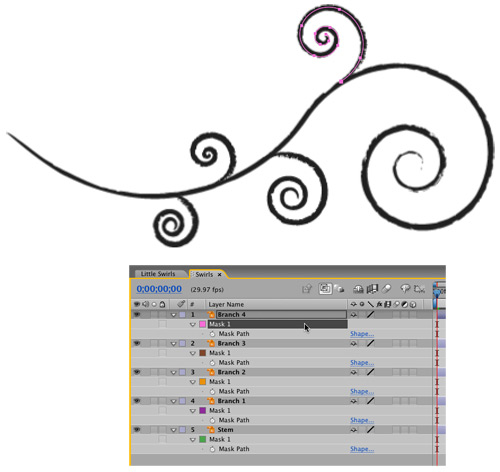
8 REPEAT PROCESS(ES)
Now switch back to Illustrator and do the same process for the remaining strokes: Target one of the paths in the Layers panel, copy it, switch to After Effects, select the corresponding layer, paste the path as a mask, then nudge it into position if necessary. When all the paths have been copied and pasted, switch back to Illustrator, close the file, and do not save the changes.
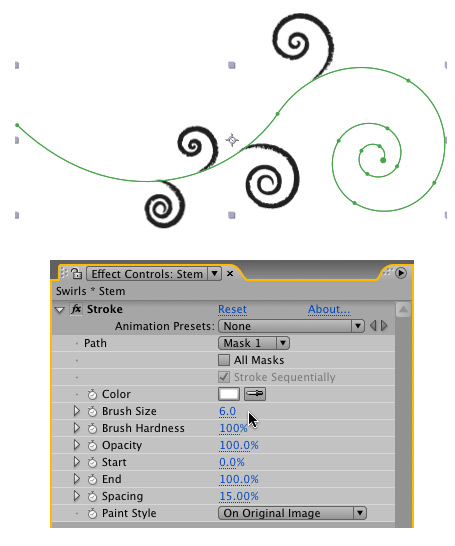
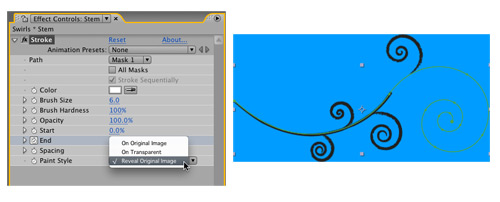
9 ADD STROKE EFFECT; ADJUST
Starting with the stem now, we can create one animation technique that can be re-used on all the other layers. Select the Stem layer and go to Effect>Generate>Stroke; a white stroke will appear on the layer. In the Effect Controls panel (ECP), you’ll see that Mask 1 is selected as the path being stroked. Adjust the Brush Size and Brush Hardness until the original black line is hidden; in my case, a 6-pixel stroke and 100% hardness cover it just fine.
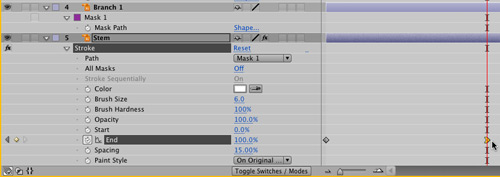
10 ANIMATE STROKE
Now drag on the End value and you’ll see your stem drawing perfectly back and forth. See, I told you it was easy, didn’t I? All you need to do now is animate the End value across time. At 0 seconds, click the Stopwatch to set a keyframe for the End value at 0%, move along the Timeline to 2 seconds, and set the End value to 100%. Then Control-click (PC: Right-click) the second keyframe and choose Keyframe Assistant>Easy Ease In. You’ll notice the line is actually erasing itself at this point, but that will change in the next step. Note: Depending on how you created the shape, you may need to animate the Start point instead.
11 SET MASK
Very cool indeed! There’s one more step, however. If you go to Composition>Background Color and set the color to a blue, you can see all we are doing is using a white stroke to hide/reveal a black stroke—which is no good if you intend to composite these swirls on a different background. Back in the ECP, simply set the Paint Style to Reveal Original Image—perfect! You’re animation should now be drawing the line instead of erasing it, as well.
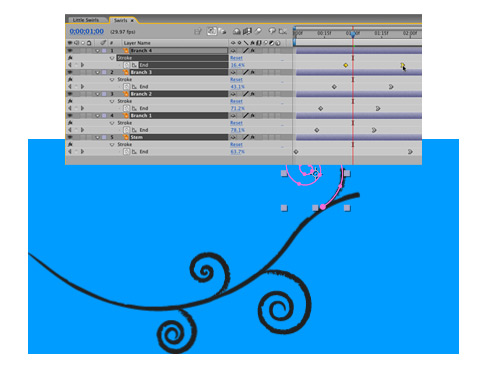
12 COPY & PASTE EFFECT; ADJUST TIMING
Now the same Stroke effect, including keyframes, can be re-used for the branches. In the ECP, select the Stroke effect name at the top and Copy it. At 0 seconds in the Timeline, select the branch layers and Paste. Now, simply click-and-drag the keyframes in the Timeline to adjust the timing for each branch so that they start to reveal just after the stem has passed by, and your swirl animation is complete!
13 COMPOSITE BACKGROUND; CHANGE COLOR
Now switch to the initial Composition you created in Step 5. Import a textured background image, such as this one from iStockphoto.com (#3855804), drag it into the Timeline at 0 seconds, and scale accordingly. Then drag your animated Swirls composition over the top, and duplicate, scale, position and rotate accordingly. Now, go to Effect>Generate>Fill, change the color to white, and set the layer Blend Mode in the Timeline to Overlay. Repeat this step for each of the Swirls comp layers in the Timeline.
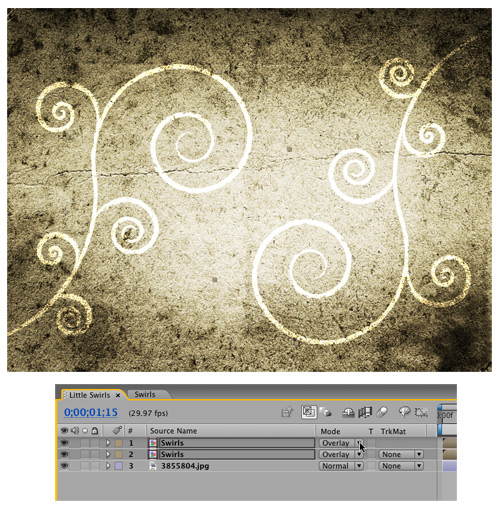
PHOTO CREDIT: ©ISTOCKPHOTO/BULENT INCE
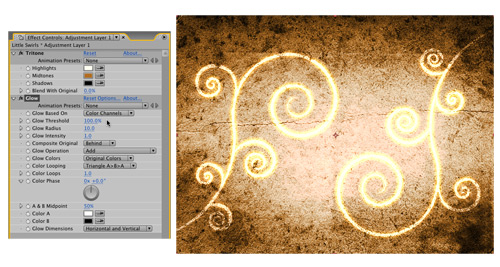
14 ADJUSTMENT LAYER; GLOW
At 0 seconds, go to Layer>New>Adjustment Layer, then Effect>Color Correction>Tritone. In the ECP, change the Highlights swatch to a slight off-white, and the Midtones swatch to orange. Now choose Effect>Stylize>Glow, and set the Glow Threshold to 100% (experiment with the settings based on the background you’re using). Hit 0 on the keypad for a final RAM Preview, and your simple, single-line vector swirls from Illustrator look completely different now, not to mention that their own paths essentially self-animated! Use them creatively. Enjoy!