
Building a Newsletter App in PHP with Dreamweaver CS3
E-mail newsletters are a very popular method of maintaining an open channel of communication with your site visitors. They have the great benefit of keeping a site’s current user base up-to-date on the latest news and offerings from the organization. Moreover, they have the potential for turning site visitors into site customers or donators.
For newsletters to be successful logistically, they have to be easy to subscribe to and—just as importantly—unsubscribe from. With a straightforward entry and exit strategy, many online viewers, leery of incurring additional e-mail spam, will steer clear.
In this article, you’ll learn how to create a complete subscribe/unsubscribe application in PHP/MySQL with a standard Dreamweaver CS3 server and just one additional block of code. To use this application, a user signs up for a subscription on a site and receives a confirmation e-mail. The e-mail contains a link to unsubscribe, personalized for the user. In all, you’ll need to create five pages to achieve this functionality:
- Subscribe.php: This page is comprised of a basic form that gathers an e-mail address and inserts a new record into the MySQL database. After the record is inserted the page is redirected to confirm_subscribe.php.
- Confirm_subscribe.php: While the visitor sees a bit of text confirming his or her subscription on this page, a PHP function contained within e-mails the user a secondary confirmation, which contains a link to unsubscribe via the confirm_unsubscribe.php page.
- Error_subscribe.php: This is an error page that displays if the e-mail attempt was not successful; it also contains a link to the subscribe.php page so another attempt can be made.
- Confirm_unsubscribe.php: This page is displayed when the visitor requests to unsubscribe. It displays the user’s e-mail address and a form button to confirm the user’s wish to unsubscribe; when clicked the user’s record is deleted from the database and the visitor is redirected to the unsubscribe_complete.php page.
- Unsubscribe_complete.php: The final page in the application acknowledges that the user has unsubscribed.
Preliminary set-up
Before you dive into the page development, let me say a few words about the preliminary set-up.
This PHP application requires a simple MySQL database and a Dreamweaver connection, in addition to a dynamic PHP site set-up on your testing server.
To define a dynamic site follow these steps:
- Open your Dreamweaver Site Definition dialog box (Sites > Manage Sites > Edit) and select the Testing Server category.
- Choose PHP MySQL from the Server Model menu and set up your access. If you’re working with your own computer as a development system choose Local/Network from the Access list and select the path to the folder on your testing server.
- Finally, set the URL to the proper address.
Here is a folder containing lesson files that you can download and follow along with.
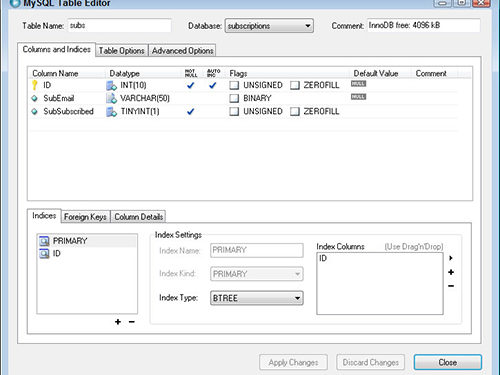
The Subscription database consists of a single table, called subs, which in turn has three data columns: ID, SubEmail, and SubSubscriptions (see Figure 1 below).
The ID column is the primary key and uses an integer format that is automatically incremented. The SubEmail column has a text format and is intended to hold the subscribers e-mail addresses. The final column, SubSubscriptions is a Boolean field, intended to note whether a user is currently subscribed or not; a 1 indicates subscribed whereas a 0 means unsubscribed. Although this field is not used in this article in this way—unsubscribed records are deleted—it is included as a possible next step.
One enhancement of the described technique is to keep the user’s e-mail address on file, in case your site offers other e-mail opportunities than just the newsletter, and toggle the SubSubscriptions field as needed.

Figure 1
The SQL file for the Subscriptions database is included in the sample files that accompany this article . You can recreate it on your test server through any number of utilities, including phpMyAdmin, MySQL Control Center or MySQL Administrator.
When you’ve established your database, it’s time to create a connection to it in Dreamweaver. To do so, follow these steps:
- Choose Window > Databases.
- Click Add (+) and choose MySQL Connection from the menu.
- In the MySQL Connection dialog box (see Figure 2 below), enter the name of your new connection in the Connection name field (for example, connSubscribe).
- Enter an IP address or MySQL server name in the MySQL server field. If you’re working with a local development system, enter localhost.
- Insert your user name and password in the appropriate fields.
- Click Select to display the available databases; choose the desired one from the list.
- Click Test to verify the connection; when the connection is successful, click OK.
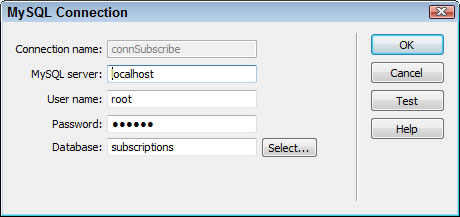
Figure 2
With your PHP dynamic site, MySQL database, and Dreamweaver connection established, you’re ready to build the first page of the application.
Signing up for a subscription
The subscription page should be simple and clear. You want to keep any barriers to signing up as low as possible. The following example page has a single form field to gather the e-mail address and a submit button, clearly labeled Subscribe Me! (see Figure 3 below).
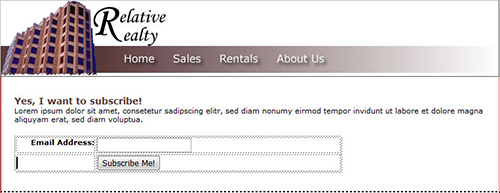
Figure 3
The text field is named txtEmail by selecting the page element and entering the name in the provided field on the far left of the Property inspector. The form action property is left blank, so the Dreamweaver Insert Record behavior can add its own code. One other form field is inserted into the form: a hidden field labeled SubSubscription with a value of 1. This hidden field will be used by the Insert Record server behavior to populate the identically named field in the database and indicate a subscription has been authorized. Remember that for this Boolean database column, 1 means subscribed.
Note: It’s always a good idea to validate your form fields. You can use the Dreamweaver Validate Form behavior or insert the Spry Validation Text Field if you prefer.
To apply the Insert Record server behavior, follow these steps:
- From the Server Behaviors panel, choose Add (+) and, from the list, select Insert Record.
- When the Insert Record dialog box opens, make sure that the current form is selected in the Submit values from list. In my example, I kept the default name, form1.
- Choose your connection from the Connection list. Here, my connection is connSubscribe.
- Select the table you want to insert your new record into from the Insert table list. My table is called subs.
- In the Columns area, you only need to specify a form element for one of the database columns (see Figure 4 below):
- Leave the first entry—’ID’ Is an Unused Primary Key—at its default settings.
- Select the SubEmail entry and from the Value list, choose FORM.txtEmail and make sure Submit as is set to Text.
- Keep the third entry (SubSubscribed) at its default settings. Because you named the hidden form element the same as the database column, Dreamweaver automatically made the assignment for you.
- In the After inserting, go to field, enter confirm_subscribe.php.
- Click OK and save your page.

Figure 4
Confirming the subscription
The subscription confirmation page is well-named as it carries out its self-named function in two ways. The text on the page lets your site visitors know that they have successfully signed up. It’s a great idea to personalize this acknowledgement by repeating their registered e-mail address. A simple Dreamweaver recordset and text binding is needed to accomplish this goal.
You can also use this space to let folks know that a second confirmation has been sent via e-mail with a link for unsubscribing. The text is simple to do in Dreamweaver; the e-mail function takes a bit of handcoding. The e-mail will take advantage of the previously inserted recordset.
Let’s start by adding the recordset to the page by following these steps:
Step 1: Open or create your confirm_subscribe.php page. The basic text on the page should be simple and straightforward as shown in Figure 5 below.
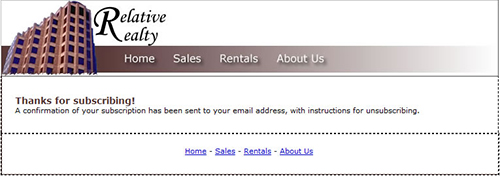
Figure 5
Step 2: From the Bindings panel, click Add (+) and choose Recordset from the list.
Step 3: When the Recordset dialog box opens (see Figure 6 below), make the following adjustments:
- Ensure that you’re in Simple mode and enter an appropriate name for the recordset in the Name field (for example, rsSubscriber).
- Choose your data source connection from the Connection list; mine is called connSubscribe.
- Select the table from the Table list, like subs.
- Leave all the columns selected and the filter at its default setting.
- From the Sort lists, choose ID Descending. Do not click OK just yet.

Figure 6
At this stage (see Figure 6 above), the recordset will return all the records and list the last one entered first; to verify this click Test. However, you don’t want all the records, you only want one. You can restrict the recordset to the number of records returned with a simple SQL phrase. For this type of customization, you’ll need to enter the Recordset Advanced mode.
Step 4: Click Advanced. You can see how your selections in the Simple mode are translated into SQL in the Advanced mode’s SQL section.
Step 5: Place your cursor at the end of the SQL code, after ORDER BY ID DESC and enter LIMIT 1 (see Figure 7 below).

Figure 7
Now, the recordset returns just the single record, which because the data is sorted by the automatically incremented ID field in descending order, is the one just inserted.
Step 6: Click OK to close the Recordset dialog box. Now that you have some dynamic data coming into the page, you can personalize it.
Step 7: In Design view, place your cursor in an appropriate spot to display the subscriber’s e-mail address, like right after the phrase “…e-mail address”. Add any necessary punctuation, such as a comma or parentheses. From the Bindings panel, expand the recordset entry, select SubEmail and click Insert (see Figure 8 below).

Figure 8
The dynamic text is added to the page.
Step 8: Save your page.
Now that you have a recordset available, you’re ready to insert the e-mail code. One of the great benefits of PHP is that it has an easy-to-use e-mail method built in. The mail() function looks like this:
mail(address, subject, message[, header[,parameters]])
The first three arguments (e-mail address, subject, and message) are mandatory. The header strings, which typically contains a from address and can also set the MIME type or list CC: and BCC: addresses, is optional. The parameter argument is also optional and is most frequently used for sending additional arguments to configure the output e-mail.
To make the actual function call readable, I like to set up a series of variables with the values assigned, like this:
$id = $row_rsSubscriber[‘ID’];
$to = $row_rsSubscriber[‘SubEmail’];
$subject = “Subscription confirmation”;
The first two variables, $id and $to, pull data from the just created recordset that will be incorporated into the e-mail. The third variable, $subject, simply sets the subject line of the message.
Some variables require a lengthy string. I like to use the PHP concatenation operator—the period—to build up the content for such variables, like this:
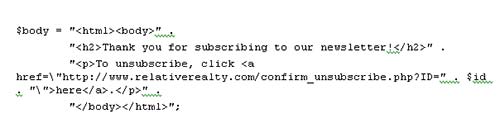
When the variable is fully declared, be sure to conclude with a semi-colon. Although you can send your message in plain text, I thought I’d show you how to send HTML e-mail in this technique. For HTML e-mail, you’ll need to add the needed HTML tags to achieve the proper formatting. It’s important to note the backslashes in the third code line above; they are used to escape the quotation marks within the “a” tag.
HTML e-mail also requires setting the e-mail header properly. In addition to defining the From address, you’ll also need to establish the MIME and content type, like this:
$headers = “From: Subscription Manager \r\n” .
“MIME-Version: 1.0\r\n” .
“Content-type: text/html; charset=UTF-8”;
The final portion of the code executes the mail() function, but does it in such a way that it redirects the browser to an error page if a problem is encountered. Here’s the code:
if (!mail($to, $subject, $body, $headers)) {
header( ‘Location: http://www.relativerealty.com/error_subscribe.php’ ) ;
The exclamation mark before the mail() function can be read as NOT, so if the function cannot be executed, the redirecting header() function comes into play.
Let’s put it all together now in the following steps.
Step 1: In the Server Behaviors panel, select the Recordset entry.
Step 2: Switch to Code view and press the left arrow to move your cursor outside the recordset code block. Press Enter (Windows) or Return (Mac) to create a new line.
Step 3: Enter the following code:
<?php
$id = $row_rsSubscriber['ID'];
$to = $row_rsSubscriber['SubEmail'];
$subject = "Subscription confirmation";
$body = "” .
“
Thank you for subscribing to our newsletter!
” .
“
To unsubscribe, click here.
” .
“”;
$headers = “From: Subscription Manager \r\n” .
“MIME-Version: 1.0\r\n” .
“Content-type: text/html; charset=UTF-8”;
if (!mail($to, $subject, $body, $headers)) {
header( ‘Location: http://[YOUR SERVER & PATH HERE]/error_subscribe.php’ ) ;
}
?>
Make sure to substitute the placeholder phrases [YOUR SERVER & PATH HERE] with your own server information and the from address (someone@mycompany.com) with your own from address.
Step 4: Save your page.
To make sure this portion of the page is complete, let’s quickly create our error page.
Allowing for errors
The error page informs site visitors that there has been a problem with the process. It is triggered by the failure of the e-mail function. After informing folks of the problem, you can provide them a link to the subscription page to allow them to re-enter their e-mail addresses and try again (see Figure 9 below).
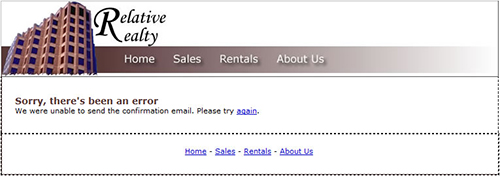
Figure 9
You can test your application at this point if you like. After publishing the pages to your Web server, go to subscribe.php and enter your e-mail address. The confirmation page will then display, assuming that everything went smoothly, and you will shortly receive your e-mail. If the error page is displayed, you know the e-mail function didn’t work properly and can start debugging.
Next, let’s build the page that handles unsubscribing.
Verifying an unsubscribe request
The confirm_unsubscribe page is very similar to the confirm_subscribe page. Both use recordsets to define a single record and both use a Dreamweaver server behavior to perform a record management function. When folks are subscribing, the server behavior inserts a new record; when they’re unsubscribing, a server behavior is used to delete their records.
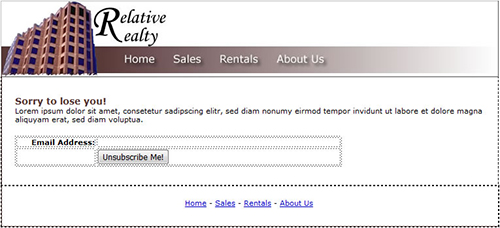
Figure 10
The structure of the confirm_unsubscribe page will also remind you of its mirror image. Both contain a form with a submit button (see Figure 10 above). They also contain a hidden form element, but there the difference ends. The hidden form element is named ID and has a value that retrieves the ID passed from the URL string:
If you don’t want to type this code into the Value field of the Hidden Form element Property inspector, you can click Add (+) on the Bindings panel and choose URL Variable from the list. When the URL Variable dialog box appears, enter ID in the Name field and click OK. Then you can just insert ID from the Bindings panel into the Value field and Dreamweaver will write the code for you.
Also, you’ll notice that although there is space for the e-mail address, there is no form. Because you’re just displaying the data and not asking folks to update or insert it, you can use dynamic text.
Let’s continue work on the page by inserting the recordset with the following steps:
Step 1: Open confirm_unsubscribe.php.
Step 2: From the Bindings panel, click Add (+) and choose Recordset.
Step 3: In the Recordset dialog box (see Figure 11 below), make the following adjustments:
- Switch to Simple mode and enter a name for the recordset in the Name field; I named mine rsUnsub.
- Choose your data source connection from the Connection list; mine is called connSubscribe.
- Select the table from the Table list (for example, subs).
- Leave all the columns selected at its default setting.
- For the Filter settings, choose = for ID and ID for URL Parameter.
- This filter checks for a URL parameter named ID and restricts the recordset to whatever its matching value is. For example, if the URL that opened this page was something like http://myco.com/confirm_unsubscribe?ID=8, the recordset would just contain the record with an ID of 8.
- Leave Sort at its default setting and click OK.

Figure 11
Now, let’s take advantage of our recordset and bring in some dynamic text.
Step 4:Place your cursor in the table cell next to the E-mail address label and, from the Bindings panel, expand the Recordset entry. Select SubEmail and click Insert. The placeholder for dynamic text appears.
Step 5: Save your page.
Now add the server behavior, Delete Record.
Step 1: From the Server Behaviors panel, click Add (+) and choose Delete Record from the list.
Step 2: In the Delete Record dialog box (see Figure 12 below), make the following adjustments:
- Leave the First check if variable is defined list set to Primary key value.
The check to make sure that the primary key value is defined is a way to ensure that the Submit button was clicked. You would choose another entry, like URL Parameter or Session Variable, only if you wanted to delete the record when the page loaded, without user interaction. - Set the Connections and Table lists to connSubscribe and subs, respectively.
- Make sure the Primary key column list is set to ID.
- From the Primary key value list, choose Form Variable and enter the ID in the adjacent field.
This is the hidden form field that, you’ll remember, you set to the URL parameter, ID. - In the After deleting, go to field enter unsubscribe_complete.php.
Step 3: Click OK and save your page.
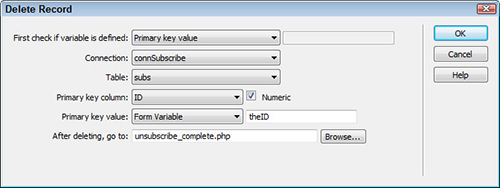
Figure 12
Just one last page to go—and it’s a simple one—so let’s get to it.
Completing the unsubscribe request
The unsubscribe_complete page is displayed when the record is deleted. The goal here is to let the visitor know that his or her request to unsubscribe has been honored and that the process is now complete. A simple text page, like the one shown in Figure 13 below, is sufficient.

Figure 13
With the application complete, you should post it to your testing server and begin testing. I’m sure you’ll think of other variations and enhancements you can add to this basic application. I hope it’s given you some idea of what’s possible with Dreamweaver CS3 and PHP as well as providing a solution to extending your Web reach.
About the author
Joseph Lowery’s books about the web and web-building tools are international bestsellers, having sold more than 400,000 copies worldwide in nine different languages. He is the author of the recently published CSS Hacks and Filters as well as the Dreamweaver Bible and Fireworks Bible series from Wiley Publishing. He also wrote Design and Deploy Web Sites with Dreamweaver MX 2004 and Contribute 3 from Macromedia Press. In addition to co-authoring Dreamweaver MX 2004 Web Application Recipes with Eric Ott, he wrote the Dreamweaver MX Killer Tips series with Angela Buraglia.
As a programmer, Joseph contributed two extensions to the latest release of Fireworks and many extensions available for Dreamweaver. He has presented at Seybold in both Boston and San Francisco, Macromedia conferences in the United States and Europe, ThunderLizard’s Web World, and KW Media Group’s Mac Design Conference. Joseph is currently the Director of Marketing for WebAssist.
