
Create a Talking Head with Adobe After Effects
Can You Talk the Talk?
BY RICHARD HARRINGTON & MARCUS GEDULD
Recently, we needed to create a Monty Python-style talking head in Adobe After Effects and, as with most of our projects, the deadline was yesterday. So there was no time to keyframe the mouth movements. With a little know-how, we were able to craft a chatterbox faster than you can say “Spam.” In this tutorial, we’ll take you step-by-step through the process, beginning with the sound recording in Adobe Audition, moving on to the image prep in Adobe Photoshop, and ending up in good old Adobe After Effects, where a little Expression magic saves the day.
Record Sound File in Audition
STEP 1 Create a High-Quality Sound File
Plug a microphone into your PC and launch Audition. Make sure you’re working in Edit view, and click the Record icon. When Audition displays the New Waveform dialog, choose high-quality settings (e.g., a Sample Rate of 48000, which is DVD-quality sound). You can always export the sound at a lower quality later if necessary.

STEP 2 Prepare File for Export
After speaking into the mic, click Stop, then choose File>Save As to save the sound. Choose the WAV format for uncompressed (highest quality) sound or MP3 for a smaller file size (but still a pretty good sound for dialog). The Options button reveals controls for fine-tuning the export. In this example, we accepted all the defaults. Once you’ve saved the WAV or MP3, you can close out of Audition.

Prepare Images in Photoshop
STEP 1 Choose Your Two Images
In Photoshop, choose File>Open and navigate to your two images: one of a closed-mouth face and one of an open mouth with teeth and a tongue.

STEP 2 Place Images into a Single File
Choose the Move tool (V) and drag-and-drop the closed-mouth image onto the teeth and tongue image.

STEP 3 Make a Selection
Choose the Lasso tool (L) and make a selection of the chin and lower lip of the closed-mouth layer (Layer 1).

STEP 4 Cut-and-Paste Selection into New Layer
Press Shift-Command-J (PC: Shift-Control-J) to cut-and-paste the chin selection onto a new layer. Use the Move tool to drag the chin down a little from its original position, as if the mouth is open.

STEP 5 Rename Layers; Save File as PSD
Now you need to move and resize the lower layer. Photoshop will only let you do this if you rename it something other than Background. In the Layers palette, double-click the text “Background” and rename the layer “teeth.” Now, using the Move tool and Free Transform command (Command-T [PC: Control-T]), adjust the lower layer (move, resize, and rotate it) until you can see the teeth and tongue showing through the open mouth on the upper layer. Rename the middle layer “face” and the top layer “chin.” Save the file as a PSD and close out of Photoshop.

Animate Chin in After Effects
STEP 1 Import the PSD
In After Effects, choose File>Import>File from the menu bar. Select the PSD and choose Composition – Cropped Layers from the Import As drop-down menu. This will import the PSD file as a layered AE Composition, keeping the layer order and layer names intact.

STEP 2 Import the Sound File
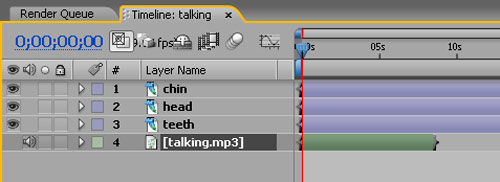
Find the imported comp in the Project panel and double-click it to open it in the Timeline and Comp windows. Import the sound file that you created in Audition and add it to the Comp.
STEP 3 Convert Audio to Keyframes
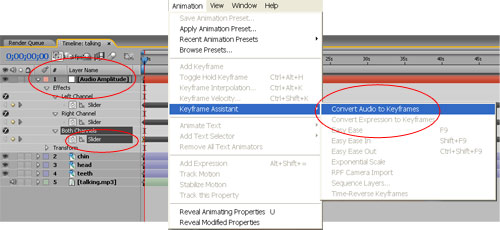
With the audio layer selected, choose Animation>Keyframe Assistant>Convert Audio to Keyframes. After Effects will create a new layer called Audio Amplitude and add it to the Comp. Twirl this layer open to reveal its Effects in the Timeline. Twirl open Effects and then the Both Channels effect (which AE added automatically). You’ll see a property called Slider with keyframes on every frame. These keyframes contain volume information from the audio layer.
STEP 4 Add an Expression to Chin Layer
Select the chin layer and move it back into its original position (closed mouth). Press P to reveal its Position property, and then Option-click (PC: Alt-click) the property’s Stopwatch icon to add an Expression. Drag the Pick Whip and release it when it’s pointing to the Slider property on the Audio Amplitude level.

STEP 5 The Expression Is Added
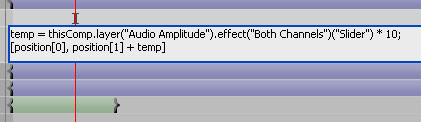
After Effects adds an Expression to the Position property of the chin layer, as shown in the image above.

STEP 6 Modify the Expression
Click inside the Expression to place a text cursor in it. Highlight all of the text that appears after (“Slider”) and replace it with the following text:
* 10;
[position[0], position[1] + temp]
Note: There should be a space both before and after the asterisk (*). Also, make sure you don’t accidentally erase the semi-colon (after the 10) or the square brackets on the beginning and end of the second line.
STEP 7 Time to Play
Play the Comp. To make the face shout, change the 10 in the Expression to a larger number. To make the face whisper, change the 10 to a smaller number.

