Displacement Maps for Graphics in Photoshop CS4

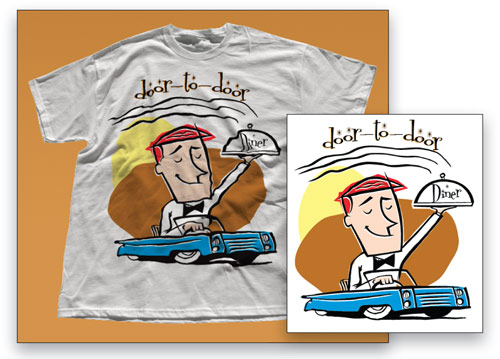
One of the most creative ways to use the Displace filter in Photoshop is to “map” an imported graphic so it follows the contours of an object in a photo; for example, adding an Illustrator logo to a photo of a T-shirt in a realistic way. Add the editability of vector smart objects and you have a match made in heaven.

1 PREPARE THE PHOTOGRAPH
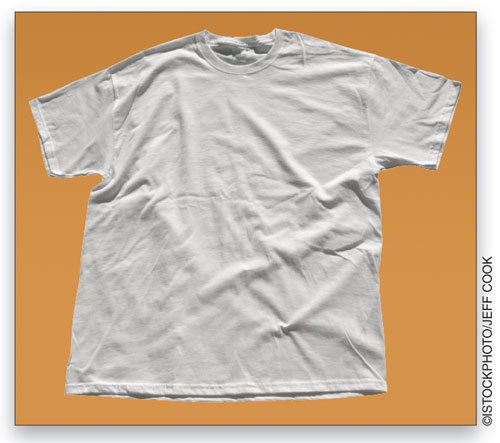
First we need to choose and prepare the photograph onto which we’ll add our logo. We chose an image of a blank T-shirt from iStockphoto.com, deliberately picking one that contained noticeable folds. If the folds are a little too subtle, use the Burn tool to darken the shadows a little and the Dodge tool to slightly lighten the highlights.

Photoshop for Designers Tutorial

2 PREPARE THE DISPLACEMENT MAP
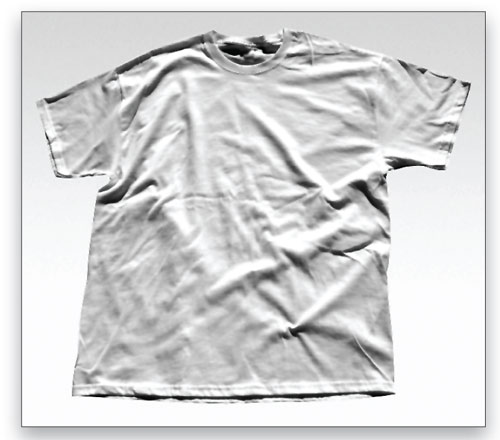
The Displace filter uses a grayscale map to distort the imported object, so we need to create a map for our project. First duplicate (Image>Duplicate) the T-shirt photo and then convert it to grayscale. Although it’s not an ideal day-to-day way to make a beautiful grayscale photo, we’ll use Image>Mode>Grayscale to convert the photo (which works just fine for a displacement map). We don’t want too much texture detail in the map, so use Filter>Noise>Despeckle to soften the texture without losing too much overall detail. Save the map as a PSD file.

Photoshop for Designers Tutorial

3 BRING IN THE ILLUSTRATOR LOGO
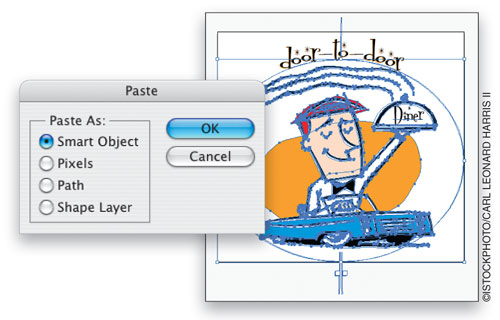
In Illustrator, keep the logo as editable and possible, then go to Select>All and Edit>Copy. Switch to the original color document in Photoshop and select Edit>Paste. From the four Paste As choices in the Paste dialog, choose Smart Object, and click OK.

Photoshop for Designers Tutorial

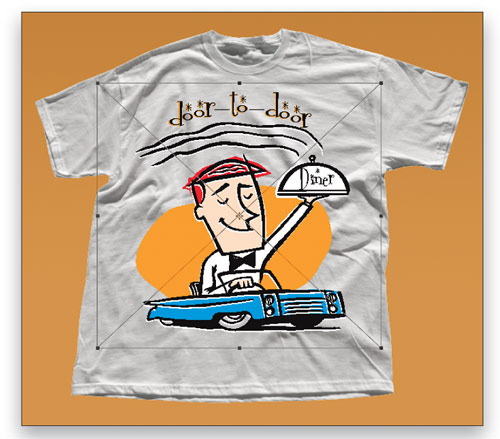
4 POSITION AND SCALE THE LOGO
When the smart object appears, use the handles to scale and rotate the graphic. You can also click-and-drag to position it. Once you’re happy, press Return (PC: Enter). (Note: Since the resulting layer is a vector smart object, that means you can always make further adjustments to the size and position of the logo without losing any quality.)

Photoshop for Designers Tutorial

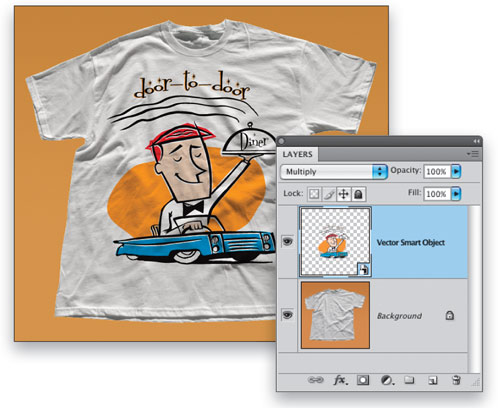
5 CHANGE THE BLEND MODE OF THE LOGO LAYER
To help make the logo look more printed on the shirt, change the blend mode of the logo layer from Normal to Multiply in the Layers panel. Depending on the colors in your design, you may also want to slightly lower the Opacity.

Photoshop for Designers Tutorial

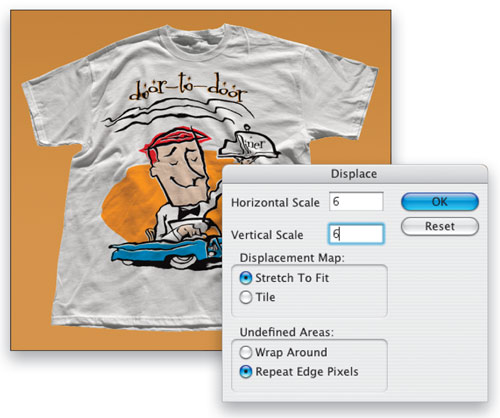
6 RUN THE DISPLACE FILTER
With the logo layer (Vector Smart Object) active in the Layers panel, use Filter>Distort>Displace. In the Displace dialog, enter a value between 5 and 10 as a starting point for both Horizontal Scale and Vertical Scale. Since this layer is a vector smart object, the filter will appear in the Layers panel as a smart filter, which means you can always edit the filter settings (see next step). After clicking OK, you’ll be asked to choose the displacement map, so navigate to the location of the PSD file you saved in Step 2. The logo will be distorted to follow the folds of the shirt.

Photoshop for Designers Tutorial

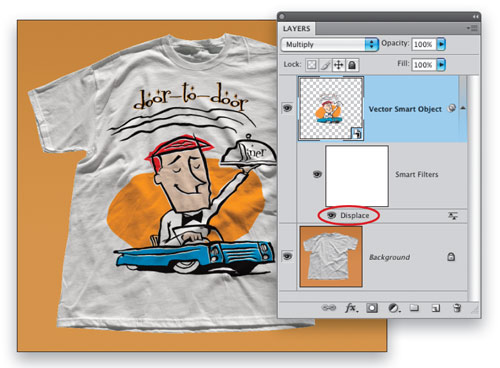
7 EDIT THE SETTINGS OF THE SMART FILTER
If the logo looks too distorted (or not distorted enough), double-click on the word “Displace” under Smart Filters in the Layers panel. The Displace dialog will appear, allowing you to enter different settings. Once again, after you click OK, you’ll be asked to choose the displacement map.

Photoshop for Designers Tutorial

8 EDIT THE ORIGINAL GRAPHIC
One of the benefits of bringing in Illustrator graphics as a smart object is the option to edit the contents, even after the Displace filter has been applied. Double-click on the Vector Smart Object thumbnail in the Layers panel to jump back to Illustrator. A copy of your logo will open in Illustrator, where you can make changes to the design. Here we changed the color of the background shape and added a second yellow background shape. After saving the Illustrator file, the logo automatically updates in Photoshop, reflecting whatever changes we made in Illustrator.

Photoshop for Designers Tutorial

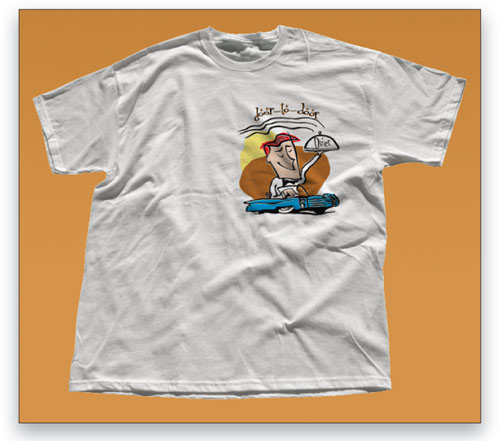
9 CONTINUE TO EXPERIMENT
Thanks to the vector smart object and smart filter combination, you can continue to experiment with the size, position, and content of the logo. If you reposition or scale the graphic, double-click on the Displace smart filter to reapply it. To change the contents of the logo, double-click on the Vector Smart Object thumbnail to return to Illustrator to edit the file. Or, start all over again with a completely different photographic object….

Photoshop for Designers Tutorial

Photoshop for Designers Tutorial

Visitor Comments »


[...] See the original post:  Free Adobe Photoshop Tutorials | Photoshop CS4 for Designers … [...]


Pingback by Free Adobe Photoshop Tutorials | Photoshop CS4 for Designers … - DigitalMunk | June 17, 2009 @ 7:07 pm


This is a fantastic tutorial Dave! Thanks so much for sharing. You’ve been all over displacement maps lately. I’ve got to start playing around with that feature more.


Comment by PBP | June 17, 2009 @ 8:50 pm


[...] Click here to read the rest of the tutorial Share This [...]


Pingback by Displacement Maps for Graphics in Photoshop CS4 | Layers Magazine | June 18, 2009 @ 9:40 am


Excellent, clear tutorial…many thanks!
Gets the old brain wheels cranking…:)


Comment by RP | June 18, 2009 @ 11:40 am


I never saw the point of studying displacement maps.. and then I started working with after effects as well.. Oh my.. they are quite helpful.
Good tut….


Comment by James | June 18, 2009 @ 12:52 pm


خوش خوش فانيلا


Comment by Yousef | June 21, 2009 @ 2:00 am


[...] Cross maps a vector logo onto a t-shirt, keeping it scalable & editable even when rippled via the Displace [...]


Pingback by Monday Illustrations: All tutes, all the time | Photoshop Life | June 22, 2009 @ 2:14 pm


[...] displacement maps for a number of projects in the fall. Anyone wanting to get a jump on this should check this out (via John Nack who also point to a few other links the Illustrator crowd might enjoy). [...]


Pingback by Look Yourself in the Eye - The Mac Lab | June 23, 2009 @ 9:58 am


Always thought displacement maps were an undervalued part of PS – there are lots of plugs in PS that are as old as the hills and for whatever reason never got developed beyond “basic” look at http://www.taron.de/zborn/index.html to see how you could paint in a Z displaced reality


Comment by JohnP | June 24, 2009 @ 4:28 am


The specific instructions leave a lot to be desired. There are several missing details.


Comment by Lauren | June 27, 2009 @ 12:36 pm


[...] continue [...]


Pingback by How To Work With Displacement Maps for Graphics in Photoshop CS4 | GraphicTutorials.net - Photoshop and Design Tutorials | July 14, 2009 @ 1:05 pm


Dave, I attended your photoshop cs4 class in Nashville (Great!). It would be helpful if you would go over the method you showed us where you painted letters on a rock mountain and then used an underlying layer to make it contour to the rocks (the “he loves she” message).


Comment by Ken Toney | July 28, 2009 @ 8:50 pm


good tutorials, pls continue


Comment by jessie | August 18, 2009 @ 4:01 am


Did I miss something? Because I just don’t see it! In step 2, you tell us how to prepare the image for making a displacement map but you end it there. I duplicated the image and converted it to grayscale. Clicking on the Filter>Displacement Map just asks you to import the map that you’ve already made. You said to save it as a PSD file, but you never really said how to make it in the first place. This tutorial assumes that you already know how to make a displacement filter and everyone who commented seem to already know, so it’s not much of a tutorial it seems. : (


Comment by Brittany | August 26, 2009 @ 8:59 am


Thanks Alot……..


Comment by Amatora7man | September 13, 2009 @ 10:05 am


Nice tuts guys
Just found this today, not sure what it’s all about but am reading more so i’m sure it’ll come in handy. added it to stumbleupon as well, so you should see some more traffic!!

http://www.photoshopcs5.co.uk/


Comment by CS5 Photoshop lover | November 14, 2009 @ 4:04 pm

Leave us a comment

Comments RSS | TrackBack URI

Back to Top


Advertisement
Creative Suite Tutorials
  1. Photoshop Photoshop
  2. Illustrator Illustrator
  3. Indesign Indesign
  4. Dreamweaver Dreamweaver
  5. Fireworks Fireworks
  6. Premiere Premiere
  7. Flash Flash
  8. After Effects After Effects
  9. Lightroom Lightroom
  10. Acrobat Acrobat

Get the latest tips, tricks and news delivered straight to your inbox.

From our Partners
Subscribe to Layers Magazine


  • Back to the Layers Magazine Homepage
  • Creative Suite Tutorials
  • Layers Magazine
  • Reviews on top products
  • Layers Magazine Reader Forums
  • Subscribe to Layers Magazine