Lightroom just keeps getting better and better—especially with the release of Lightroom 1.1. For the photographer, this good news means an even more enhanced and creative workflow. Even more, the new improvements help us create more compelling and lasting images. The bad news is that there’s now more to learn. But don’t lose heart! Strive to follow Evan Chong’s advice: “…gain technical skill in order to become more fluid, more expressive, and more creative in [your] craft. Technique is always at the service of creativity.”
In this article, we’ll focus on techniques that will strengthen your workflow skills and simultaneously reveal some of the new features in Lightroom 1.1. To get the most out of Lightroom 1.1, our approach will diverge from the traditional list of new features. Instead, we’ll provide a few highlights of how new features can be integrated into an effective photographic workflow.
STEP 1 Import and Eject
Why use Lightroom instead of Adobe Bridge? Simply put, Lightroom is much more powerful than Bridge. When you import photos into Lightroom, it builds a database of the images and their previews. This gives you faster organizational and visual access to the images. Be sure to get the most out of the Import dialog: Click the checkbox to Eject Card after Importing; if you inserted the incorrect media card, click Eject; expand the dialog to fullscreen and increase the thumbnail preview size with the slider; and save hard drive space by unchecking images that don’t need to be imported.

STEP 2 Find What You’re Looking For
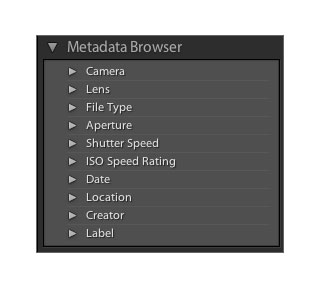
Before I started using Lightroom, many of my images were buried in the abyss of one of many hard drives. Lightroom came along and empowered me to locate, view, process, and enjoy my photography in a whole new way. The new Metadata Browser panel in the Library module takes this to a new level. It now gives you the ability to sort images based on new categories: Aperture, Shutter Speed, and ISO. Don’t let this subtle improvement go unnoticed, as it will help you get one step closer to finding exactly what you’re looking for!
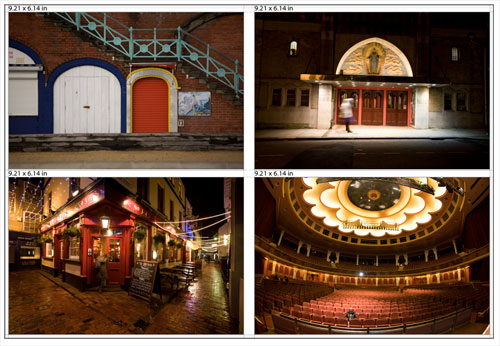
ALL IMAGES CHRIS ORWIG
STEP 3 Captions, Arrows, and More
The Metadata panel has been greatly improved. While in the Library module, change what metadata is displayed by making a selection from the Metadata pop-up menu. Choose Large Caption, click in the Caption box, and add your image caption information. Choose one of the other options and you’ll notice new right-facing arrows next to the metadata fields. For example, click on the Website arrow to launch the website. Other helpful arrows let you locate files, search for files based on specific criteria, and more. Hover over any of the arrows to view a tool tip.


STEP 4 Ready, Preset, Go!
Using presets can supercharge your speed and creativity. In the Develop module, open the Navigator (to view a thumbnail preview of the image) and Presets panels. New to the Presets panel is the ability to separate the default Lightroom Presets and your own custom presets. Click the right-facing triangle to expand/collapse a group of presets. Scroll over the preset name to view the effect in the thumbnail above. Click on the preset name to apply the settings. Try using default presets to expand your vision for what’s possible or as a starting point to build your own preset.

STEP 5 Painting Time
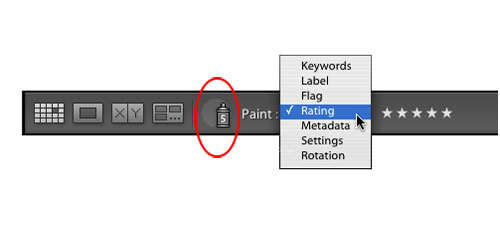
The new Painter tool allows you to quickly apply modifications to multiple images. In the Library module, choose the Painter tool from the Toolbar. Click on the pop-up menu to choose one of the following options: Keywords, Label, Flag, Rating, Metadata, Settings, or Rotation. The Painter tool icon will display the option that’s selected. For example, if you choose 5 Star Rating, the number 5 will appear inside the paint icon. Next, to apply the settings, click on a single image or even better, become a graffiti artist and click-and-drag over multiple images.
STEP 6 Quality by Comparison
When tuning a guitar string, it’s best to tune the string flat, then sharp, and then find the “sweet spot” where the string is in tune. It’s only by going flat and sharp that the best tonality is discovered. This is also true with photography and that’s why I love virtual copies; they give me creative flexibility that helps me discover the best visual destination for an image. Use virtual copies to try on different settings and then compare the options with the original. Plus, you can now create virtual copies with a new shortcut: Command-’ (PC: Ctrl-’).

STEP 7 Coffee Filters
There’s nothing like the aroma of freshly brewed coffee on a cold morning in the mountains. And the good old cup of coffee is only possible because a filter blocked out the nonessentials. Filters in Lightroom work the same way by removing the images that you don’t want to see. In the Toolbar, click the filtering button (or “switch”) or press Command-L (PC: Ctrl-L) to toggle filtering on and off. Next, click on the icons to define the filtering criteria: Flags, Labels, Stars, and new to Lightroom 1.1 is the ability to filter virtual copies!

STEP 8 Crop and Compose
Photo 101 teachers often say, “Get the subject out of the center of the frame. Crop and compose on camera!” While this approach is best, there are times when cropping in Lightroom can make all the difference. New to Lightroom 1.1 are crop overlays that can help you create better images and learn more about composition. Select View>Crop or press R to enter Crop mode in the Develop module. In the Toolbar, select the crop options, and click-and-drag on the image. Before you apply the crop, press O (as in options) to toggle through the overlay options.

STEP 9 Color and Tone
If you love photography, the majority of your time in Lightroom will be spent fine-tuning color and tone in the Develop module. Typically, it’s best to work your way through the sliders from top to bottom, setting the White Balance, then dialing in the tone with the sliders, etc. To become even better at color and tone, follow these tips: Set the Exposure with the slider or click-and-drag to the left or right on the Histogram. To ensure the best tone for printing, Option-drag (PC: Alt-drag) the Exposure, Recovery, and Blacks sliders to view clipped (missing) information.

STEP 10 Can Color Sing?
The Hue/Saturation/Luminance (HSL) sliders can give your images new life. As Pablo Picasso once said, “Why do two colors, put one next to the other, sing? Can one really explain this?” The HSL sliders enable you to make powerful modifications to an image’s color (Hue), color intensity (Saturation), and color density (Luminance).
Here, I wanted to emphasize the rich colors of the box of chalk. First, I modified the Exposure sliders, yet this overbrightened a few of the colors. Rather than desaturating the whole image, I modified the Luminance sliders to bring back detail and definition of the overbrightened colors.

STEP 11 Retouching in the RAW
Nondestructive RAW retouching is becoming widely popular. The advantage of using Lightroom is that the retouching can be removed at any time. Even more, the Lightroom 1.1 retouching tools have been revamped and are now more intuitive and visual. In the Develop module, select the Remove Spots tool (N) in the Toolbar. Press the Left Bracket ([) key to make the cursor smaller, and the Right Bracket (]) to make it larger. To apply the retouching, click or click-and-drag on the image. If the circles get in the way, press H to hide and show the circles.

STEP 12 Clear As a Bell
After you’ve dialed in the color and tone and cleaned up the image with the retouching tools, it’s time to begin work on image clarity. The Clarity slider is a very welcomed addition to Lightroom 1.1. Adobe explains that clarity “adds extra punch.” In more technical terms, clarity adds local contrast. It’s best to zoom in to 100% and then increase the Clarity slider until you see the desired midtone contrast. If you notice the appearance of “halos” along high-contrast edges, decrease the slider. [For more on Clarity, watch a free training movie at www.chrisorwig.com/clarity or click here to download it.]

STEP 13 Sharp As a Tack
The new Sharpening controls are amazing! (Prior to these enhancements I was sharpening everything in Photoshop.) While Clarity adds subtle contrast and sharpening, the Sharpening controls add significant sharpening. Before you begin, zoom to 100%. Increase the Amount slider for the overall sharpening. Keep the Radius (or sharpening extension) to 1 or 2. Increase the Detail slider to sharpen small details. (Note: Use a low Detail number for more flattering sharpening of portraits. This will help to prevent sharpening or exaggeration of small details in the skin.) Increase the Masking slider to limit the sharpening to more defined edges.

STEP 14 New Year’s Resolution
Now it’s time to create a final print. In the Print module’s Print Job panel, click the Print Resolution checkbox and hover over the current setting. When the cursor changes into the scrubby slider, click-and-drag to the left or right, or you can enter a specific number in the field. In the Layout panel is a new option called Image Print Sizes. Check this box to display the dimensions of each cell based on the increments of the ruler. The dimension won’t be printed but will take the guesswork out of sizing multiple cell print layouts.