

At its essence, Lightroom is a photographer’s dream workflow tool. It allows you to streamline how you import, organize, process, and output your images. Let’s look at a typical workflow overview so you can become more familiar with how Lightroom 2 works. (This tutorial is written for those who are new to Lightroom and are curious how it works from start to finish.)
1 IMPORT PHOTOS
Choose File>Import Photos from Disk to import photos from a memory card or folder into the Lightroom catalog (our photos are in a folder). Click Choose. In the Import Photos dialog, set File Handling to Add Photos to Catalog without Moving so they’ll remain in that folder. Next, add global Keywords that are relevant to all the images, then set the Initial Previews (we chose 1:1 as it gives the best preview). (Note: These previews will take longer to render and increase your catalog database file size.) Check Show Preview to see your images (you can change the thumbnail size with the slider). Finally, click Import.

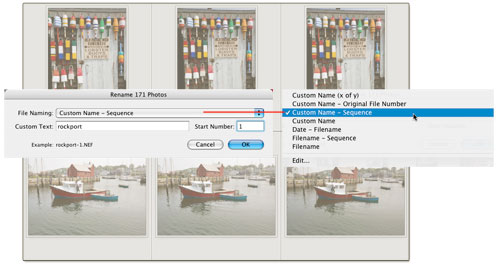
2 RENAME
Now that we’ve imported the photos, it’s time to begin some organizational work. At this juncture, there are a number of different directions that you can go. Because we’re exploring workflow, you might want to rename the images now. In the Library module, click on one of the images, then press Command-A (PC: Ctrl-A) to select the remaining images. Then choose Library>Rename Photos or press F2 to open the Rename Photos dialog to select a new naming convention, then click OK.
3 ADD KEYWORDS
Adding keywords to photos can help you manage your image database, and the keywording improvements in Lightroom 2 are amazing. To add keywords, open the Keywording panel in the Library module, select one or more images, and then click in the Click Here to Add Keywords field to add keywords tags in alphabetical order. As you add keywords, you’ll notice that Lightroom automatically builds a Keyword Set out of the recently added keywords. In addition, when you select another image, Lightroom will suggest keywords. Click on any of the Keyword Suggestions or Keyword Set words to quickly add new keywords to your image.

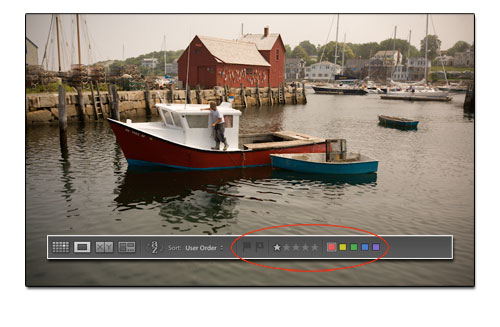
4 FLAGS, STARS, AND LABELS
Flags, stars, and labels are used to rate or rank your images. To evaluate your images, press the E key to enter Loupe view in the Library module. Below the image, you’ll notice the Toolbar; press the T key to toggle the visibility on and off. Click on the flag, star, or label icons to add the different rating possibilities to the image, or use one of the following shortcuts: Press P for Flagged, U for Unflagged, X for Rejected; press 1–5 to add a star rating; press 6–9 to add a label rating.
5 FILTER BY ATTRIBUTE
Now that you’ve marked which images are best, take advantage of this information and filter out all of the images that you don’t want to work with. In the Library module’s Grid view (G), you’ll see the Filter Bar above the preview area. (Note: Press the Backslash key \ to hide and show the Filter Bar.) Click on the Attribute filtering option. Next, click on the various flag, star, and label icons to filter your images based on specific criteria. In this example, we filtered the images based on the 1-star rating. 
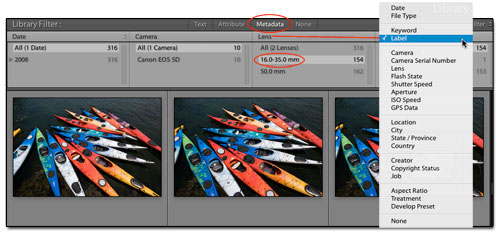
6 FILTER BY METADATA
Another way to filter your images is by using the Metadata filtering option. With this filter, you can search based on additive metadata (labels, stars, etc., as we did in Step 5) or by using descriptive metadata (Lens, ISO Speed, Date, etc.). In the Library module’s Grid view, click on the Metadata filter. Next, click on one or more of the filter search categories below. In our example, we filtered the images to just show those captured with the 16–35mm lens. You can further customize your metadata filtering by clicking on any of the metadata column titles and choosing another option.
7 CREATE COLLECTION
After filtering your images, it’s a good idea to create a collection, which is a way to group images. For example, after filtering your images down to your favorites, open the Collections panel. Next, click on the New Collection icon (+) in the Collections panel header and choose Create Collection. In the Create Collection dialog, type in a collection Name and check Include Selected Photos. For even more flexibility, select Make New Virtual Copies. 
8 SET WHITE BALANCE
Select an image that you’re interested in working on, then press the D key to go to the Develop module. Press W to select the White Balance Selector tool. Hover the dropper over areas of the image that should be neutral (whites, grays, etc.) and look in the Navigator panel (top left) to see a preview. Next, click on an area that should be neutral, then drag the Temp and Tint sliders to make other subtle and subjective color changes to the image, if necessary.

9 MAKE TONAL ADJUSTMENTS
After you’ve white-balanced the images, it’s time to make tonal adjustments. The quickest way to make these adjustments is by dragging the sliders located in the Basic panel: The Exposure slider sets the overall image brightness; the Recovery slider allows you to reduce the brightest aspects of the image, which can be helpful to recover highlight details; Fill Light lightens the shadow areas; Blacks increases the darkest tones; Brightness mainly adjusts the midtones; and Contrast adjusts the overall image contrast. Modify the sliders until your image looks good.

10 CROP
While typically, it’s best to crop and compose in camera, the Crop Overlay tool in Lightroom can help improve your overall composition. Press R to select the Crop Overlay tool (this shortcut works in all of the modules). Next, click-and-drag any of the four corner points and position the crop over your image; the grayed-out area will be cropped. For an even better crop view, press the O key to cycle through the various crop overlays. These overlays can help you determine which crop will work best. To apply the crop, press Return (PC: Enter) or double-click inside the crop area.

11 ADJUST DETAILS
Before you output the image, work on the details. In the Develop module, open the Detail panel. Generally speaking, the Sharpening Amount controls the overall intensity; Radius controls the extent of edge sharpening; Detail affects small details (use a low Detail amount for people and medium to high amount for other subjects); and Masking limits what’s sharpened (use a high amount to limit sharpening to the edges). The Noise Reduction sliders allow you to reduce both Luminance and Color noise. Use the Chromatic Aberration sliders only when you need to fix color fringing that can occur when shooting with wide-angle lenses.

12 CREATE PRINT COLLECTION
Now we’ll print some photos, so click Print in the Module Picker. Because we don’t want to print all of the images, let’s make a Print Collection that will serve as a subgroup of images that we’ll print. In the Filmstrip, Command-click (PC: Ctrl-click) on the images you want to add to the collection, click the New Collection icon in the Collections panel header, and choose Create Print. Name your collection, check Include Selected Photos, then click Create. (Note: To see larger images for your selection, press G to enter the Library module’s Grid view and create your collection there.) 
13 DESIGN PRINT LAYOUT
Open the Layout Engine panel and choose the layout that fits your printing needs. Select Contact Sheet/Grid for a more rigid, grid-based layout; choose Picture Package for a more free-form layout. We chose Contact Sheet/Grid then moved down to the Layout panel and modified the Margins, Page Grid, Cell Spacing, and Cell Size to create a “collage” print of the selected images. Continue to modify settings in the other panels in the Print module to further customize the print layout to suit your needs.

14 PRINT
Before you print the images, head down to the Print Job panel. Select Print to: Printer for desktop printing, or JPEG File if you’re sending the images to a lab to be printed. Next, enter a Print Resolution, then turn on Print Sharpening and select Standard, as this seems to work best with most images. Select the paper Media Type. Choose the appropriate paper Profile for your printer (we’re using the profile for the Epson 3800 Enhanced Matte paper), then select a Rendering Intent. Typically, Relative works best so try that first. Finally, click the Print button below the panels.

ALL IMAGES BY CHRIS ORWIG UNLESS OTHERWISE NOTED
