Fun Film Design Using Illustrator
With a little experimentation and imagination, you can use tools in not-so-obvious ways to create really interesting and seemingly complex effects. In this tutorial, we’ll use a number of basic shapes and a photo to create a simple filmstrip. Then we’ll map that art to a 3D shape that we’ll create and manipulate entirely in Adobe Illustrator.
STEP 1 Start with the Basic Shape
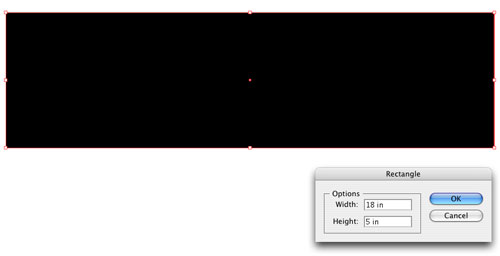
Select the Rectangle tool (M) from the Toolbox, then click once on the artboard. In the Rectangle dialog that appears, enter 18″ for Width, 5″ for Height, then click OK. In the Control panel, set the Fill color to black and the Stroke to None. We’re building the filmstrip sideways because of the way we’ll use it as mapped art on a 3D shape.

STEP 2 Create the Sprocket Hole
With the Rectangle tool still selected, click on the artboard again. This time enter 0.2″ for Width, 0.3″ for Height, and click OK. Set the Fill color to white and leave the Stroke set to None. Now choose the Selection tool (V) and position this box in the upper-left corner of the black rectangle.

STEP 3 Repeat the Sprocket Hole
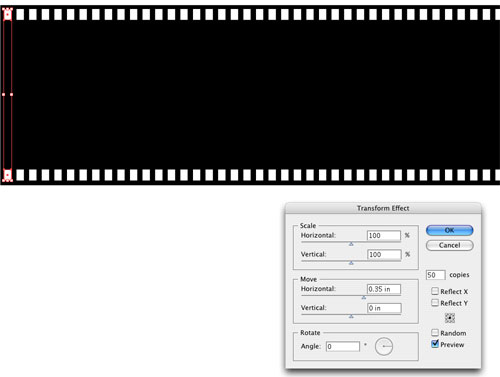
With the sprocket hole still selected, go under the Effect menu and choose Distort & Transform>Transform. In the Move section of the dialog, enter 0.35″ for the Horizontal setting. Then, enter 50 for the number of copies and click OK. This will repeat the sprocket holes all the way across the shape. Now hold down the Option key (PC: Alt key), then click-and-drag the first shape in the series down toward the bottom of the rectangle so the holes are on both sides of the film. (Note: Add the Shift key after you start dragging to keep the holes aligned.)

STEP 4 Create a Film Frame
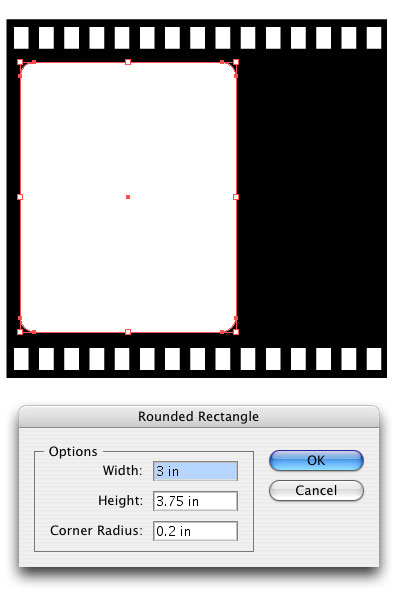
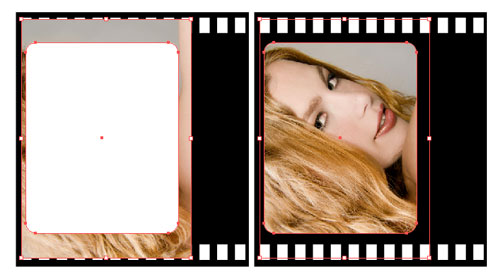
Choose the Rounded Rectangle tool (nested with the Rectangle tool) from the Toolbox. Then click once on the artboard and enter 3″ for Width, 3.75″ for Height, 0.2″ for Corner Radius, and click OK. Then set the Fill color to white and the Stroke to None. Choose the Selection tool and move the film frame onto the left side of the filmstrip.

STEP 5 Place the Photo
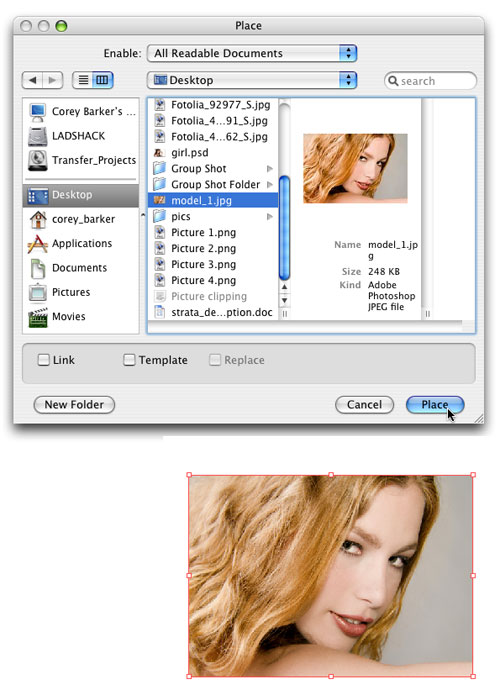
Now let’s place the photo that we’ll use in the film frame. You can use different images for each frame or you can use the same image. We’re using the same image so it looks like a movie clip. Go to File>Place, navigate to the photo you want to use, and click Place. (Note: Make sure the Link option is unchecked in the Place dialog. Also, if you’ve placed a landscape image, go to Object>Transform>Rotate, enter 90° for Angle, and click OK.)

STEP 6 Crop the Photo
Drag the photo over the frame box we created in Step 4, then choose Object>Arrange>Send Backward. Now resize and center the photo so it’s just a little bit bigger than the film frame. Select both objects, go to the Object menu, and choose Clipping Mask>Make. This will crop the photo inside the frame.

STEP 7 Repeat the Frames
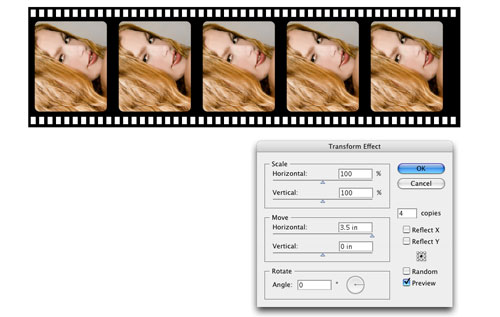
With the object still selected, choose Effect>Distort & Transform>Transform. In the Move section of the dialog, enter 3.5″ for Horizontal and then set the number of copies to 4. Turn on the Preview option to see the result before you commit, tweak the settings if necessary, and then click OK. (Note: If you’re using multiple photos, go to Object>Expand Appearance, then choose Object>Ungroup. Select the next frame on the filmstrip, open the Links panel [Window>Links], and click the Relink icon. Navigate to your next image in the Place dialog that appears, and click Place. Repeat this step for each image.)

STEP 8 Make It a Symbol
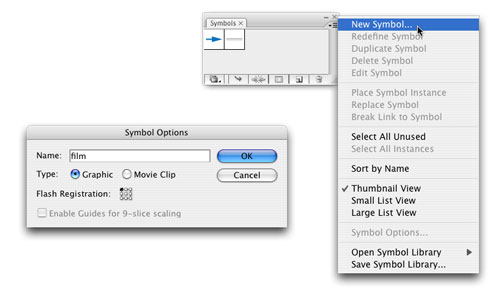
We need to convert this object into a symbol so we can map it to our 3D shape. Open the Symbols panel (Window>Symbols), choose the Selection tool, and click-and-drag over the entire filmstrip object to select it. Click the Symbols panel’s flyout menu and choose New Symbol. In the Symbol Options dialog that appears, choose Graphic, name the symbol, and click OK.

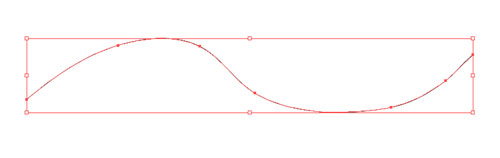
STEP 9 Draw the Line
We’re going to create our 3D shape from a stroke. Choose the Pen tool (P) from the Toolbox and draw a smooth, wavy path about the same length as the filmstrip (not too wavy though). Set the Stroke to any color and set the Fill to None.

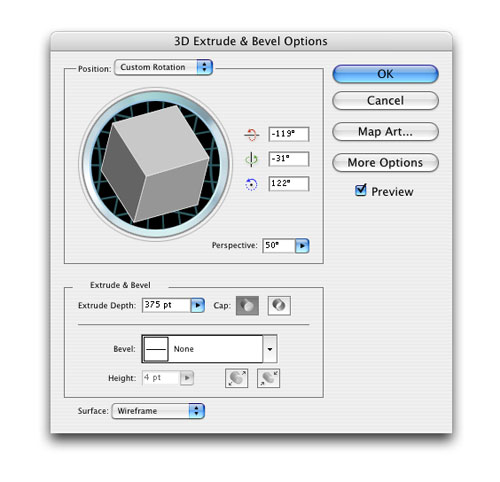
STEP 10 Another Dimension
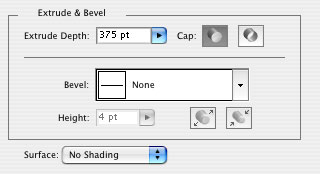
With the stroke selected, go under the Effect menu and choose 3D>Extrude & Bevel. Check on the Preview so you can see the result as you work in this dialog. Change the Surface setting at the bottom to Wireframe, enter a Perspective amount of 50°, and set the Extrude Depth to 375 pt. Now you can use the cube to manipulate the angle of the 3D shape or you can enter specific values for each x, y, and z rotation. Don’t click OK yet.
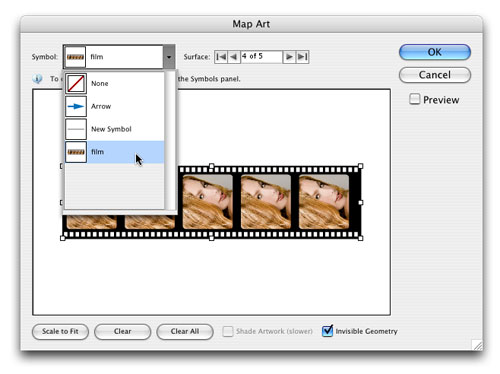
STEP 11 Map the Art
Click the Map Art button. In the Map Art dialog, toggle through the Surface to find the face of the filmstrip (the selected surface is indicated by red outlines on the artboard). Then click the Symbol menu and choose the film symbol we created in Step 8. When it appears in the window, click the Scale to Fit button and turn on Invisible Geometry. This will render only the mapped art, leaving the 3D shape invisible. Click OK to close the Map Art dialog, but don’t close the main 3D Extrude & Bevel dialog yet.

STEP 12 Finish It Off
Back in Step 10 we set the Surface to Wireframe. This was mainly for visibility and speed because this setting doesn’t have a render lag when manipulating the 3D object. But now that we’ve rendered our map art, we need to change this setting to No Shading. This will render our finished art as it was created but now it’s mapped to the 3D shape, giving the appearance of a semirealistic strip of film.


Visitor Comments »
Comment by John Deer | May 22, 2008 @ 9:00 pm
It would be real nice if you would complete this tutorial for those like me that are trying to learn.
I have finished the tutorial 5 times and still come out with a film strip cut off at the top and bottom because the original size was to be set at 18″W by 5″ H.
How do we get the finished product like your example above???
Comment by John Deer | May 22, 2008 @ 9:32 pm
FANTASTIC!!!
Comment by Jericho | May 23, 2008 @ 12:29 am
This is very useful tutorial. I like it very much. ThankYou
Comment by dinesh | May 23, 2008 @ 1:48 am
wonderful steps, you can do it with photoshop, but it takes time. thank you so much for these simple steps
Comment by Abdullhameed | May 23, 2008 @ 2:56 am
After Step 7 not able to create a Symbol as mentioned in Step 8, it shows an error as “A Symbol definition cannot contain a linked image”
Comment by Gopalakrishnan.B | May 23, 2008 @ 5:59 am
Nice tutorial. It would be nice to see transparent sprocket holes so that the background showed through, and maybe lower opacity of images slightly, again so that background showed through. Great stuff anyway. Thanks.
Comment by IsmetM | May 23, 2008 @ 6:23 am
verry helpful thank you for this phantastic tutorial
Comment by Ruediger Fischer | May 23, 2008 @ 6:33 am
A little tip.
A 35mm film got 5 holes for each picture and at the same time there are 3 soundtracks (left, right and digital) between the holes and the picture.
okay, Im a nerd but in case you want realism
![]()
Comment by Esben Thomsen | May 23, 2008 @ 7:05 am
Great, thanks! Recommend using the white squares to delete the spaces in the reel rather than just make them white.
Comment by Brent Nelson | May 23, 2008 @ 10:50 am
Nice tutorial. Took me some time to figure out the new surface I’ve created to join to the film symbol, but that give an excellent result.
Comment by steele76 | May 23, 2008 @ 7:37 pm
@ Gopalakrishnan.B,
Make sure that when you place your image, you uncheck the link checkbox in the window.
Blue
Comment by Blue | May 23, 2008 @ 7:52 pm
At what point was the image flipped and can I control it?
Comment by David | May 23, 2008 @ 9:42 pm
gostei do tutoria mais achei mais facil fazer com mask pois do seu modo não fez de jeito nenhum
Comment by ana paula | May 23, 2008 @ 9:53 pm
worked great BUT the pic got distorted. the girl’s head looks like an alien’s head in the bottom two!
fun, easy tutorial. thank you.
Comment by brad goldstein | May 26, 2008 @ 10:45 am
I loved it, I was able to repeat all your steps. Thanks for the great work.
Comment by Patrick | May 26, 2008 @ 6:55 pm
I cant do it! I end up having a stroke in the correct shape but my actual filmstrip is still horizontal.
Comment by Sam | May 27, 2008 @ 11:10 am
Nice Tutorial…
and easy to implement…
Comment by Shobhit | May 28, 2008 @ 1:04 am
Like other readers I have finished the tutorial a number of times but at the very last point when I change the wireframe to no shading all I get is the top portion with the rest cut off. Please advise, otherwisw the tutorial is very useful.
Neil
Comment by neil | May 28, 2008 @ 1:18 am
Actually, 35mm MOVIE FILM has 4 sprocket holes per frame, not 5 as the self-proclaimed ‘realism nerd’ stated earlier. But very nice tutorial, just the same.
Comment by Heather | May 29, 2008 @ 11:29 pm
Its wonderful. Thankz a lot.
Comment by Chandru | May 30, 2008 @ 12:35 pm
did not try, but looks great
Comment by Avdhat | June 6, 2008 @ 1:33 am
I am using a single image but unable to create symbol: it shows an error “A Symbol definition cannot contain a linked image.”
Comment by Anita | June 8, 2008 @ 8:28 am
a litle tip
if an image is distorted it helps to trace bitmap to vector
Comment by aki | June 13, 2008 @ 10:59 am
it is realy sooooo goooooooooood.
goooood joooooooooooooob.
Comment by Arijit | June 14, 2008 @ 6:24 am
I have gotten through all the steps but when I go to the wire 3D and then put the artwork (symbol) on the path, what it is showing is that it follows the “size” of the stoke. The only way I can get any image is to increase the size of the stroke. Therefore, does the stroke size matters
Comment by Steve | June 26, 2008 @ 12:10 pm
I am like several others. I get through the entire tutorial and get nothing. Is this tutorial for Illustrator CS2?
Comment by Lonnie | June 30, 2008 @ 8:17 pm
Thanks for this tutorial, it’s very good. I’ve some image distorted, but I learned new things with this, thanks a lot!!!
Comment by Tito V | July 1, 2008 @ 7:56 pm
wow. simple way to make great things…
Comment by freddy | July 2, 2008 @ 10:32 am
I’ve gone through the tutorial, but at the end my image does not appear on the film strip. What am I doing wrong?
Comment by Charlie | July 11, 2008 @ 4:01 pm
He did say to make sure the link option is unchecked in the place dialog. Otherwise, when you’re all finished, choose to embed the links.
Comment by Deb | July 16, 2008 @ 4:13 pm
Fantastic !
Now, how would you animate the film so that it gives the impression that it’s constantly turning ? In flash ?
I have really no idea how that could be done !
Comment by Tristan | July 17, 2008 @ 12:23 am
very nice tutorial
i had done, but the film strip is not coming with the black color
just come the film bend is outline otherwise inside pic coming and its also cut off.,.
but its very useful to make good design and we can use the menu and ideas
thanks somcuh
Comment by sen | July 17, 2008 @ 11:32 am
i like it!! very helpful
Comment by weoulf | July 21, 2008 @ 9:52 pm
IT VERY NICE TUTORIAL,THANKS A LOT I LEARN SO MUCH.
Comment by ANDREIBENEDICT | August 7, 2008 @ 5:00 am
Well I did everything like they said, I got some mistakes, but I came back again and again until I fix them. It was excellent tutorial, if any one needs help, how to get it right, I am available to explain, just let me know!
Comment by Shariel Arroyo Monrouzeau | August 16, 2008 @ 10:42 pm
Great tutorial but didn´t work for me…i did something wrong but i did this a lot of times already and all the time is wrong..the image doesn´t fit…
Comment by Dnlo HM | August 21, 2008 @ 7:31 pm
it happened the same with me…the image didn´t appeared in the filme strip
Comment by danilo | August 21, 2008 @ 7:33 pm
awesome
Comment by stole | August 25, 2008 @ 8:59 am
Thanks for the tutorial, but it doesn’t work for me, i have tried about 10 times and all i get is the color of the stroke i made, and no mapping of the symbol, even though the symbol image i made was available to choose from the Map Art section, which did go into the box and scaled to fit too, so I’m not sure what’s happening here
![]()
Comment by Doesnt work for me - thanks though | August 29, 2008 @ 11:39 pm
i made a larger strip with gradient frames instead of pictures.
The final result is just a line, no 3d effect…
Comment by this tutorial | September 9, 2008 @ 8:31 pm
Amazing!!! Thanks a lot.
Comment by Ella B. | October 10, 2008 @ 10:52 am
Thanks; someone suggested “see thru” on the filmstrip holes. I think the eraser tool might work (use it to make the holes).
The tutorial was VERY helpful, btw. I got it to do the filmstrip but had trouble making it curve; still, it was helpful
Comment by SE18 | October 22, 2008 @ 12:02 pm
AWESOME …
Comment by SEGRAN PILLAY | October 24, 2008 @ 11:05 pm
I think I figured out why some people can’t get this to work. I had to go through the steps several times before I caught my mistakes. My mistakes were in the Map Art dialog box. Before you choose the film symbol make sure the front surface is selected. The surface option is right next to where you select the symbol. Click through the options and notice that a red line(s) appears in the preview box. Make sure you have the front surface selected before you choose the film symbol. The other thing that might cause trouble is if your line is too wavy. If you have more than 4 or 5 surfaces to choose from that could be your problem.
Also I had to scale my symbol while still in the Map Art dialog box even after I clicked scale to fit. Use the handles on the preview of the film to click and drag until it is within the grey box.
Hope this helps those having trouble because the end result is worth it.
Comment by Laurie | October 26, 2008 @ 12:21 pm
would LOVE to make this. have tried multiple times. once getting thick red 3d stroke and PART of the filmstrip complete.
Comment by ko | October 29, 2008 @ 10:35 pm
first of all many thanx for the great tutorial
@SEGRAN PILLAY: 10x dude! that was exactly what was missing in the tutorial – surface selection – I have multiple surfaces, applied object to every surface, one after another, and the final result (with a little of fine tuning) looks great!
Comment by d1a | November 4, 2008 @ 4:32 am
Sorry, not Sergan Pillay, LAURYE is to take all the credits
![]()
Comment by d1a | November 4, 2008 @ 4:33 am
thank u for providing so nice tutorial
Comment by rehmat hadi.....dagbsd | November 6, 2008 @ 9:57 pm
After several attempts I got a perfect one, I then deleted it and went on to replicate, problems now for every time I try to replicate:
Patches of cut out from the original film.
Anyone know what I am doing wrong?
Comment by Dinhi | November 9, 2008 @ 4:42 pm
Oh! A super tut and great big shout out thank you to Laurie for making a full day of head scratching go away with a very helpful hint [=
Comment by Dinhi | November 9, 2008 @ 4:44 pm
Ok—Having tried to replicate the film strip after a successful go of it, I began using the paint tool vs. the pencil took which worked the first time. I have since repeated the task with the pencil tool and there are no torn film strips in the finished product.
Not that familiar with this program, can anyone explain why that may have happened with the paint tool?
Thanks!
Comment by Dinhi | November 9, 2008 @ 4:52 pm
Another hint I discovered that may help the newbee (like myself) with this tutorial:
double click on the pen or pencil tool, which ever you are using, set the Fidelity to 20
and smoothness to 100%What I have discovered is the least amount of anchor points contributes to the best image, and you can draw your shape with much more curves and no distortion to the symbol image you apply.
ah…learning…love it!
Comment by Dinhi | November 12, 2008 @ 5:47 pm
thanks boss very very super…….
Comment by ismail rv dubai | November 17, 2008 @ 2:10 am
After Step 7 not able to create a Symbol as mentioned in Step 8, it shows an error as “A Symbol definition cannot contain a linked image”
Comment by Rajesh | November 21, 2008 @ 7:11 am
you should have the source files.. it is a good tutorial, but what would help if we have the files so we dont have to do the work.
Comment by r | December 10, 2008 @ 6:47 am
Attention!!!
all the people having problems with the film strip not filling up the path as a whole image, make sure your path has a “BLACK STROKE” NOT a “BLACK FILL” actually it dosent make any difference what color you use. And with the linking error, you cant have the clipping masks in your layer when you try and make it a symbol, what i did is export the illustrator layer to photoshop and used the clipping mask as a selection and did a reverse seletion and deleted the area around my pictures then took the pictures back into illustrator and layed them over my “clipping masked” pictures and once my photoshop edited pictures were alignded i delelted the clipping mask and my old pictures. Hope all that makes sense
Comment by Jason | December 15, 2008 @ 4:01 pm
thank you soooooooooooooooooo much!!!
Comment by tasost_greece | December 16, 2008 @ 5:00 pm
Hi everyone,
I am hoping you can help me.. I tend to make things more difficult then what it actually is and don’t see the simpliar things sometimes. I am new to illustrator and was wondering about what the size of document should be when you first open it up? I know how to set the size of the rectangle for the filmstrip but unsure of what the right size is for the new document should be all together.. Should I just set it the same size as the filmstrip? Like I said I am making it more difficult I am sure but would like to know what you guys have set yours too. I obviously can’t use the tool unless I have a new document open. Thanks again
Comment by Shannon | January 6, 2009 @ 9:00 pm
Would be nice if it worked, but it’s nowhere’s near useable. I used to teach Illustrator back in the day, and you have to learn how to WRITE a tutorial, there’s obviously about 50 missing pieces of info, otherwise it’d work perfectly.
Comment by Greg | February 27, 2009 @ 2:41 pm
i loved it and it worked perfectly. As far as greg above, he may need to learn to read a tutorial too. Look at link check and surface area and it will work exactly as shown. Fantastic job!
Comment by Joseph Gardner | March 15, 2009 @ 1:46 am
Awesome. I just looked this up to fix an error.
Comment by Don | April 30, 2009 @ 7:45 pm
Great tuto but Laurie saved the day for sure, couldn’t get it to work before picking the right surface.
Anyone else have trouble with the power used for this, I have a pretty big new computer, but she does not like this.![]()
Comment by Jayski | October 8, 2009 @ 11:23 am
Leave us a comment

- Dragging an Object Between Documents
- TV Scanline Effect
- Trick to the Glossy Effect
- 3D Text
- Changing Type on a Path


Photoshop
Illustrator
Indesign
Dreamweaver
Fireworks
Premiere
Flash
After Effects
Lightroom
Acrobat


