
It’s here! InDesign CS3, along with the rest of the Creative Suite 3, has shipped. Now it’s time to dive into some of the features that will enhance your creativity and speed up your production.
I’m going to start off with something that just about everyone can use, and that’s table styles. Like paragraph, character, and object styles, table styles gives you the flexibility of defining a consistent look and feel across the tables in your documents.
Step 1
Create New Document
Start by creating a new document (File>New>Document) or opening an existing one. Note: Before we jump into creating our table, bring up your Preferences (press Command-K [PC: Ctrl-K]), click on the Type category on the left, enable Create Links When Placing Text and Spreadsheet Files, and click OK. This will ensure that if you place a table from Word or Excel, when someone updates the Word or Excel document, your InDesign document updates too.

Step 2
Place or Create Your Table
If you have an Excel document, choose File>Place. If not, create a text frame using the Type tool (T), then choose Table>Insert Table. (Our table is 8 Body Rows and 4 Columns.) An easy way to create a style is to format a table first. Since cell styles can also incorporate paragraph style info, we’ll format our text with a couple of paragraph styles. If your table doesn’t have text, type some text in the first 2–3 rows, styling the first row of text the way you want your header to appear and the second as you want your body rows to appear.

Step 3
Build Two Paragraph Styles
Let’s build two paragraph styles: one for our header row and one for our body rows. Put your cursor anywhere in the header text. (Note that our example has a reverse type effect.) In your Paragraph Styles panel (formerly called palette), hold down the Option key (PC: Alt key) and click the Create New Style icon. Holding the modifier key allows you to name the style—Header Row. Click OK. Now put your cursor in the body text and do the same thing to create a new paragraph style called Body Rows. Note the new Apply Style to Selection checkbox.

Step 4
Build Cell Styles
Cell styles not only format the cell attributes but they also use paragraph styles to format the text. Open your Cell Styles panel (Window>Type & Tables>Cell Styles), and Option-click (PC: Alt-click) the Create New Style icon. Type “Header Rows” for Style Name, choose your Header Row paragraph style, click on Strokes and Fills on the left, and set the Cell Fill Color to Black. Click OK.
For our Body Rows, again in the Cell Styles panel, Option-click (PC: Alt-click) the Create New Style icon, enter “Body Rows” for Style Name, choose your Body Rows paragraph style, and click OK.

{module:ads/large_rectangle}
Step 5
Build the Table Style
Bring up your Table Styles panel (Window>Type & Tables>Table Styles), Option-click (PC: Alt-click) the Create New Style icon, and name the style something that has meaning to you, such as “Terry’s Awesome Table Style Tutorial.” At the bottom of the New Table Style dialog, assign your Cell Styles to the rows to which they belong—Header, Footer, and Body Rows as well as the Left and Right Columns of your table. So assign your Header Rows style to Header Rows and your Body Rows style to Body Rows. Don’t click OK yet.

Step 6
Choose Alternating Fill Colors
It’s time to choose our alternating fill Colors for our body rows. Click on the word “Fills” in the column at the left of the New Table Style dialog. Now choose Every Other Row from the Alternating Pattern pop-up menu and select your two colors (we chose cyan and yellow). Don’t worry, you can always come back and change it later. Click OK. Note: If your table didn’t update based upon the style, place your cursor in your table and in the Table Styles panel, click on your style.

Step 7
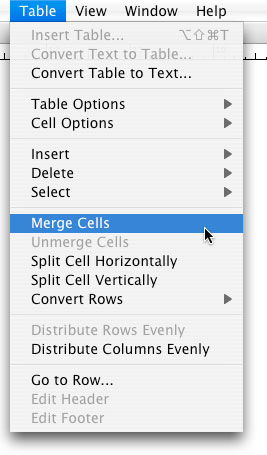
Merge Cells for Header Row
With the table style definition complete, we now need to merge the cells for our header row. With your Type tool selected, move your cursor to the left side of the top row (the cursor will change to an arrow pointing toward the column), then click to select the entire top row. From the Table menu, choose Merge Cells.
Step 8
Designate Top Row as Header Row
Now that the cells are merged, we can convert that top row to a header row. We need to designate it as a header row so that if we make any future changes to the style, the table will update correctly. With the top row selected, go under the Table menu and choose Convert Rows>To Header.


Step 9
Open the Effects Dialog
We could stop here but when in doubt, I always say, “Add some transparency.” Switch to the Selection tool (V) in the Toolbox and click on the table to select it as an object. While InDesign CS2 offered effects such as Opacity, Blend Modes, Drop Shadow, and Feathering, InDesign CS3 offers a complete range of transparency effects. Go to Object>Effects and choose Transparency to bring up the Effects dialog.

Step 10
Add a Drop Shadow
To finish things off, let’s add a drop shadow. From the Effects dialog, click on the word “Drop Shadow” in the list of effects on the left, and in the dialog, adjust the settings to your taste (make sure to turn on the Preview checkbox). If your table is sitting on top of another graphic or background (as ours is), you might also want to click on the word “Transparency” at the top of the list of effects and experiment with the Basic Blending Mode. Click OK when you’re done. Here’s how our table looks.

CREDIT: ADOBE STOCK PHOTOS
