Night Lights: Creating a Glowing Neon Effect in Illustrator
Create a glowing neon effect in your illustration that can grab an audience’s attention with its beauty and uniqueness.
This compelling effect really draws in the eye. Using a technique that emulates glowing neon in your illustration can do exactly what a real neon sign is designed to do-grab an audience’s attention with its beauty and uniqueness. Plus, it’s just a lot of fun to play around with!
1
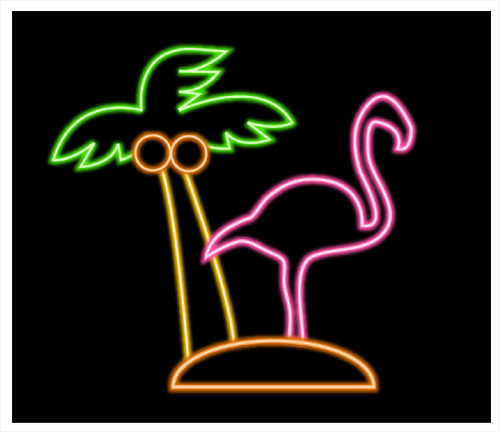
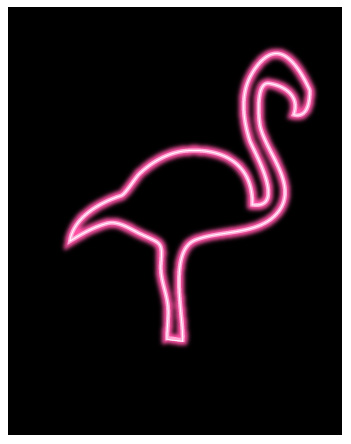
A black, or otherwise dark-colored, background will set off the neon effect very nicely. Create a black background by drawing a rectangle with the Fill set to Black. Using the Pen tool (or if you prefer to draw free-handed, the Pencil or the Brush tool), create a simple outline shape. For this example I’ve drawn a flamingo. Make the Stroke White for now, and the Fill should be set to None.


2
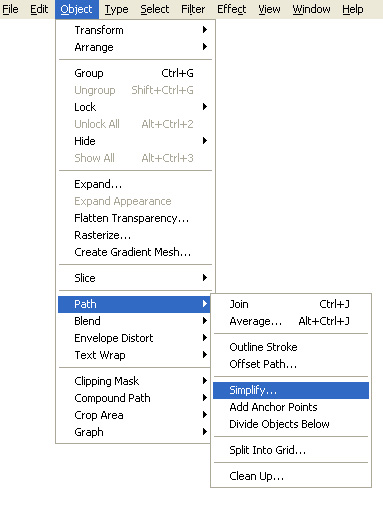
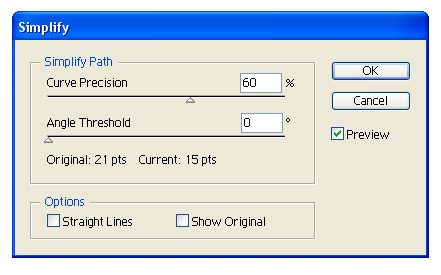
Select the new shape with the Selection tool. Go to Object>Path>Simplify. In the Simplify menu, click the Preview option, then experiment with the Curve Precision percentage till your shape is smooth like neon tubing. In this example, I set the Curve Precision to 60%.


3
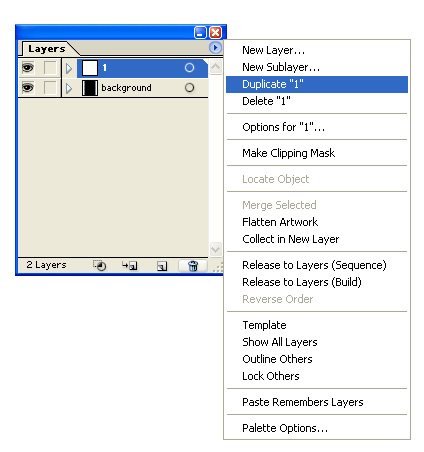
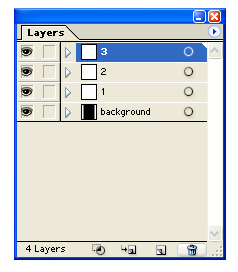
Select the layer in your Layers palette that contains your shape, and then click on the small triangle in the upper right hand corner. In the menu that opens, select the Duplicate option. Repeat this step one more time, so you end up with three separate layers with your shape on each one. Name these layers 1, 2 and 3, with 1 being the second to bottom layer, then 2, then 3 as shown here..


4
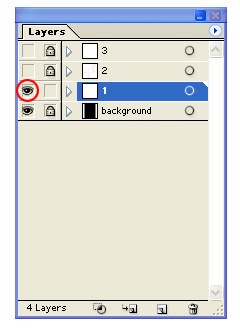
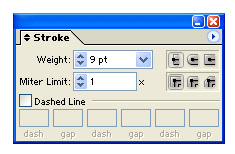
Toggle off the visibility for Layers 3 and 2 by clicking on the eye icon in front of them in the Layers palette. Select the shape on layer 1 (using the Selection tool), and change the stroke color to a deep and saturated hue. In this example I choose a dark pink. Then increase the stroke’s width to 9 points with the Stroke palette (Window>Stroke).


5
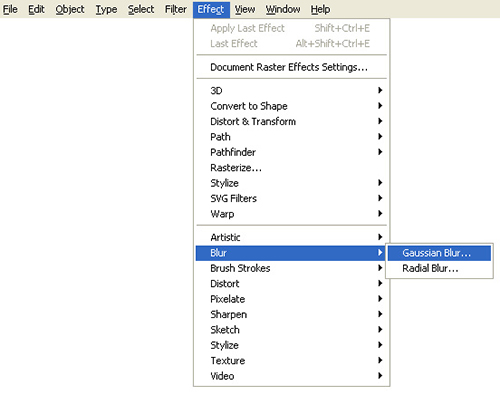
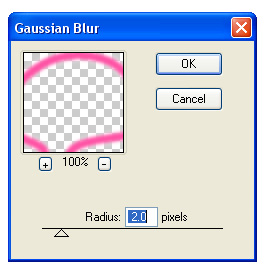
Select your shape, and then go to Effect>Blur>Gaussian Blur. In the Gaussian Blur dialog, set the Radius to 2 and click OK. This will provide the glow for your neon shape.


6
Toggle on the visibility of Layer 2 now. Select the shape on this layer, then change its
stroke width to 4 points and the color to a lighter version of the one you selected in Step Four.

7
Now toggle on the visibility of Layer 3. Select the shape on this layer-you may need to zoom into the art to select the line. Change its stroke width to 1 point and the color to an even lighter version of the one you selected in Step 4.

8
Using the same technique it is now easy to build up a more complex image, with all the elements having their own striking neon glow.

Visitor Comments »
Comment by Unski | April 20, 2008 @ 12:37 pm
Simple but very nice.
My kids will like it.
Comment by Brian Sayward | April 21, 2008 @ 7:09 am
fine really very fine, it is really great
Comment by ganesh | April 27, 2008 @ 2:07 am
It’s really great thx for posting it =D
Comment by kerstin | May 5, 2008 @ 6:45 am
=D huahau ! Nice tuto dude !
Comment by .cactus | May 13, 2008 @ 3:14 pm
It’s really nice, thanks for posting it.
Comment by Nusrat | May 17, 2008 @ 12:40 am
文字看不懂,图片还能看懂一些 Thank you!!
Comment by xiaoxue | June 20, 2008 @ 4:04 am
Its a great tutorial!!!
Comment by Cláudio | June 25, 2008 @ 1:04 pm
muito bom o tutorial, mas nao to conseguindo faze-lo. sou iniciante, e meu fotoshop é em portugues…estou um pouco perdida pois nao estou encontrando as ferramentas…alguem poderia me ajudar?
Comment by josi | July 2, 2008 @ 11:06 am
So Great… Thx,
Comment by Sami Hussein | July 26, 2008 @ 3:06 am
2 CONFUESiN
Comment by KAY KAY | August 9, 2008 @ 9:35 am
In INDIAN style…
JHAKASSSVERY NICE SIR.
Comment by JAI PRAKASH | August 11, 2008 @ 5:00 am
it’s working dude… nice one alavista….
Comment by rajan | August 13, 2008 @ 5:03 am
I think you have to added the palm tree
Comment by PJ Lux's | September 16, 2008 @ 12:01 am
I think you have to added the palm tree
Comment by PJ Lux's | September 16, 2008 @ 12:01 am
There is more simple way to do such effect: by using appearence pallete.
Comment by Anton | September 29, 2008 @ 2:29 pm
Great Post Cheers
Comment by paul | October 1, 2008 @ 3:35 am
um on my photoshop there isn’t the objects tab on top.
Comment by a.Lo | October 4, 2008 @ 3:42 am
Thank you, this was a good one.
Miguel
Comment by Miguel Almeida Deca | October 15, 2008 @ 4:09 pm
great one,the very ideal thought you have as to help many of graphics liking men
Comment by rehmat hadi.....dagbsd | October 17, 2008 @ 12:17 am
Paul, he’s working in Illustrator. For Photoshop, go here–>http://www.photoshopsupport.com/tutorials/cb/neon-sign.html
Comment by Bronwyn | December 5, 2008 @ 2:47 pm
you can use this method to create lightsabers in photoshop- just make the line straight.
great tutorial.
Comment by frogboy | December 9, 2008 @ 6:35 am
My layers wont combine together, like i cant see them all combined at once?
Comment by Cooper | December 14, 2008 @ 6:43 pm
Un tutorial muy interesante!!!
Comment by daniel | January 5, 2009 @ 8:42 am
Well done! this is gonna be my new job, doin that kind of stuff for real light things.
Comment by mxky.com | January 6, 2009 @ 1:52 pm
[...] Creating a Glowing Neon Effect in Illustrator- Create a glowing neon effect in your illustration that can grab an audience’s attention with its beauty and uniqueness. [...]
Pingback by Photoshop Illustrator Effects and Tutorials : phploop | January 7, 2009 @ 5:58 am
excellent tutorial, excellent, pls keep posting
Comment by yathunandan | January 19, 2009 @ 11:17 am
GREATEST TUTORIAL SIMPLE AND STRAIGHT
Comment by ken obama | January 20, 2009 @ 8:08 am
very effective tutorial
Comment by sindhu | February 10, 2009 @ 4:12 am
[...] Creating a Glowing Neon Effect in Illustrator- Create a glowing neon effect in your illustration that can grab an audience’s attention with its beauty and uniqueness. [...]
Pingback by 53 Killer Photoshop Illustrator Effects and Tutorials | Noupe | March 18, 2009 @ 7:55 pm
wow! thats really nice, no detail but it looks awsome! =D
Comment by Loubna A. | March 19, 2009 @ 6:37 pm
Thats realy kewl
Comment by john hammington | May 8, 2009 @ 3:21 pm
Thats really shweet
Comment by john hammington | May 8, 2009 @ 3:22 pm
[...] Creating a Glowing Neon Effect in Illustrator- Create a glowing neon effect in your illustration that can grab an audience’s attention with its beauty and uniqueness. [...]
Pingback by 53 Killer Photoshop Illustrator Effects and Tutorials | Webmaster Zone - Cyooh.com | June 2, 2009 @ 9:12 pm
[...] Creating a Glowing Neon Effect in Illustrator- Create a glowing neon effect in your illustration that can grab an audience’s attention with its beauty and uniqueness. [...]
Pingback by 53 Killer Photoshop Illustrator Effects and Tutorials | www.my2tech.com | July 1, 2009 @ 8:56 pm
Thanks for sharing the tut with me/us. It was beautifully described. Well done. Looking forward for more tuts from you!
Comment by Goga. | July 21, 2009 @ 4:40 pm
[...] Creating a Glowing Neon Effect in Illustrator- Create a glowing neon effect in your illustration that can grab an audience’s attention with its beauty and uniqueness. [...]
Pingback by 53 Killer Photoshop Illustrator Effects and Tutorials | Webmaster Tips | July 22, 2009 @ 8:23 pm
[...] trabalhoso o resultado final vale a pena. [ 1 ] [ 2 ] [ 3 ] [ 4 ] [ 5 ]. Para fazer aquele efeito tradicional de luzes de neon veja este tutorial (traduzido). COM ADICIONAR EFEITOS DE LUZ EM FOTOSGerador de imagens estilo NeonFAZER EFEITOS EM [...]
Pingback by TUTORIAIS EFEITO NEON PHOTOSHOP | August 6, 2009 @ 8:51 am
[...] illustrator ile parlak neon efekti yapmak:güzelliği ve benzersizliğiyle bir izleyicinin dikkatini çekebilen parlak bir neon etkisi yarat. glowing neon effect [...]
Pingback by 53 adet öldürücü Photoshop ve illustrator efekti « IsimsizZ WordPressS | September 9, 2009 @ 4:22 am
[...] Crear efecto neón con algo de glow – [...]
Pingback by Tutoriales Photoshop+Illustrator de gran calidad | Tutoriales y Recursos | September 9, 2009 @ 7:53 am
very easy u guy did a good job of explaing….
Comment by anatoliy | October 12, 2009 @ 3:11 pm
Leave us a comment

- Dragging an Object Between Documents
- TV Scanline Effect
- Trick to the Glossy Effect
- 3D Text
- Changing Type on a Path


Photoshop
Illustrator
Indesign
Dreamweaver
Fireworks
Premiere
Flash
After Effects
Lightroom
Acrobat


