Photoshop CS4: A Picture Worth a Thousand Words

I love Photoshop techniques that offer all kinds of possibilities for experimentation—and the following tutorial is a perfect example of one of those techniques. In this issue, we’re going to take a portrait and replace the person’s image with text (think 2009 Grammy posters).

1 CHOOSE YOUR PHOTO

Pick a portrait that offers good contrast—a photo that’s very dramatic and dark probably won’t work as well. I’ve had the best success with straight-on head and shoulder shots, but again, feel free to experiment with all types of photos. For the best results, choose a photo that has a light background (or select the background around the person and make it lighter).

ps cs4
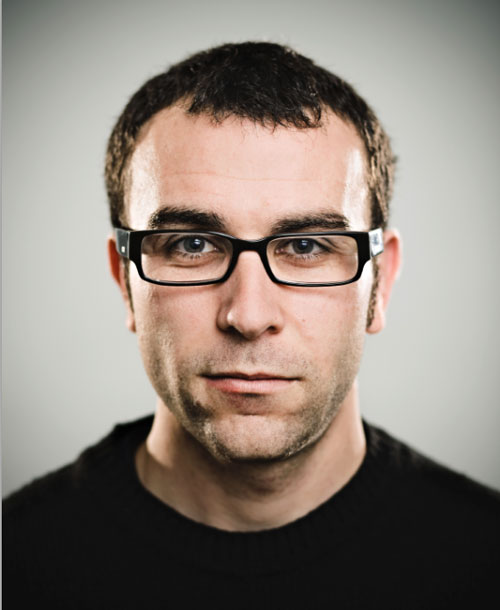
©ISTOCKPHOTO/JOAN VINCENT

2 CREATE VARIOUS TEXT BRUSHES

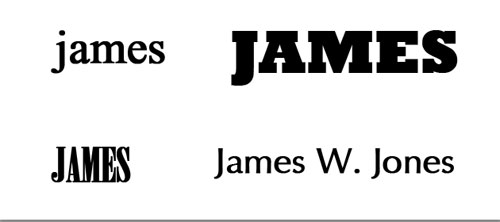
Create a new document (File>New) in a size that’s smaller than your photo: the specifics don’t really matter. Press D to set the Foreground color to black. Use the Type tool (T) to type several different words in various fonts and sizes (in this case we used a person’s name). One at a time, draw a selection around each word with the Rectangular Marquee tool (M), and from the Edit menu, choose Define Brush Preset. Name each brush in the Brush Name dialog and click OK.

ps cs4
ps cs4

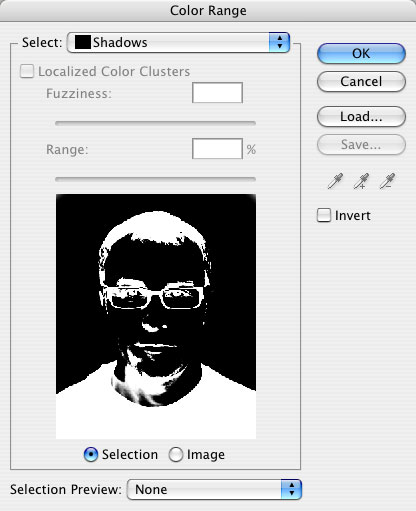
3 SELECT THE SHADOWS AND MAKE A LAYER

Switch back to the photograph. From the Select menu, choose Color Range. From the Select drop-down menu in the Color Range dialog, choose Shadows and click OK. (In our example, nothing in the background was selected. If parts of the background are selected in your photo, see the next step for removing those selected areas.)

Then, press Command-J (PC: Ctrl-J) to copy the selected pixels onto a new layer. Press Command-J (PC: Ctrl-J) to copy the selected pixels onto a new layer. Click back on the Background layer in the Layers panel.

ps cs4
ps cs4

4 SELECT THE MIDTONES AND MAKE A LAYER

Go back to the Select menu and choose Color Range again. From the Select drop-down menu in the Color Range dialog, choose Midtones and click OK. If (as in this example) some of the background is selected, use the Lasso tool (L) with the Option key (PC: Alt key) held down to circle the areas you don’t want selected. Then, press Command-J (PC: Ctrl-J) to copy the selected pixels onto a new layer.

ps cs4
ps cs4

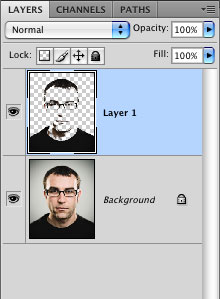
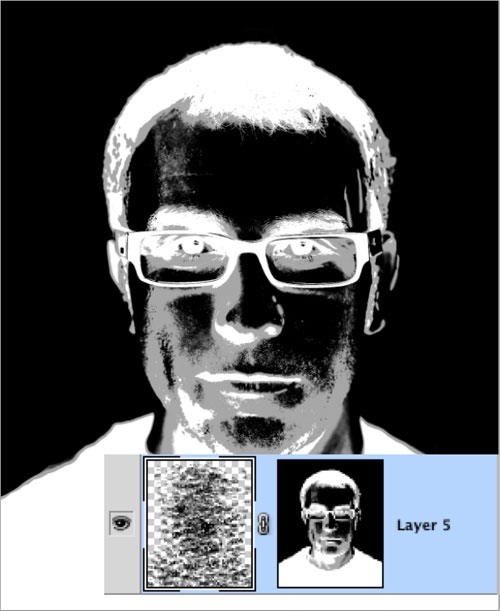
5 FILL THE LAYERS WITH BLACK AND GRAY

Click the Eye icon next to the Background layer in the Layers panel to hide that layer from view. Click on the midtones layer and from the Edit menu choose Fill. Use 50% Gray, check the Preserve Transparency box, and click OK. Then, activate the shadow layer and use the Fill command again, except this time use Black with Preserve Transparency checked. You should have a very basic portrait made from black and 50% gray.

ps cs4

6 FINE-TUNE THE RESULTS AND MERGE DOWN
If necessary, show the original Background (click where the Eye icon used to be) and use the Brush tool (B) to paint with black on the shadow layer, gray on the midtones layer, or use the Eraser tool (E) to completely remove areas. (Note: For gray, click on the Foreground color swatch, enter R:128, G:128, and B:128 in the Color Picker, and click OK.) In this example, we added a little more definition to the ears by painting with gray on the midtones layer. Once you’re satisfied, click on the top layer (the shadow layer) and press Command-E (PC: Ctrl-E) to merge it with the midtones layer.

ps cs4

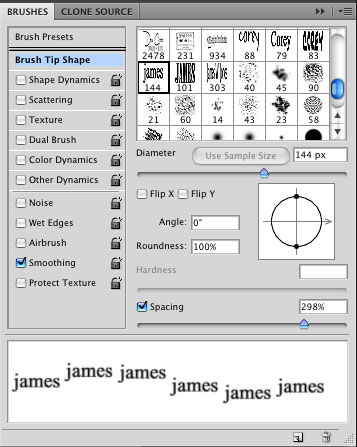
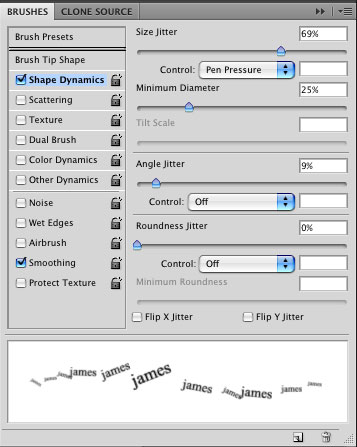
7 ADJUST BRUSH SETTINGS AND PAINT SOME TEXT

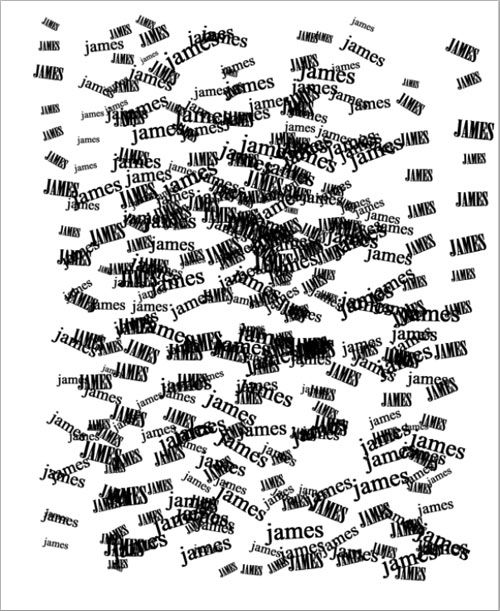
Click the Create a New Layer icon at the bottom of the Layers panel. Press D to set your default colors. Press Command-Delete (PC: Ctrl-Backspace) to fill the new layer with white. Choose one of your custom brushes from the Brush Picker in the Options Bar, and in the Brushes panel (Window>Brushes), click on the words “Brush Tip Shape.” Adjust the Spacing so there’s space between each word. Under Shape Dynamics, vary the size and rotation of the brush. As you paint on the white layer, experiment with the Shape Dynamics. Repeat with your other custom brushes. For now, just get some “text paint” on the layer—we’ll continue painting in a moment.
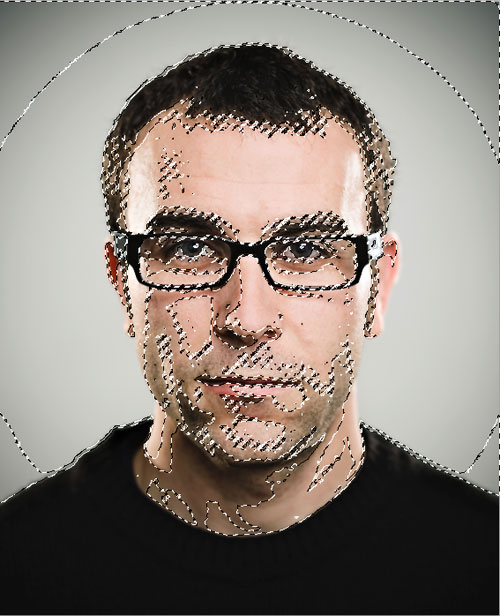
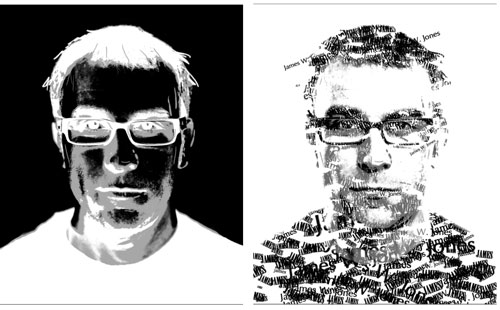
ps cs4
ps cs4
ps cs4

8 COPY THE PORTRAIT
Create a new layer and drag it above the black-and-gray portrait layer. Press Command-Delete (PC: Ctrl-Backspace) to fill it with white. This will provide a white background behind our image. Hide all the layers except the black-and-gray portrait layer, and then click on that layer to make it active. Press Command-A (PC: Ctrl-A) to Select All and then Command-C (PC: Ctrl-C) to Copy.

ps cs4

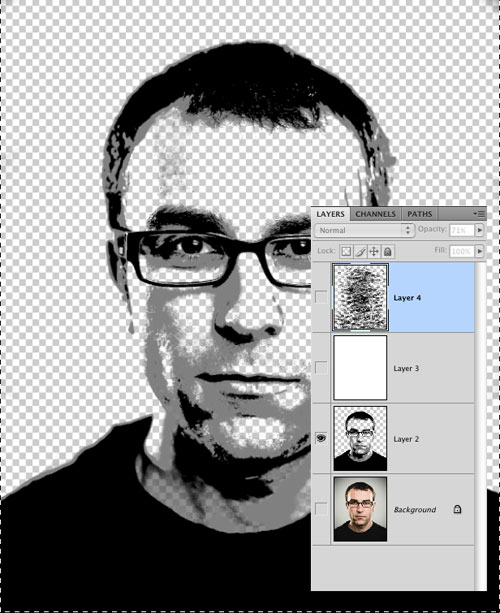
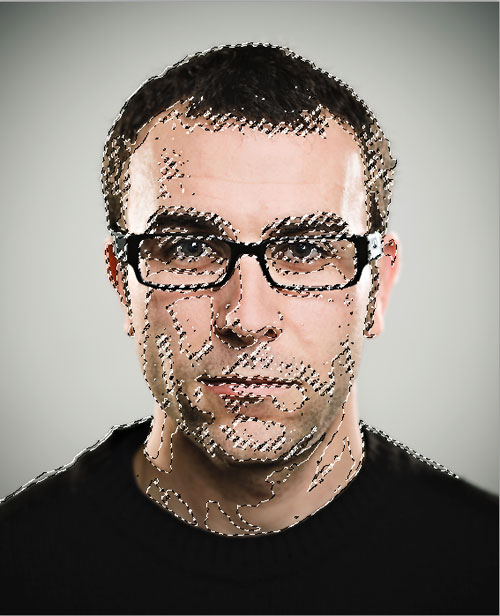
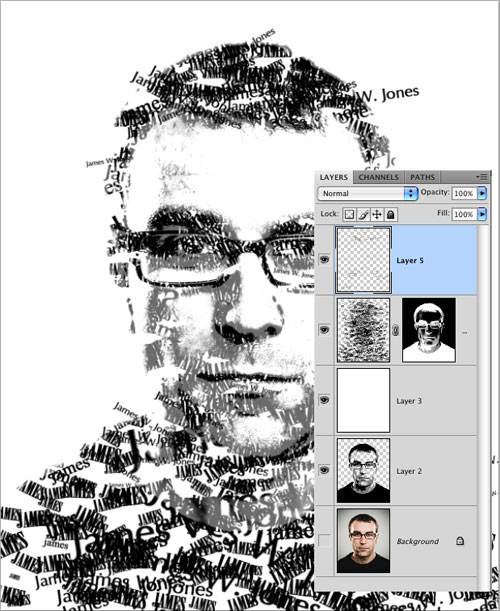
9 PASTE INTO A LAYER MASK
Show all layers and activate the layer with the painted words. Click on the Add Layer Mask icon at the bottom of the Layers panel to add a layer mask. Hold down Option (PC: Alt) and click on the layer mask thumbnail (this will hide the painted text and show just the mask). Press Command-V (PC: Ctrl-V) to paste the copied pixels onto the mask. Press Command-D (PC: Ctrl-D) to Deselect. Press Command-I (PC: Ctrl-I) to Invert the mask (your mask should look like a negative of the black-and-gray pixel image that you pasted).

ps cs4

10 CONTINUE PAINTING, VARYING BRUSHES
Activate the painted text layer (not the mask) by clicking on the layer thumbnail, and continue painting using the different custom brushes you created. You can also continue to experiment with the brush settings for Size, Spacing, and Shape Dynamics. (Although you don’t need a pressure sensitive pen for this technique, it sure helps!)

ps cs4

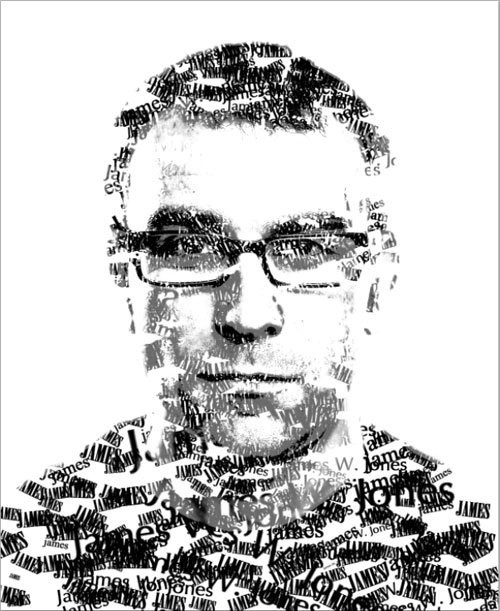
11 ADD A LAYER WITH RANDOM TEXT
The painted text will only appear inside the white and gray areas of the mask. To add a bit more randomness to the portrait, add a new layer above the painted text layer. Then use the same text brushes to add a few words here and there outside the boundaries of the mask.

ps cs4

12 PAINT ON THE MASK IF NECESSARY
If there are areas where you’d like text to appear in the portrait—or there’s text showing where you don’t want it to show—click on the layer mask and paint with a round, soft-edged brush: use black to hide the text, white to show the text, and shades of gray to make the text somewhat visible.

ps cs4

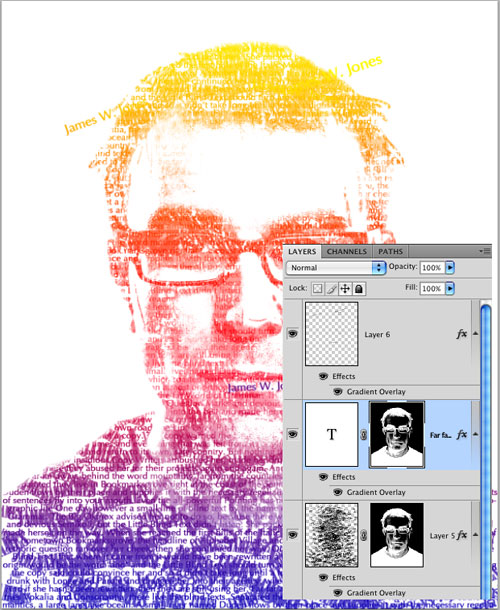
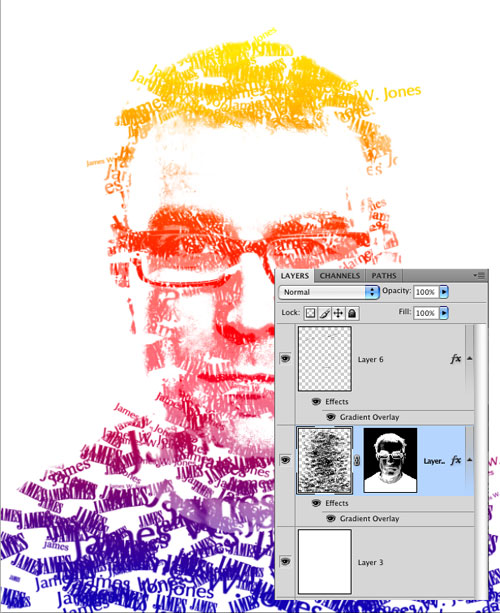
13 VARIATION: ADD A GRAIDENT OVERLAY
Here’s a simple variation: Add a Gradient Overlay layer style to the painted words layer. Just click on the Add a Layer Style icon (fx) at the bottom of the Layers panel and select Gradient Overlay. In this case we clicked on the Gradient thumbnail, and selected the Blue, Red, Yellow gradient in the Gradient Editor. Click OK to close the Gradient Editor, then select Screen for the Blend Mode and click OK. Hold down Option (PC: Alt) and drag the word “Effects” in the Layers panel on top of the “extra words” layer to copy the same layer style to that layer.

ps cs4

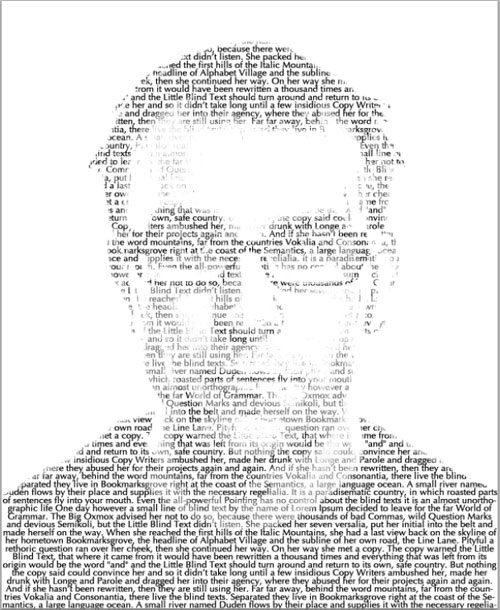
14 VARIATION: USE TEXT BLOCKS WITH THE MASK
Use the Type tool to click-and-drag a text box around the entire image. Get a large amount of random text (we used www.blindtextgenerator.com) and paste the text into the text block. Hold down Option (PC: Alt) and drag the layer mask from the painted text layer onto this new type layer to copy the mask. Then, either hide the painted text layer, or use both the painted layer and the new type layer—the possibilities are endless!

ps cs4
ps cs4

Visitor Comments »


What a great idea! I’d like to know how to use this in After Effects as well!


Comment by Byron C. | September 1, 2009 @ 5:26 pm


great tutorials thank you


Comment by TurnOFF | September 1, 2009 @ 9:39 pm


cool. I like it, pretty simple. how come I’ve never through of such simple idea.


Comment by Erez | September 2, 2009 @ 12:25 am


Cool


Comment by abhijeet | September 2, 2009 @ 8:48 am


Excellent tutorial… I’ve learnt so much that will definitely aid in adding a little zest to my website or pdf’s. Can this method be duplicated in illustrator?


Comment by Andrae | September 2, 2009 @ 1:19 pm


great tutorials.. thanks


Comment by shashi | September 2, 2009 @ 5:16 pm


so cool…can’t wait to try this.


Comment by Jackie | September 2, 2009 @ 8:01 pm


I GOT A BIG MEATY!


Comment by McLovin | September 3, 2009 @ 8:05 am


[...] Click here to read the rest of the tutorial Share This [...]


Pingback by Me in NYC – Dave Cross’ Text Portrait (Cool!) | Layers Magazine | September 3, 2009 @ 9:50 am


[...] Dave Cross shows us how to replace an image with words in Photoshop (p. 50 of the magazine or click here for the online tutorial). Your mission is to use these techniques to create your very own font [...]


Pingback by Layers Back Page Design Contest | Layers Magazine | September 3, 2009 @ 10:25 am


Good work


Comment by Jimmy | September 3, 2009 @ 10:27 am


This is soooo awesome.


Comment by Anjelika | September 3, 2009 @ 10:41 am


Good Idea!!!


Comment by Val_Ery | September 3, 2009 @ 1:43 pm


will try this later tonight. thank you!


Comment by Kuro-san | September 3, 2009 @ 6:05 pm


awesome, indeed!


Comment by Khemiset | September 4, 2009 @ 1:22 am


Dave Cross is the Man! Its so simple to do and the tut is easy to follow, but the idea and outcome are extraordinary


Comment by Ian Lee | September 4, 2009 @ 3:36 am


This is really very nice……Naveed
I am also a Photoshop Lover.


Comment by naveed | September 5, 2009 @ 7:21 am


COOL!!!


Comment by Apraanpreet | September 5, 2009 @ 8:56 am


love itttt


Comment by donna | September 5, 2009 @ 4:50 pm


It’s an awesome style, i had a some trouble with my brushes. There was a shadow behind the text. Is there a way to get ride of that?


Comment by ???? | September 5, 2009 @ 11:54 pm


outstanding tutorial


Comment by noman elahi | September 7, 2009 @ 2:12 am


Excellent! (:


Comment by Dhanisha Ganase | September 7, 2009 @ 9:16 am

Comment by zoe4ever | September 8, 2009 @ 2:09 pm


great tut!


Comment by luvDJA | September 9, 2009 @ 12:19 pm


I am having a problem pasting the black and grey image in the layer mask. I not sure why, but instead of pasting it to the layer mask it just creates a new layer above it. Is any one else having the same problem?


Comment by Dalton patterson | September 10, 2009 @ 11:18 am


I want learn more about the new features and new filters. Photoshop is an amzing software in the field of multimedia.


Comment by R. Harikumar | September 13, 2009 @ 9:41 am


Love it!


Comment by Tamixes | September 13, 2009 @ 7:59 pm


Fab tutorial easy to follow and brilliant result :)
thanks!!


Comment by Em | September 18, 2009 @ 4:50 am


Cool…


Comment by noles | September 29, 2009 @ 9:50 pm


Great Tut. I really like the step of taking the transpant graphic image and Alt-Drag to create a mask on the name texts layer. I did not know you could do this. Thanks for the skills


Comment by Charles "BraCharles" Lonon | October 2, 2009 @ 12:14 pm


i rea alt-drag to create a mask.thanks for your skillslly like the graphic image and


Comment by ushizimpumu leopold | October 10, 2009 @ 9:39 am


[...] 1- A Picture Worth a Thousand Words [...]


Pingback by All Tutorials » 7 Awesome Photoshop CS4 Tutorials | October 12, 2009 @ 12:28 pm


wow ! wow ! wow !


Comment by teuingsaha | October 14, 2009 @ 1:18 am


this looks stunning. what an amazing thing to accomplish, such a simple idea that produces outstanding results. great tutorial :D


Comment by Liam Carson | October 17, 2009 @ 7:37 am


It was a lot of fun!! Thanks!!


Comment by Elana | October 18, 2009 @ 4:26 pm


nice tut.brilliant idea. thanks


Comment by seakar | October 18, 2009 @ 8:55 pm


Success!

Just completed this for Vis Lit class.


Comment by Fluffgar | October 19, 2009 @ 9:30 am


man what shall i say you are a master ..thanks i really enjoyed this tutorial ,time for me to show off my new skills i will treat my little sis with a new portrait


Comment by jas | October 19, 2009 @ 1:29 pm


[...] A Picture Worth a Thousand Words [...]


Pingback by 10 Best Typography Tutorials | November 4, 2009 @ 4:53 pm


Great!! thank you


Comment by Cecilia | November 5, 2009 @ 6:36 am


I’m stuck half way through. My gradiant masks the entire picture. This is really frustrating. I don’t see where to drag ‘effects’.


Comment by Depressed | November 13, 2009 @ 2:25 am


nice one boss!!!!!!!!!!!!!!


Comment by raymon | November 13, 2009 @ 3:31 am


Great tutorial but I’m having trouble on the last step (typical or what?)

I can’t seem to get the bulk of text to appear on the image properly. I’m not sure what exactly I’m meant to be dragging onto the new text layer so at the moment I just have a load of text on top of the image. I suppose I can’t complain as my image looks awesome as it is but I would like to know :)


Comment by Owen | November 13, 2009 @ 6:42 pm


good tutorial indeed BUT, i dont get it, in your tutorial your background is white when you paint the text on the image and later on it is transparent? I dont see why its suddently transperent? Do you understand? just below COPY THE PORTRAIT…


Comment by Adi | November 15, 2009 @ 11:10 am


I am having problems with my image copy onto the mask it worked once but now I was trying to do this exercise again and now it is not working. I was wondering if you could tell me what I might be doing wrong? thanks


Comment by chelsy | November 17, 2009 @ 8:42 pm


cooooooooooooooooooooll

thx


Comment by Asim | November 22, 2009 @ 7:20 pm


Wowwwwww I love it! LOveeeeeee it!


Comment by mafe alvarez | November 23, 2009 @ 3:24 pm


exelente tutoral


Comment by Crazy_emc777 | November 24, 2009 @ 2:00 am


fantastic tutorial
every step is clear, I learnt a heap! thanks!


Comment by AlisonWonders | November 28, 2009 @ 10:04 pm


u guys really rock!!!


Comment by binu | November 29, 2009 @ 6:27 am


What can I say!!! I am stunned!!!


Comment by Senthil Ramesh | November 30, 2009 @ 3:34 am


COOL tut


Comment by Manshy | December 3, 2009 @ 10:46 am


cool stuff..


Comment by siva | December 3, 2009 @ 9:59 pm


Thanks a lot…


Comment by Gurung | December 10, 2009 @ 4:06 pm


fablous……but little critic to understand the source …….but over all had a great fun in the section of creative jungle…..had a nice view in the part of explaining sense….. thanks for a nice tutorial………


Comment by mithun | December 16, 2009 @ 7:04 am


hello people out there?


Comment by fred yola | December 17, 2009 @ 8:01 am


Amazing results.
Great one, thank you.


Comment by Robert Pinsent | December 21, 2009 @ 4:44 pm


Great!! Thank you for the tutorial,wat else can i add apart from the text?!!!
now let me try this out. Thanks again


Comment by deeware | January 9, 2010 @ 1:59 pm


its a crazy design good keep it up.


Comment by david mante | January 26, 2010 @ 7:58 am


Oh! this is realy cool! I’l try do do it. Thank’s!


Comment by Juliana | February 4, 2010 @ 4:46 pm


This is SICKKKKKKKKKKK :D D


Comment by kennedy | February 5, 2010 @ 2:16 pm


5 star tutorial, thanks a ton!


Comment by Kyle | February 5, 2010 @ 4:34 pm


Great!!! Thank you so much! I got the same idea, but i didn’t know it could be realised so awsome!!! Got some nice present’s for st. valentine’s day.


Comment by Andrew | February 13, 2010 @ 8:26 pm


Thank you so much for all the tutorials, they are great and really easy to follow. Once again thank you a million for being so kind.


Comment by the one | February 21, 2010 @ 10:40 am


You SPICE !.


Comment by Yur Duggi | February 22, 2010 @ 2:53 pm


[...] Here is a tutorial on doing a word portrait. See if you can recreate the results. Use words that describe your hopes dreams, and interest. [...]


Pingback by Digital art project: word faces | The Urban Studio | February 23, 2010 @ 1:26 pm


woooooooooooooooooooooooooooooooooooooooooooooooooooooooooooooooooooooooooooooooooooooooooooooooooooooooooooooooooooooooooooooooooooooooooooooooooooooooooooooooooooooooooooooooooooooooooooooooooooooooooooooooooooooooooooooooooooooooooooooooooooooooooooooooooooooooooooooooooooooooooooooooooooooow


Comment by tevin | February 23, 2010 @ 3:36 pm


woooooooooooooooooooooooooooooooooooooooooooooooooooooooooooooooooooooooow


Comment by tevin | February 23, 2010 @ 3:37 pm

Comment by Connor | February 24, 2010 @ 4:37 am


this suuksss crap


Comment by robeto gonzalez | March 4, 2010 @ 3:40 pm


This looks like a fun thing to try. I just wish that I was this creative in the first place.

http://www.davidnh.com


Comment by David Hardwick Photography | March 7, 2010 @ 7:02 pm


woooooooooooooooooooooooooooooooooow dis ding is cool


Comment by biily bob cubushca | March 8, 2010 @ 3:53 pm


its sooooooooooooooooooooooooooooooo boringgggggggggggggggg i dont like dis


Comment by many sanches | March 8, 2010 @ 3:57 pm

Leave us a comment

Comments RSS | TrackBack URI

Back to Top


  • Back to the Layers Magazine Homepage
  • Creative Suite Tutorials
  • Layers Magazine
  • Reviews on top products
  • Layers Magazine Reader Forums
  • Subscribe to Layers Magazine