
Possibly one of the most confusing aspects of dealing with digital imagery is resolution-specifically, what it really is and how changing it affects an image. You’d be shocked at the number of brilliant designers who don’t know how to change an image from 72 dpi to 300 dpi-without turning it into a pile of pixel mush. That is, until now.
Today we’re going to talk about the relationship between resolution and pixels, and what it means to you. We’ll discuss the difference between upsampling-a rather evil practice of increasing the resolution (and thereby the number of pixels) in order to make the image larger than it originally was-and changing the resolution of an image without changing pixel data. First, let’s chat briefly about resolution in general.
What is resolution?
Simply put, image resolution is the number of pixels displayed per unit of printed length in an image. It’s a measurement used for printing (hence the phrase “of printed length”) and it’s usually stated in pixels per inch (ppi-used when referencing screen images) or dots per inch (dpi-used in printing because printers print dots).
The way resolution affects an image is thus: For a given number of pixels in the width or height of an image, the higher the resolution, the closer the printer packs those pixels together in order to make a beautifully smooth and sharp print. The closer the pixels are packed together, the smaller the image will be physically when printed. Conversely, the lower the resolution, the more loosely those pixels are packed and the larger the image can be physically-though it loses definition and the print will look extremely undesirable and, well, chunky.
Because our monitors can only display a certain amount of information that our eyeballs/brains can process, resolution matters only to printing devices. That’s right, it doesn’t mean a hill of beans until that image is headed for a printer because only a printer can do anything with the resolution measurement. Your monitor just doesn’t care: A 72-dpi image will look exactly the same as a 3000 dpi image.
So how much resolution do you need to make a gorgeous print? It depends on the printer. While the current crop of consumer-level inkjets does a fine job at 225-250 dpi, a professional service bureau may require 300+. If it’s your own printer, run a few tests. If someone else is printing it for you, ask them what dpi they need.
What’s a pixel?
I won’t bore you to tears with a dissertation on how the smallest picture element of any digital image is called a pixel and how images are displayed in tiny blocks (also referred to as dots) of color that together form an entire image (or maybe I just did). That’s a pixel, and for the most part, creative types have been brainwashed not to pay attention to the number of pixels an image contains. We’ve been told to pay attention to its resolution instead. As you now know, this is true when it comes to print but not so much any other time.
But why should I care?
Because any file-the same file-can be measured at 72, 300, or 3000 dpi, its pixel dimensions are what matters most, not its resolution. You’re going to encounter 72 dpi files that need to be printed, and because you’ll need to resize that image, you need to understand how to change one without changing the other.
From digital camera to the big screen
For example, let’s take a photo from a high-quality digital camera (an Olympus Evolt E-330 to be exact). I thought this shot might make good stock photography so I took it on a high-quality setting so I’d have sufficient pixel data for printing. I popped open the photo in Photoshop and took a peek at its Image Size dialog to find that it was 3136×2352 pixels, but only 72 ppi. Does this mean my photo is of low-quality and unsuitable for print? Not at all. Read on.
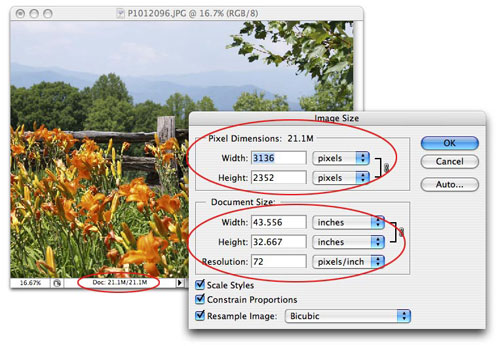
There are several important things to note in this screenshot:
1. At the bottom of the document window, you can see that the file is indeed large-it’s 21 MB (circled in red).
2. Note the pixel dimensions shown in the upper portion of the Image Size dialog: 3136×2352 (also circled in red). Remember these numbers for a few seconds.
3. Note the honking big physical dimensions of this image. If I were to try printing the thing at its current resolution, it’d be more than 43.5 inches by 32.5 inches… INCHES!
Now, watch carefully as I increase the resolution of the image without messing with the number of pixels. Here’s how:
Step 1: In Adobe Photoshop, choose Image>Image Size. TIP: In Photoshop CS2, just press Command-Option-I (PC: Control-Alt-I).
Step 2: At the bottom of the dialog, uncheck Resample Image. This all-powerful magic option locks the number of pixels contained in the image, thereby locking the quality. Enter 300 into the Resolution field and look what happens:
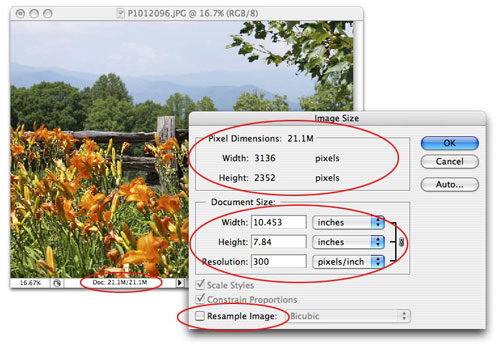
The image is now 300 ppi and the physical size has decreased to about 10.5×7.5 inches. See how the physical dimensions of the image changed but the pixel information didn’t? I have exactly the same number of pixels I started out with: 3136×2352; they’re just packed more tightly together. Furthermore, notice how the file size didn’t change at all? It’s still 21 MB, as evidenced in the document window and in the Image Size dialog (another clue that the pixel data didn’t change). I haven’t changed the quality (pixels), I’ve just changed the measurement (dpi), which only affects the printed image.
Admittedly, this is confusing because the onscreen image didn’t change a bit (see earlier paragraph on monitors, eyeballs, and brains). The truth is only revealed by the Image Size dialog.
The thing to remember is that as long as you uncheck the Resample Image box, you can tweak the resolution ’til the cows come home and you won’t alter the image quality at all. Ever. If you leave the Resample Image box checked, you’ll be practicing a dark magic called upsampling, wherein you’re adding pixels (data) to the image that weren’t originally there. It’s usually a very bad idea; unless, of course, you’re in a real pickle or you’re going for that chunky look in your design.
The (dark) art of upsampling
That being said, (lowers voice to a whisper) there is a very special technique for squeezing pixels into an image without losing too much quality, but one should only use it in the direst of deadline or Extreme Large Format Printing (i.e., billboard) situations. The trick is to pop open the Image Size dialog, leave Resample Image checked and choose Bicubic Smoother from the pop-up menu to its right. Next, change the document dimension pop-ups to Percent and enter anywhere from 105-110%, then click OK. Do this as many times as necessary until you get the desired pixel dimensions. This will indeed add pixels to the image with surprisingly little quality loss, and at super large sizes, no noticeable quality loss at all. With such power comes the need for great restraint, however, so do resist the urge to increase more than 5-10% at a time.
Another alternative is to download software specific to this task. Take a peek at PhotoZoom Pro 2 by BenVista or Genuine Fractals by onOne Software . Both of these applications perform some pretty amazing image enlargement voodoo.
That’s all for now, and I hope this article has helped to clear up whatever resolution confusion you might have had. Until next time, may the creative force be with you all!
