
Popping Animation Effect in Adobe After Effects
Flower Power
Combining vector art and shapes inside After Effects can yield some great and unexpected results. In this tutorial, we’ll show you how to set up the popular “popping” animation effect with very little effort. Then we’ll add the new CS4 Wiggle Transform operator combined with the Repeater to explore some fun and random animations.
If you’d like to download a finished movie for this tutorial, just click here. All files are for personal use only.
1 PREPARE LAYERED ARTWORK
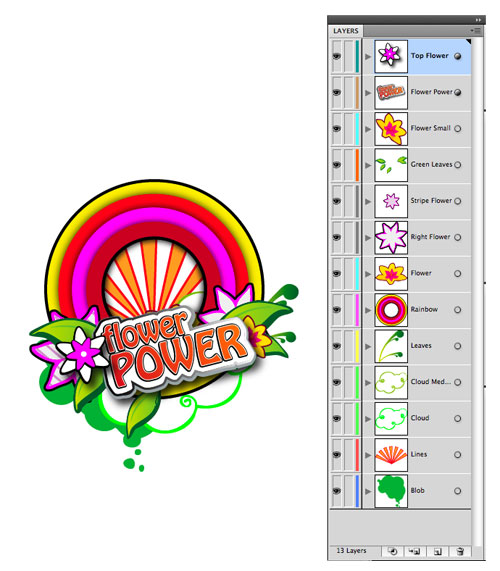
I always prepare my graphics in Illustrator, because of its vector qualities. This workflow allows me to keep all the layers (as with Photoshop) and yields a much clearer and crisper result even when scaled up within After Effects. One important note: Make sure to set the layer structure correctly and always name your layers in a logical manner. Working in an organized way will make the animation process faster, making life much easier if you need to go back and change things later on.
2 IMPORT FOOTAGE; CREATE BACKGROUND
Import your artwork into After Effects by choosing File>Import>File. Be sure to set Import Footage to Composition and set the Footage Dimensions to Layer Size. The spec for this project (Composition>Composition Settings) is a square-pixel comp of 720×534 pixels (from the Preset drop-down menu, choose NTSC D1 Square Pixel—these are the new CS4 corrected PAR dimensions for NTSC and should come up automatically if you set it in Illustrator), 29.97 fps, and 5 seconds in length. Double-click the imported comp (ours is “Flower Power”) to open it, ensure nothing is selected, and then double-click the Rectangle tool (Q) to create your first shape background.

3 DESIGN BACKGROUND
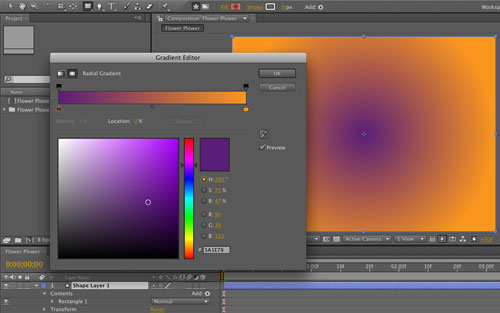
Select Shape Layer 1 and in the Toolbar, set the Stroke to 0 px, click the word Fill, choose a Radial Gradient, then click OK. Next we’ll define two suitable colors that will blend well with the design. Click on the Gradient Fill icon in the Toolbar and click on each color stop to set the colors to fit your design (we used dark purple and warm orange). Press OK to confirm, then return to the Selection tool (V), and drag the tiny right circle on the screen until you’ve reached the edge of the comp, which will define a nice even gradient from the middle to the edge of the screen.
4 REORDER LAYERS; CLICK SOLO
With the shape layer selected in the Timeline, press Return (PC: Enter), rename it “Background,” and then use the keyboard shortcut Shift-Command- (PC: Ctrl-) to send it beneath all the layers.
Next, we want to set an interesting popping animation that reveals all the layers sequentially. We only need to set it for one layer and then use the same settings for the other layers, with minor adjustments as needed. Let’s start by selecting any one of the artwork layers and press S to show the Scale properties. At this point, I’d also suggest clicking the Solo switch to visually isolate this layer.

5 CREATE MAIN “POP” ANIMATION
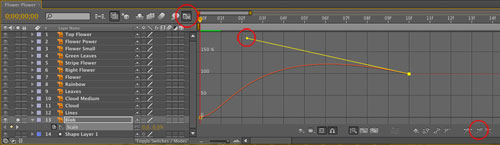
Go to 10 frames along the Timeline and click the Stopwatch next to Scale to set a keyframe with the current value of 100%. Return to the first frame (0) and change the Scale to 0%. Next, we want to change the velocity and the ease so the animation will grow a bit beyond full size before ending at 100%, and we can use the Graph Editor very nicely for this. Click the Graph Editor icon in the Timeline, select the last keyframe, click the Easy Ease In icon to convert the keyframe, then adjust the curve handle upward to extend the scale above 100%, before it drops back in.
6 DUPLICATE ANIMATION
Click the Graph Editor icon to return to the regular Timeline view, then Shift-select both keyframes for the Scale property. Copy them to memory (Command-C PC: Ctrl-C). Now, select the rest of the layers in the comp (excluding the Background and the layer you’re copying from), and Paste (Command-V PC: Ctrl-V) to apply the same animation to all of them. “Un-Solo” the layer you worked on originally, then press 0 on the keypad for a RAM preview, and confirm that all layers now have the same “pop” scale animation.

7 TRIM AND DISTRIBUTE LAYERS
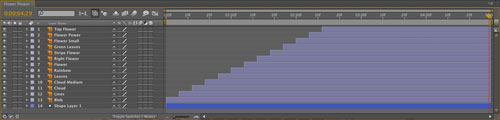
Our basic animation is now in place, but the timing is the same on all layers. Let’s fix that with a few short steps. First, select the bottommost artwork layer (not the shape background), then hold down Shift and select the topmost artwork layer. This is very important, as it will set the order of the layer sequencing. Now go to 10 frames on the Timeline, press Option- (PC: Alt-) to trim all the layers to 10 frames, then Control-click (PC: Right-click) on any selected layer and choose Keyframe Assistant>Sequence Layers.

8 SET OVERLAP
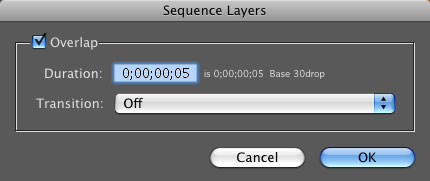
In the Sequence Layers dialog, check the Overlap box on, set the Duration to 5 frames, and Transition to Off, then click OK—this now offsets the layers by 5 frames in time sequentially. Now, while the layers are still selected, go to the end of the Timeline and press Option- (PC:Alt-) to extend their visibility till the end. Create a RAM Preview to see the new results—nice!
That was easy, wasn’t it? But we’re not done yet—you’ll want to work on each element individually and set the correct Anchor point, so the growing effect will take place from the correct part of the layer.
9 ADJUST ANCHOR POINTS
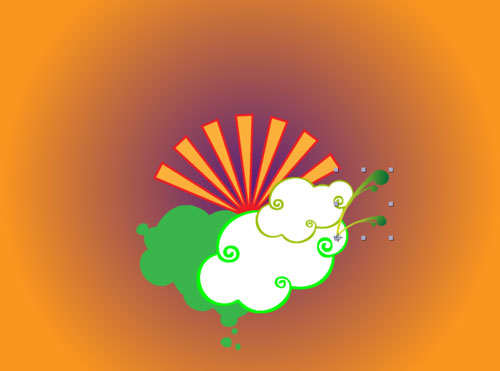
The easiest way to do this is to use the Pan Behind tool (Y). Deselect all the layers (F2), select your first layer, and then drag the center Anchor Point to the desired point from which the animation needs to occur. In this step, we selected and adjusted the Leaves layer’s anchor point, so the animation now occurs from its bottom-left corner. Repeat this process for each of your artwork layers, and you’ll really notice the difference!
10 EMBELLISHMENT SUGGESTIONS
To enhance the motion, I’ve added a Rotation spin on top of the scale to the Lines layer, and for my Rainbow layer, I’ve used the Radial Wipe effect to reveal it. You might want to add some changes to the timing to add more variations to your design.
Next, we’ll spice up our scene by adding a few elements from inside After Effects, starting with a simple shape layer in order to take advantage of the brand-new Wiggle Transform operation in CS4.

11 SHAPE BUILDING
Deselect all, choose the Ellipse tool (nested under the Rectangle tool Q), and create a small circle in the center of the screen. Move this layer to begin at 1 second along the Timeline. Solo this element, and let’s modify it. Twirl down the Ellipse 1 property in the Timeline and shut the Eye for the Gradient Fill. Twirl down Stroke 1. Use the Eyedropper next to Color and sample one of the colors (bright green in our example), and set the Stroke Width to 5 px. Name this layer “Bubbles” and let’s have some fun with it….

12 WIGGLE TRANSFORM
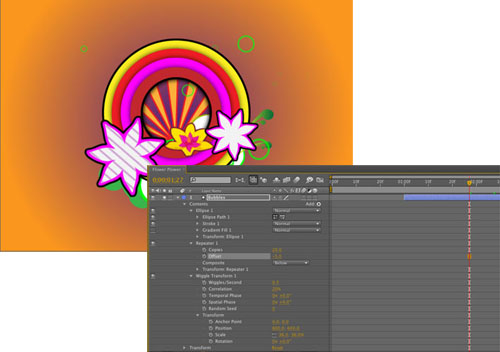
Select the Bubbles layer and in the Timeline choose Add>Repeater. Twirl open Repeater 1 and change the Copies to 20. Then twirl open Transform: Repeater 1; set the Position to 50, 0; and set the Scale to 80%. Now for the fun part—from the same Add menu, choose the new Wiggle Transform operator. Before we adjust it, drag Wiggle Transform 1 to below Repeater 1 so it will wiggle all the repeater’s copies individually! Now twirl it open, set the Wiggles/Second to 0.5 and the Correlation to 20%. Twirl down Transform, and change the values until you’re satisfied.

13 WIGGLE ADJUSTMENTS
In my comp, I’ve set the numbers pretty high so the circles are flying all over the place, giving the illusion of fast, popping bubbles. Pay attention to the fact that you must change the default values if you want the Wiggle Transform to work well. Feel free to change the position of the Bubbles layer until it looks the best overall, and change its layer order as desired to integrate the bubbles better into the design. Finally, set a global Scale animation to reveal the whole layer (copy-and-paste the Scale keyframes as we did in Step 6).
14 FINAL TOUCH
Let’s add a small airplane to circle the art. Select the Text tool, choose the Wingdings font in the Character panel, move to 1 second along the Timeline, click in the comp, and press Shift-Q (PC: Shift-J) for the airplane symbol. Select the Text layer and create a circle mask around the art with the Ellipse tool. In the text layer, twirl open Text and then Path Options and set the Path to Mask 1 to align the airplane to the circle path. Set Reverse Path to On and set keyframes for the First Margin value at the start and end of this layer, adjusting them until you’re happy with the position and speed of the animation. Enjoy!

