Remove Elements From a Photo in Photoshop CS4
If you’d like to download the images used in this tutorial to practice these techniques, visit www.layersmagazine.com and navigate to the Magazine section. All files are for personal use only.
Disappearing Act
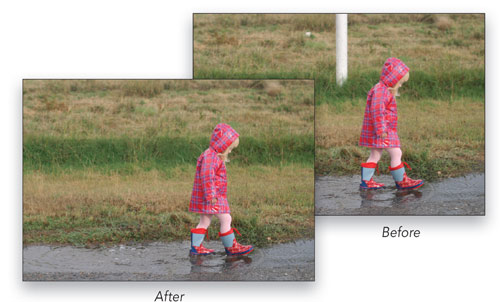
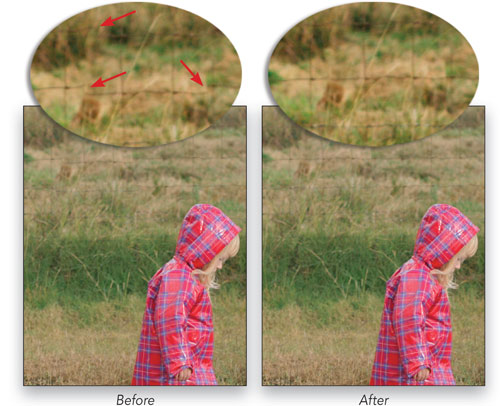
Let’s face it: no matter how carefully you try to compose your image, in some photos there’s something in the shot that just has to go! In this tutorial, we’ll review some key techniques for removing elements from a photograph using cover-up layers and the new live brush preview for the Clone Stamp in Photoshop CS4.
1 [CONCEPTUAL OVERVIEW]
The Clone Stamp and the Healing Brush are both great for retouching and, in some cases, removing smaller objects from an image. But for larger items, especially in areas of more complex detail, you often have to use another approach that involves copying sections of the background onto separate layers. In order for this technique to work, there needs to be enough “extra” background information that can serve as a patch to cover up the unwanted object. Both the Clone Stamp and the Healing Brush can be used to fine-tune rough edges after the main cover-up layers have been created.

2 [SELECT THE AREA TO BE COVERED]
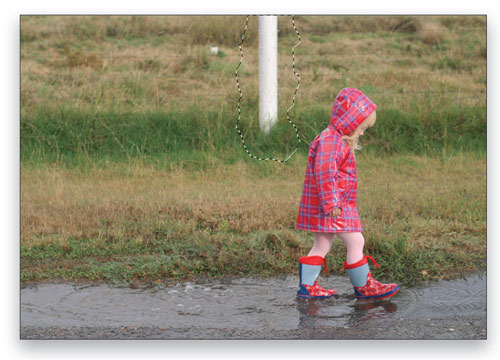
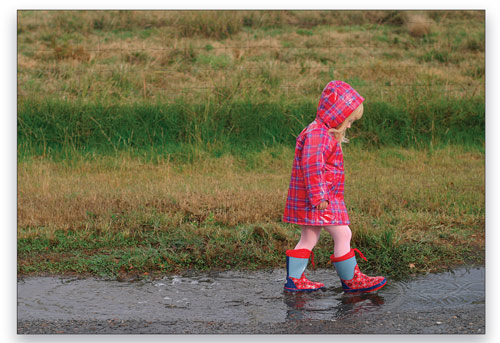
In the image of the girl walking through rain puddles, our goal is to remove the white fence post. It’s a bit distracting and the image will be more pleasing without it. Fortunately, there’s plenty of background that we can use to cover the post. It’s also slightly out of focus, which will make it easier to blend over the post. Use the Lasso tool (L) with a 2-pixel Feather in the Options Bar to drag a loose selection around the fence post. It’s okay to have irregular edges, as this will help camouflage the cover-up. (Note: You can download this image from www.layersmagazine.com.)

3 [MOVE SELECTION TO GOOD DETAIL]
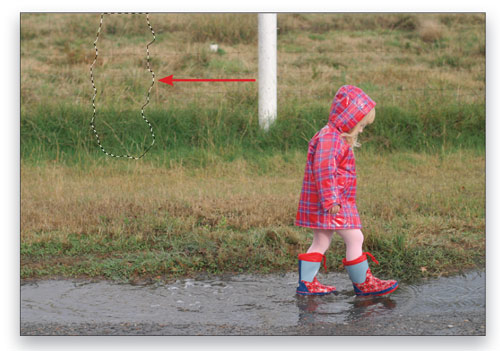
With the Lasso tool still active, click inside the selection, hold the Shift key down, and move the selection over to the left to an area of background detail that will provide good image information for covering up the fence post. The use of the Shift key will constrain the movement of the selection to keep it aligned horizontally with the original position. In some images, such as this one, this is not that critical, but in others it may be important to have precise alignment of the data you’ll be copying.

4 [CREATE THE COVER-UP LAYER]
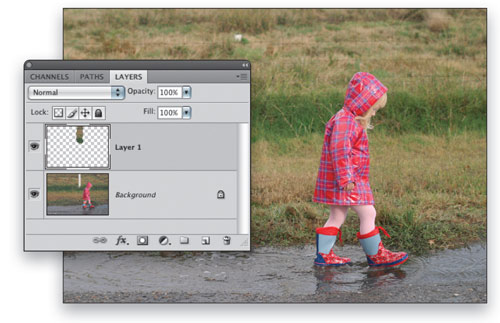
To create the cover-up layer, choose Layer>New>Layer via Copy, or use the handy shortcut Command-J (PC: Ctrl-J). Select the Move tool (V) and, holding down the Shift key again to constrain the movement horizontally, move the new cover-up layer back to the right until it covers the fence post. So far, so good. Now we need to zoom in for a closer look, adjust the positioning so that the fence wire matches up as well as possible, and touch up other areas with the Clone Stamp or Healing Brush.

5 [FINE-TUNE THE LAYER ALIGNMENT]
Double-click the Zoom tool to view the image at 100% (you can also choose View>Actual Pixels). It’s clear that the fence wire does not line up perfectly in some areas. Make the Move tool active (V), and use the Arrow keys on the keyboard to nudge the layer in 1-pixel increments until the wire mesh is better aligned.

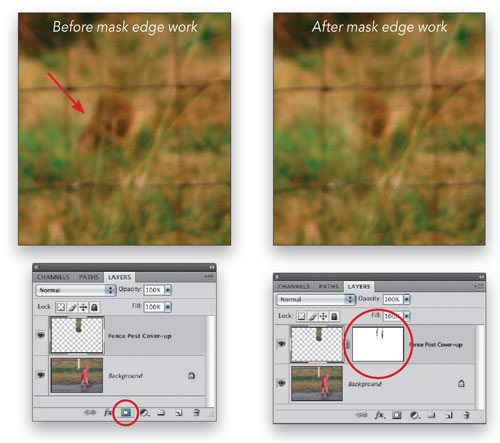
6 [ADD LAYER MASK TO REFINE EDGE]
With the cover-up layer active, click the Add Layer Mask icon at the bottom of the Layers panel (it’s the third icon from the left). Choose the Brush tool (B), press D to set the default colors, and then X to exchange them to place black in the Foreground color swatch. In the Brush Picker in the Options Bar, choose a 45-pixel, soft-edged brush. Double-check to make sure the layer mask is active. Now check for any hard, obvious edges on the cover-up layer and brush over them to add black to those areas of the layer mask and hide or soften those edges.

7 [CHECK FOR REPEATING ELEMENTS]
The cover-up layer is now working quite nicely; however, because we copied a section of the background, we now need to double-check to see if there are noticeable repeating elements. In this case, there are¬ some grass patterns at the base of the fence that are obviously the same in two places. This needs to be retouched to hide the fact that it’s the same chunk of grass. You can choose to retouch either the cover-up layer or the original place from where the data was copied. For this example, let’s retouch the cover-up layer. Click the layer thumbnail to make it active instead of the layer mask.

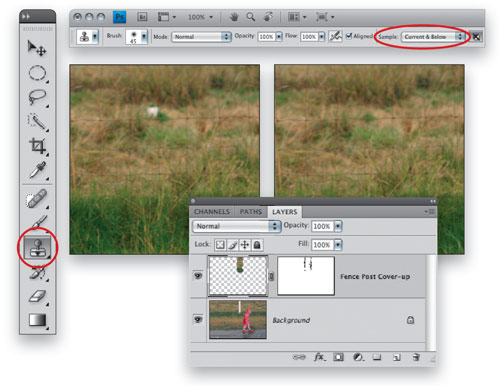
8 [RETOUCH REPEATED ELEMENTS WITH CLONE STAMP]
Choose the Clone Stamp tool (S), set the Sample drop-down menu to Current & Below in the Options Bar, and Option-click (PC: Alt-click) to sample some of the dark green grass. Now retouch the lighter yellow strands of grass to hide the fact that it’s the same image information as elsewhere in the image. In Photoshop CS4 the Clone Stamp cursor will show you a preview of the data that you’ll be stamping, which makes it very easy to correctly align the data you’re cloning with existing image information. For this photo this is not that critical due to the slightly out-of-focus background.

9 [REMOVE OTHER ELEMENTS]
As a final step you can use the Clone Stamp tool to remove the short white pipe near the upper center of the image. Keep the cover-up layer active so the retouching can be added to this layer and separate from the Background layer. Because the Sample drop-down menu is still set to Current & Below in the Options Bar, you’ll be able to clone the information from the Background layer to the cover-up layer.

10 [SHOOTING TIPS]
So the key is to look for background detail that can be copied onto cover-up layers. When photographing, if you notice something that needs to be taken out, be sure to take extra shots containing good source material that can be used for a cover-up. For wedding group shots, take a shot of the background with no one in front of it. That way you can use it as source material in case someone needs to be removed from the group (hey, it happens!)

ALL IMAGES BY SEÁN DUGGAN UNLESS OTHERWISE NOTED
Visitor Comments »
Comment by JerkJack | August 11, 2009 @ 7:07 am
Great tutorial, but what about the “patch” tool? Wouldn’t that be the tool of choice in a case like this? Or is there a specific reason it wouldn’t work as well in this case?
Comment by Udo Schmitz | August 11, 2009 @ 8:28 am
Good tuitorial for people who are experienced with this.. but cloning, vanishing point, and anything of this sort would be much more appreciated in video for the beginners.
Comment by Jimmy | August 11, 2009 @ 9:10 am
Very easy stuff. Too basic
Comment by Steve | August 11, 2009 @ 12:44 pm
Only basic if you know it… Helpful tips for the beginner.
Comment by Mike | August 11, 2009 @ 3:52 pm
Wow, some people can’t help but complain
![]()
Great stuff guys, I’m sure a lot of readers got a lot out of this so keep them coming.
Comment by Michael | August 11, 2009 @ 10:54 pm
I appreciate the step by step attention to detail. Thank you.
Comment by Julian | August 12, 2009 @ 10:36 am
[...] Check out the rest of the article Share This [...]
Pingback by Removing Elements from a Photo | Layers Magazine | August 12, 2009 @ 12:00 pm
Great information, thanks for taking the time to share!
Comment by cliff | August 12, 2009 @ 1:41 pm
yes, please keep it comming as some of us need it. Help that is. Thank you for the time it took to prepare it so clearly for the rest of us.
Comment by Kathy | August 12, 2009 @ 6:31 pm
For the person who thought I wa complaining.. I was not..
I’ve watched more tutorials than you can imagine.. lynda.com
this site
deke.com
andrew Kramers site.. (very best for after effects)
allbetsareoff.com
And the list goes onI was simply saying that based on people that I have taught.. If they are beginners.. This is not a good tutorial to read.. Better off taking the time to use the 59 dollar program to capture on screen and record it.. It would probably take less time that cutting and pasting and typing it all out to be honest with ya.. Thats all
No complainging.. Tutorials of all kinds rule..
![]()
Comment by Jimmy | August 13, 2009 @ 9:28 am
Jimmy, you complained
Comment by Jimmy | August 14, 2009 @ 7:46 pm
“…or you could have spent that extra half hour with your daughter instead of removing some ugly but irrelevant object in the background of her photo.”
Literally Laughed Out Loud.
Comment by Loren | August 14, 2009 @ 8:04 pm
Jimmy, Hate to say it but you’re still complaining even in the second reply. Foot is already firmly planted in your mouth….keep it there.
Anyway thanks to the editors for the great tutorial. You effort is much appreciated….keep them coming.
Comment by Dan | August 14, 2009 @ 8:12 pm
Here’s the thing, if you have a naturally high visual awareness then you’ll figure out a way to make something look realistic using the tools you know and trial and error. This is just one of a million ways to go about taking an object out of an image in photoshop, and the technique will never be the same because every photo is different.
dont rely on tutorials to learn how to do something, nor believe a tutorial is the proper way to do something, instead, read tutorials to expand your knowledge of photoshop as a tool, eventually, you will be able to skim through a tutorial and figure out what and how they are doing something, and decide if its even worth trying out.
Comment by poop cooper | August 14, 2009 @ 8:19 pm
I just discovered this site.
Great stuff, keep up the level of detail. Its hard to find truly comprehensive tutorials without having to watch drawn out videos (I just dont have the patience); your content is a true asset.
Thanks.
Comment by Derek | August 14, 2009 @ 10:06 pm
The title is a bit misleading. “Remove Elements From a Photo in Photoshop CS4″. The approach your using isn’t very specific to Photoshop CS4, you could do that in photoshop 4 over 14 years ago ( CS4 is version 11). How about just “Remove Elements From a Photo”
Comment by Steve | August 14, 2009 @ 10:25 pm
Fuck you Jimmy.
Comment by bonoes | August 14, 2009 @ 11:19 pm
Um…why don’t you just take some more time to plan your shots out instead of relying on photoshop. You can totally see where you copied from to make that patch
Comment by Justin | August 14, 2009 @ 11:33 pm
Excellent tutorial, Sean. Very thorough.
I’m a big advocate for doing everything nondestructively in Photoshop, so I usually use a method similar to what you described, with a cover-up layer and mask. I have a few variations that I use, though, depending on the project.
For example, once I get to Step 6, and add the layer mask to the cover-up layer, I’ll then fill the entire mask with black, so that the layer disappears. Then, I switch my brush color to white, and paint into the mask with a feathered brush, over the area that I want to conceal.
Another variation is to forego the layer mask for the cover-up layer entirely. Instead, with the marquee tool selected, I “select all” on the cover-up layer and hit delete. Then, I go to my history palette, and set the history brush source back one step, right before the deletion. Then, I paint into the blank cover-up layer with a feathered history brush.
Comment by buddhistMonkey | August 15, 2009 @ 3:30 am
I prefer this type of tutorial to the video type. In video tutorials I often find myself jumping back and forth to see things again, very awkward with most video players. With a step-by-step tutorial like this I can just scroll up and down to see something again.
And I guess I agree that “some people can’t help but complain.” After all, there was the option of just saying nothing. This guy took the time to create a nice clear, well presented tutorial.
Comment by Jay | August 15, 2009 @ 3:02 pm
Free Adobe Tutorials | Photoshop CS4 | Clone Stamp | Cover-up layers | Layers Magazine…
How To Properly Remove Elements from a Pic in Photoshop CS4 ?
Here are some key techniques for removing elements from a photograph using cover-up layers and the new live brush preview for the Clone Stamp in Photoshop CS4.
…
Trackback by www.techforum.ws | August 15, 2009 @ 4:06 pm
[...] 2 – Here’s a lesson I always teach in my photography classes – how to remove an object in photoshop. [...]
Pingback by Cool Links #54: Are We There Yet? « TEACH J: For Teachers of Journalism And Media | August 15, 2009 @ 6:00 pm
[...] Remove Elements from a Photo in Photoshop CS4 [...]
Pingback by Notable NAPP Links for August 16, 2009 | My Home Sweet Home | August 16, 2009 @ 12:00 am
Here’s an easier method:
1. Download the GIMP (free).
2. Download the Resynthesizer plugin (also free).
3. Select object to remove.
4. Select “Filters” -> “Enhance” -> “Smart remove selection”.
5. Done. If not happy, try again and/or tweak the settings, but with an image like the one in this tutorial it should basically Just Work(TM).Don’t get me wrong, it’s a nice tutorial and Photoshop is generally a pretty damn good image editor. But just every once in a while those pesky Free Software folks just manage to win hands down, and IMHO this is one of them.
![]()
Comment by Ilmari Karonen | August 17, 2009 @ 9:09 am
Great tutorial!!! I have experience using photoshop (not a lot, just a little) but every little detail is important and useful.
Thanks guys!!!
Comment by Eagletv | August 17, 2009 @ 12:40 pm
[...] Layers Magazine var infolink_pid = [...]
Pingback by Remove Elements From a Photo in Photoshop CS4 | Ethiopian News | August 17, 2009 @ 2:06 pm
[...] Remove elements from a photo in Photoshop CS4 [...]
Pingback by Links creativos para 17.08 | Eliseos.net | August 17, 2009 @ 9:42 pm
I have an even better idea – learn how to use your camera so that the shot taken doesn’t require being fixed on the computer. If you own a digital camera learn how to take photographs. Force yourself to learn – you’ll not only develop a keen eye but you won’t have to waste your time in front of Photoshop.
Comment by Matthew | August 18, 2009 @ 2:23 am
Incredible told, with characteristic simplicity.Than you a lot for a wonderful tutorial.
Comment by Dinesh | August 19, 2009 @ 7:46 am
[...] Free Adobe Tutorials | Photoshop CS4 | Clone Stamp | Cover-up layers | Layers Magazine [...]
Pingback by Daily Digest for August 20th | August 20, 2009 @ 10:04 am
You can take the best photographer in the world.. You can always improve a picture in photoshop.
If it’s already at 100% then you can make it 110%There’s no such thing as a picture you see in a magazine or picture see on television is not processed.. Even if it’s something such as a basic sharpening.
And even though I was the first to “complain” as people stated it on this thread, even though I was giving a suggestion for the beginners…. I do think the idea was good. The shot was obviously used intentionally to explain how this tutorial is done
Comment by Jimmy | August 20, 2009 @ 12:33 pm
Thanks! I found this useful.
Comment by Lisa | August 20, 2009 @ 2:29 pm
[...] great examples that have gone popular on social media include How to Ruggedize Your Own Gadgets, How To Properly Remove Elements from a Pic in Photoshop CS4, How to Crack an Egg with One Hand and How to use math to choose a [...]
Pingback by 3 Ways to Use Specificity to Reach the Digg Front Page | August 24, 2009 @ 1:08 am
Its really helpful Thanks!
Comment by matt | August 25, 2009 @ 9:41 am
punctilious post. simply one unimportant where I quarrel with it. I am emailing you in detail.
Comment by Bankruptcy | August 25, 2009 @ 11:43 am
[...] Remove Elements from a photo in photoshop Disappearing Act [...]
Pingback by Programming Genius » Blog Archive » Remove Elements from a photo in photoshop | August 27, 2009 @ 9:52 pm
Very confusing, anyway to make this simple for us non photoshop geeks?
Comment by Art | August 29, 2009 @ 10:36 am
[...] Free Adobe Tutorials | Photoshop CS4 | Clone Stamp [...]
Pingback by Free Photoshop Photography Tutorials | September 9, 2009 @ 9:44 am
Very useful! Great site!
Comment by Dan | September 9, 2009 @ 7:14 pm
“Make this simple for us non photoshop geeks”? Call me crazy, but this is a Photoshop tutorial for Photoshop users.
Comment by Gray | September 22, 2009 @ 3:48 am
hi
how r u
bro plz help me plz
how to my pic out of focus
unblur,,,,
i m waiting ur reply;.. plz help me
Comment by SABOOR | October 25, 2009 @ 12:28 pm
Thanks! Keep it coming
Comment by Nila | November 9, 2009 @ 7:20 am
I am having an issue with PS4 that has never happened in all the years I have used PS. When I try to use the clone brush I sample an area but when I go to apply the clone the images goes completely black. It doesn’t do it on any other tool but the pen paths tool. I have reinstalled twice with no luck. Is there something I am missing. This only just started on my new creative suite purchase, it worked fine this morning. Thanks to any and all for the help.
Comment by jonathan Ross | November 12, 2009 @ 7:29 pm
Leave us a comment

- Dragging an Object Between Documents
- TV Scanline Effect
- Trick to the Glossy Effect
- 3D Text
- Changing Type on a Path


Photoshop
Illustrator
Indesign
Dreamweaver
Fireworks
Premiere
Flash
After Effects
Lightroom
Acrobat


