Swingin’ Retro Look in Adobe Illustrator

There definitely seems to be a resurgence of retro design techniques all over the place. It can be seen everywhere. Perhaps the appeal is the simplicity of the technique. Adobe Illustrator has just the tools to achieve this look quickly and easily. Here we’re going to create a retro look using custom brushes and symbols.

STEP 1 Begin with a Long, Thin Rectangle
Select the Rectangle tool (M) from the Toolbox. Click once on the artboard and in the Rectangle dialog, enter 5″ for Width and .25″ for Height. Then open the Color panel (Window>Color) and fill the shape with any color you like (we used R:251, G:176, B:59).

STEP 2 Duplicate and Vary the Size of the Object
Hold down the Option (PC: Alt) key then click on the object with the Selection tool (V) and drag down to create a duplicate of the object. Drag the duplicate down to where there’s a small space between the two shapes. Repeat this several times, varying the space in between. Then vary the height of each object by selecting the object with the Selection tool, grabbing the middle handle on either the top or bottom, and dragging up or down slightly.

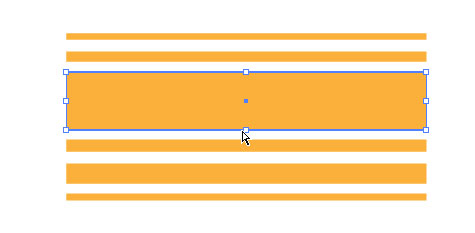
STEP 3 Fill the Spaces with White
We need to make sure that the areas between the shapes are filled with white. Right now nothing’s there, so it’s transparent. Select all the shapes with the Selection tool and make note of the overall measurement of the shapes by looking in the Info panel (Window>Info). Our overall object is 5×2.319″. Select the Rectangle tool and click once in the artboard. Enter the dimensions that you noted from the other shapes and click OK. Then in the Control panel, fill the box with white and set the Stroke to None.

STEP 4 Set the White Box in Place
Drag this new white box on top of the other boxes until they’re no longer visible. Then go under the Object menu and select Arrange>Send to Back. While there’s no obvious change, the transparent gaps now have a white fill.

STEP 5 Create a Brush
Press Command-A (PC: Ctrl-A) to select all the shapes or, if you have multiple objects in your artboard, click-and-drag over the entire shape area with the Selection tool. Open the Brushes panel (Window>Brushes) and drag the graphic into the panel. Choose New Art Brush from the New Brush dialog that appears. Make sure the Direction is set lengthwise along the shape, then check the Proportional option in the Size section and click OK. Now that you have this graphic as a brush, you can delete it from the artboard.

STEP 6 Create Background
Select the Rectangle tool and click on the artboard. In the Rectangle dialog, enter 15″ for Width and 8″ for Height. Fill the rectangle with R:247, G:147, B:30.

STEP 7 Add Gradient Fill
Open the Appearance panel and drag the Fill item onto the Duplicate Selected Item icon at the bottom of the panel. Open the Swatches panel and select the black-and-white radial gradient (Radial Gradient 1). Then go to the Transparency panel and change the blend mode to Overlay.

STEP 8 Create a New Shape
Now select the Ellipse tool (L) and click on the artboard. In the Ellipse dialog, enter 1.5″ inches for Width and Height. Then open the Brushes panel and click on the brush we created in Step 5. This will wrap the stripe effect around the circle you just created.

STEP 9 Make a Symbol
Now open the Symbols panel and drag this object into the panel. In the Symbol Options dialog, select Graphic and click OK. This will turn the original art into a symbol instance. Since we’re going to create a new graphic with the Symbol Sprayer tool, select this instance on the artboard and delete it.

STEP 10 Symbol Sprayer
Select the Symbol Sprayer tool (Shift-S) and make sure that the symbol you created is still selected. Then just randomly click in the center area of the background graphic. Note: The longer you hold down the mouse button the more Symbol instances are laid down. Now select the Symbol Sizer tool that’s grouped with the Symbol Sprayer tool in the Toolbox. Click on the symbols to increase the size of each instance. Hold down the Option (PC: Alt) key to decrease the size of the symbols. Finally, select the Symbol Screener tool to vary the opacity of the objects as you click on them.

STEP 11 Create Line Element
Select the Line Segment tool (\) from the Toolbox and click to the right of the background. In the Line Segment Tool Options dialog, enter 15″ for Length and set the Angle to 0°. Then set the Stroke to white in the Control panel. Go to the Effect menu and choose Distort & Transform>Transform. In the Move section of the Transform Effect dialog, enter –0.25″ for Vertical, set the number of Copies to 12, and click OK. Now choose the Selection tool and move the lines onto the background.

STEP 12 Distort the Lines
Next, go to the Object menu and choose Envelope Distort>Make with Mesh. Enter 1 for Rows and Columns, and click OK. Choose the Direct Selection tool (A), select the top-right corner handle, and drag it just beneath the bottom-right corner. As you can see, the lines distort the bend of the shape. Feel free to select other corner handles and drag them apart to change the distortion. Position the overall object so that lines run off either side. Top it off by adding a swinging silhouette party girl and it’s celebration time!

Visitor Comments »


good one than you .


Comment by said | April 23, 2008 @ 11:50 am


I think is great and very easy to do!
Thanks!


Comment by Maria Miller | April 23, 2008 @ 1:19 pm


Watch your document’s colour mode!

The Overlay mode with a grey gradient on top of a coloured fill in the appearence panel just works in RGB but doesn’t in CMYK.


Comment by René | April 23, 2008 @ 2:37 pm


thank u for the tip. nice tutorial:) if i had to make so many circles i`d probably make them with the ellipse tool, but this way is much much easier.


Comment by edith | April 23, 2008 @ 4:20 pm


GOOD! but i like to know how to get a striped line flowing seemlessly into a circle…or imagine a straight striped line flowing into an S shape i tried envelop distort mesh..and it’s just too wobbly..any ideas?


Comment by Mark | April 25, 2008 @ 9:50 am


yea that was really easy i do that very often and take me to long to do it but whit thisis so much easyer


Comment by alberto | April 25, 2008 @ 5:43 pm


@Mark: Create an Art Brush from the stripes using the Brushes panel. Then apply to your circle or S shaped stroke.


Comment by Dennis | April 26, 2008 @ 7:26 pm


I’m a total beginner and your tutorial has shown me so many possibilities. Thanks.


Comment by marakas | April 30, 2008 @ 9:49 pm


good


Comment by mazen | May 2, 2008 @ 10:56 am


im trying to learn illustrator and for some reason it doesnt seem to do what you have told me! so annoying thanks any way


Comment by jonny | May 8, 2008 @ 6:26 am


Why not use the blend tool in STEP 11: draw two lines between which you’d like the distortion and use blend with steps in between to create the “distorted” lines in the background?

Just a thought.


Comment by joan | May 8, 2008 @ 12:05 pm


Argh! I can’t seem to create the gradient properly. When I apply the multiply to the b/w fill, nothing happens. Any thoughts on what I’m missing?? I can make the gradient with a yellow and orange swatch, but it seems that this is an important step that would come in handy another time.

Thanks for this tutorial. It’s got lots of great re-usable elements!


Comment by Shari | May 9, 2008 @ 10:30 am


Shari,

As Rene mentioned, make sure your document is in RGB mode- File>Document Colour Mode>RGB colour.


Comment by Joe | May 9, 2008 @ 1:32 pm


GOOD


Comment by omprakash | May 13, 2008 @ 12:29 am


My Illustrator CS3 must be defective. My horizontal lines in Step 12, Envelope Distort -> Make with Mesh, Direct Selection Tool (A) moves all lines as a block and does not distort the shape of the lines at all.


Comment by John | May 24, 2008 @ 4:52 pm


Make with mesh does not work. Very frustrating and disappointing tutorial


Comment by R M | May 26, 2008 @ 9:55 pm


nice..awaiting more from u


Comment by sajan | June 8, 2008 @ 8:32 am


I had the same problem with the distort > make with mesh, with the direct selection tool just moving the whole block of lines… but if you click on one on the anchor points it directly selects it then allowing you to create the warp.

Great tutorial!!


Comment by Heather | June 9, 2008 @ 9:12 am


I can’t get the concentric circle bit to work. When I apply the brush to the ellipse I get this nasty white and orange line through it. :(


Comment by Melody | June 10, 2008 @ 6:29 pm


If you’re on CS3 you should have no problem at all with this. IF not, then it may work differently or not at all. Thanks for the nice tutorial; it was disappointing at all.


Comment by chris T | June 18, 2008 @ 11:07 am


Why I cannot get the orange gradient even after change to RGB


Comment by Sumfata | June 22, 2008 @ 7:24 am


It woked out with me. and i like the effects very muck.. keep on the good work…..


Comment by Ryan | July 2, 2008 @ 9:25 am


Very Cool


Comment by Jose | July 2, 2008 @ 12:23 pm


nice! thanks : 0


Comment by chuck | July 8, 2008 @ 2:51 am


cool … in the final step u can use white anchor to move free form

great …..I can do it ….

million thanks teacher


Comment by pap | July 22, 2008 @ 2:47 am


Nice work and well-explained!


Comment by Cos | July 24, 2008 @ 8:23 pm


That’s a really cool affect


Comment by Rudy | July 24, 2008 @ 11:05 pm


When I do the last step, and drag the top right corner under the bottom right corner, it creates a giant white block. Any tips on what I’m doing wrong?


Comment by Sarah | July 27, 2008 @ 1:08 am


Hi,Thanks a lot for this.It’s very simple yet innovative.GOD Bless you.Take care.


Comment by Lucky | August 1, 2008 @ 8:47 am


awesome tutorial! the only thing i couldnt do, was the gradient part, every time i put overlay a yellowe colour appeared and it was not gradient :( any suggestions?


Comment by valeria | August 13, 2008 @ 1:54 pm


Ok so I’m a total beginner. How do you get the party girl silhouette into illustrator?


Comment by KRenea | August 28, 2008 @ 1:24 pm


I love this tutorial… I’ve been looking for a good retro tutorial for some time. If you don’t mind I am going to use it in my classroom and show them your work.
Thanks


Comment by cynthia | September 7, 2008 @ 10:41 pm


is nice..
and very simple


Comment by MorRock's | September 14, 2008 @ 11:33 pm


is nice..
and very simple


Comment by MorRock's | September 14, 2008 @ 11:33 pm


great!


Comment by noata | September 26, 2008 @ 7:23 am


I feel so empowered!!!


Comment by SensualGeekNY | October 3, 2008 @ 7:45 pm


I feel so empowered and I love it!!!


Comment by SensualGeekNY | October 3, 2008 @ 7:46 pm


yeah how do u get the silouhette chick in the background? is it a photoshoped image


Comment by joe | October 20, 2008 @ 1:56 am


thank you for this tutorial.. im just
a beginner and it help me a lot..
thank you..

chuck-gwapo..


Comment by chuck-spcba | October 22, 2008 @ 10:13 am


good tut.. awesome!!!
when i try the circle in another document it does not come out…
i did save it..so how can i keep it in the symbols panel for other documents?


Comment by Will | October 24, 2008 @ 12:59 am


I’m stuck on step 7. I followed the stop and my rectangle color is changing to yellow not the gradient (orange and yellow) as shown in the tutorial. help


Comment by Shay | October 24, 2008 @ 9:42 pm


nice artwork.best


Comment by Saranga Asith | November 6, 2008 @ 7:49 am


love it and hate it


Comment by didibibi | November 11, 2008 @ 2:38 pm


I love this tutorial…
NicE artwork.


Comment by Sumithra Wijayantha Thilakarathna | December 19, 2008 @ 1:29 am


hey, all. step 12 – bending the lines – just add a double click to the top right anchor point after selecting the Direct Selection Tool (A). -k


Comment by Keith | December 26, 2008 @ 12:44 am


[...] Swingin’ Retro Look in Adobe Illustrator [...]


Pingback by Websites for Learning Adobe Illustrator - Geek’s Pond | December 31, 2008 @ 6:42 am


I’m having problems using the radial gradient swatch along with the overlay transparency effect… Instead of getting it as the example shows, a yellow color appears out of the blue, and I just can’t make it! Is it a CS3 bug or something?
Nice work with the walkthrough though.
Thank you!


Comment by Allan | January 30, 2009 @ 6:24 pm


It would have been a great tutorial if it was possible to get the swinging silhouette party girl into. But you didnt tell us how or where to get it – to bad!


Comment by charlotte | February 20, 2009 @ 8:41 am


hello, i’m not speak a very well english, but for the problem of the gigant stroke, its because you have tu chage de fill color to transparent, and the stroke to white. i’m sorry for my bad english, i’m from argentina..
very nice work!
thank you


Comment by Martin | March 9, 2009 @ 6:15 pm


This is so cool! I’m just starting out on illustrator and this has been really easy to follow! Looks like I’m a professional already! I’m just having a small problem, when I try and screen the symbol instance it happens so quickly that it almost disappears, I don’t have much control over the transparency, any tips?


Comment by Hayley from Nz | May 13, 2009 @ 6:47 am


[...] Gitmek için tıklayın   Posted in Illustrator | Tags: adobe, adobe illustrator tutorials, ders, design, [...]


Pingback by » Retro Vektor Yapılışı - Yeni Key Ödemeleri ve DiÄŸer Konular | June 7, 2009 @ 6:44 pm


[...] Things You Didn’t Know Adobe Illustrator Could Do Monster Character in Illustrator Create a Retro Poster in Illustrator Create an Atmospheric Backdrop Make Lovely 3D Looking Graphs Cool Vector Flower How [...]


Pingback by Yepyeni Adobe Ýllustrator Dersi 19 Adet - Siirtliler-Board | Siirt Gençlik ve Biliþim Derneði - SÝRGEB | June 19, 2009 @ 3:36 am


*****TIP*****
make sure your squares dont have a stroke on them otherwise you will have a white line going across the circle!


Comment by Pat | September 6, 2009 @ 5:52 pm

Leave us a comment

Comments RSS | TrackBack URI

Back to Top


Advertisement
Creative Suite Tutorials
  1. Photoshop Photoshop
  2. Illustrator Illustrator
  3. Indesign Indesign
  4. Dreamweaver Dreamweaver
  5. Fireworks Fireworks
  6. Premiere Premiere
  7. Flash Flash
  8. After Effects After Effects
  9. Lightroom Lightroom
  10. Acrobat Acrobat

Get the latest tips, tricks and news delivered straight to your inbox.

From our Partners
Subscribe to Layers Magazine


  • Back to the Layers Magazine Homepage
  • Creative Suite Tutorials
  • Layers Magazine
  • Reviews on top products
  • Layers Magazine Reader Forums
  • Subscribe to Layers Magazine