
Shape Layers in After Effects CS3
From the large selection of new features that Adobe has infused into After Effects CS3, shape layers are (in my humble opinion) the black sheep of the family – a feature seemingly taken from Photoshop to keep it in the family? Perhaps. Is it useful? Absolutely! But dig under the hood and, using some very interesting techniques, a whole army of moving, synchronized shapes can be created from something that seemed so harmless to begin with. This is something the manuals won’t show you.
The specs for this project are a square-pixel composition of 800×450 pixels (16:9 aspect but intended for Flash video), 29.97 frames per second, 5 seconds long, with a background color of white, and named “Army Comp”.
STEP 1 Set up New Shape Layer Group
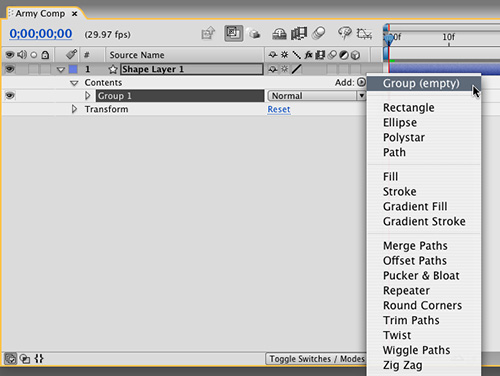
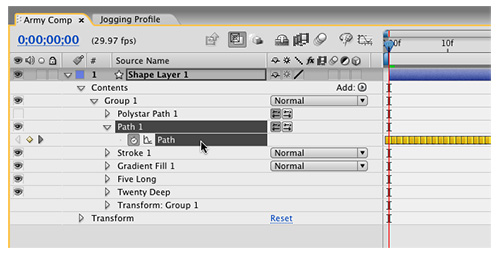
Let’s start out by taking a look at how to successfully build shape layers. You can use the shape tools in the Toolbox but I find it better to create them using the menus because it’s easier to organize all the “extras” we’ll need. First, go to Layer>New>Shape Layer. Twirl down the Shape Layer 1 that appears in the Timeline, then twirl down Contents—it should be empty. Go to the Add menu under the Switches column, and choose Group (empty).
STEP 2 Add Path; Fill with Gradient; Edit Gradient
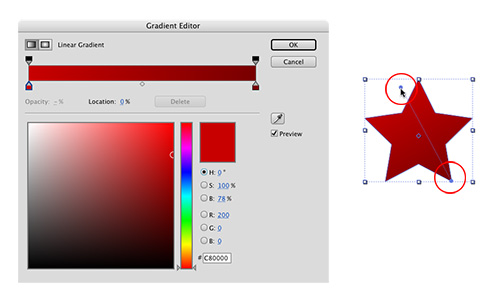
Go back to Add and choose Polystar. A new shape appears in the Group and you’ll also see a star path in the Comp window—but no color. Go back to Add, choose Gradient Fill, then click the gradient swatch next to Fill in the Toolbox to access the Gradient Editor. Make the color changes you desire, then click OK. Using the Selection tool (V), you can drag the gradient points around inside the shape to define the direction and length of the gradient fill. Good so far.
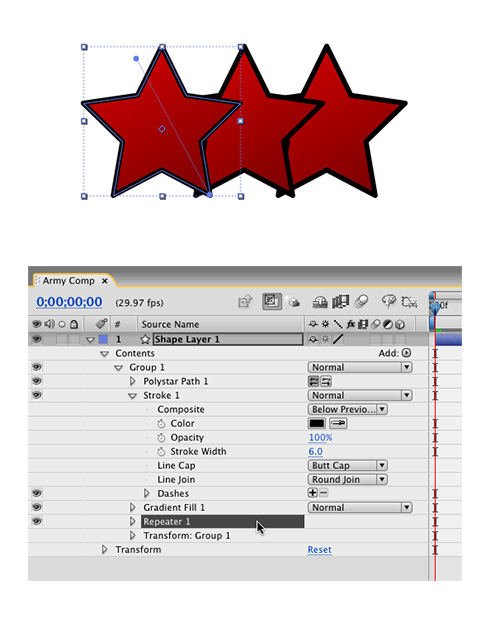
STEP 3 Add & Edit Stroke; Add Repeater 1
For good measure, go to Add>Stroke, twirl down Stroke 1, and set the Color to black, the Stroke Width to 6 pt, and the Line Join to Round Join. (Just as an aside here: The stroke was created above the fill, which means it can also be dragged down below the fill.) So, we have our first (and only master) shape. How do we get more—lots more? Making sure either Stroke 1 or Group 1 is still selected, go to Add>Repeater. Suddenly, we have three stars!
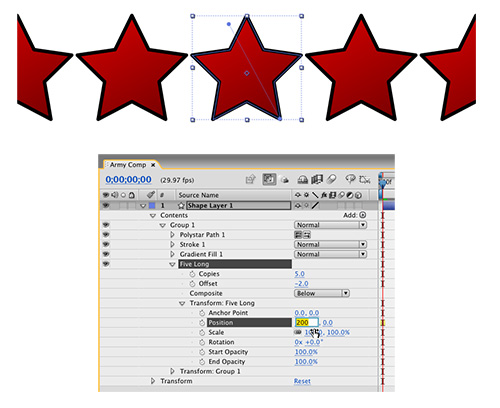
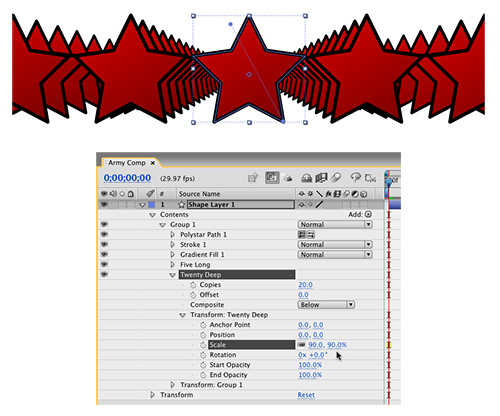
STEP 4 Adjust Repeater 1
Twirl up the Stroke, and select the Repeater. Press Return to rename it and call it “Five Long,” as we’ll be adding another Repeater later, and this makes it much easier to identify. Twirl down its options and change Copies to 5 and Offset to –2. Now twirl down Transform: Five Long, and change the Position value to 200,0 to add more space between the duplicates. Now that you see how easy it is to make extra shapes, we’ll use a similar technique to add hundreds more.
STEP 5 Add Repeater 2; Adjust Settings
Twirl up all of Five Long, then go to Add>Repeater again. Press Return to rename it, calling this one “Twenty Deep.” You can imagine what’s coming up. Twirl down Twenty Deep, and change Copies to 20 but leave Offset at 0. Twirl down Transform: Twenty Deep, and change Position to 0,0, then set the Scale to 90%. How cool is that? Each duplicate (from the first set of duplicates) now gets progressively smaller into the distance—and all this from one original star-shaped path.
STEP 6 Use Custom Shape
Stars are okay, but using a custom shape is much more desirable, and very easy. Twirl the Repeater(s) up, select Group 1, then go to Add>Path. Twirl it down and you’ll see the word “Path” (note that it has a keyframe stopwatch). You can use the tools to create your own shape here but if you have an Illustrator shape ready, simply copy its path (in AI) into memory. Back in After Effects, turn off the visibility icon for Polystar Path 1, then click the word “Path” under Path 1, and simply paste—very cool indeed!
STEP 7 Import Green Screen Footage
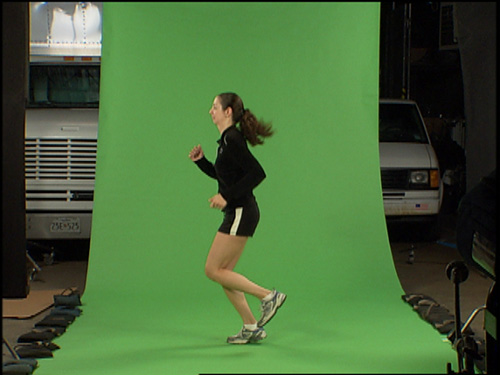
Potentially, barring a few keyframes here and there, this is where your exploration of shape layers might fizzle out. Static shapes are cool if you animate their repeater values, but how about using static repetitions with animated shapes? Perhaps, an outline of someone running? Call the Energi hotline! Locate and import a piece of footage, such as someone walking or running against a green screen background, then drag the clip onto the Create a New Composition icon at the bottom of the Project panel.
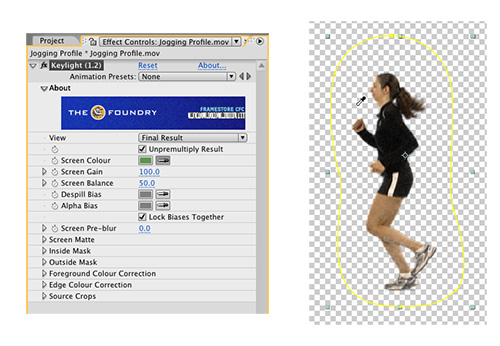
STEP 8 Garbage Matte; Apply Keylight
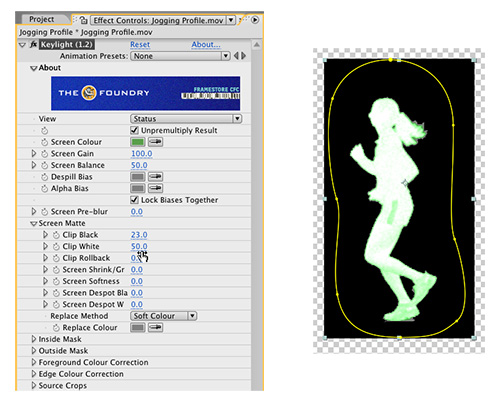
In this case, the footage has too much “garbage” visible beyond the green screen, so use the Pen tool to draw a mask area around the person to “matte” it—but be sure not to cut off any parts of them as they move around—always scrub the Timeline and double-check. When done, go back to the Selection tool, then go to Effect>Keying>Keylight. In the Effect Controls Panel (ECP), click the eyedropper next to Screen Colour (yes, English spelling!), and click on the green background in the footage.
STEP 9 Show Keylight Status
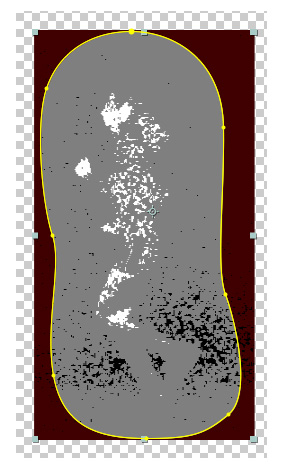
Initially, it might look like the key is good; but it almost always isn’t—and we want ours to be sharp and strong for the vector process coming up. Keylight has some great options to really get the best result, so in the ECP, go to the View pop-up menu and choose Status. This shows a simple analysis of the key in three areas: white is opaque, black is transparent, and gray is any transparency between. In this case, you can see that almost the entire matte is transparent, and not defined.
STEP 10 Adjust Keylight; Check Matte
Twirl down the Screen Matte options, and slowly start to drag (increase) the Clip Black value until you see the outside, original green area become black and reveal the person. Then, decrease the Clip White value until the person’s outline becomes more opaque. When done, you can go to View and choose Screen Matte to see the results, but be sure to choose Final Result in the View pop-up menu when finished.
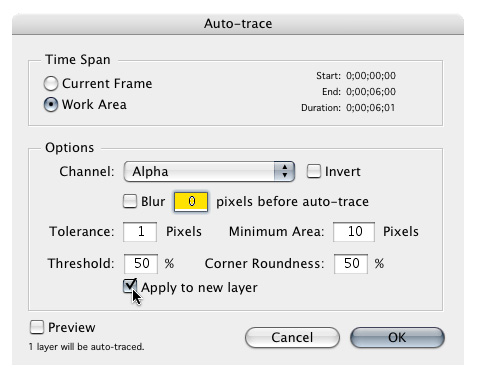
STEP 11 Pre-Comp Keying; Auto-trace
We now want After Effects to create a vector-based animated trace of this alpha channel we’ve created, so first select the movie clip layer and go to Layer>Pre-Compose. Check Move All Attributes Into The New Composition and click OK. Now go to Layer>Auto-trace and in the Auto-trace dialog, be sure to select Work Area, and ensure that Alpha is visible in the Channel pop-up menu. Finally, select Apply to New Layer and click OK to start the Auto-trace procedure.
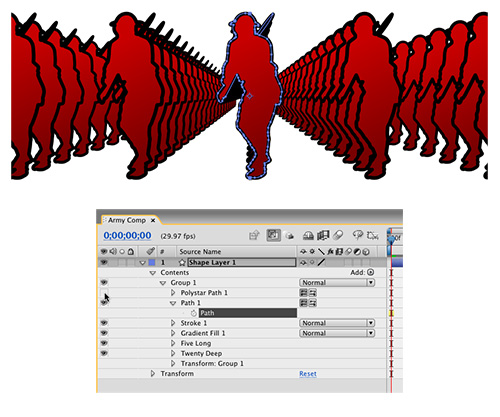
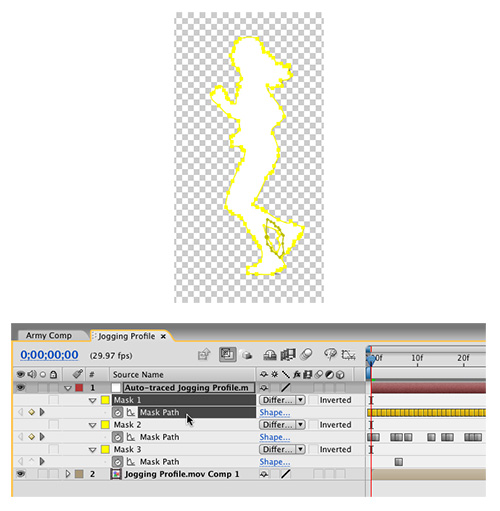
STEP 12 Reveal and Copy Mask 1
When it’s finished, you’ll see a new Solid in your composition, with a many-pointed path around the outside. Select the solid and scrub the Timeline, and you can see that an animated mask has been created—perfect! Press M to reveal all the masks and you’ll see there’s more than one—any compound shapes have also been traced; however, Mask 1 (the outer shape with the most keyframes) is the one we want. Click on the words “Mask Path” below Mask 1 to select all the keyframes, and copy them (Command-C [PC: Ctrl-C]).
STEP 13 Paste Mask Keyframes
Here comes the cool part! Switch back to the main Army Comp we started with and make sure you can see the Shape Layer options. Ensure that the Polystar Path 1 item is still turned off (you could even delete it), then twirl down Path 1 again, and click on the word “Path” just like we did in Step 6. Now, press Command-V (PC: Ctrl-V) to paste the animated mask keyframes into the path—and you now have 100 completely animated shape layer outlines!
STEP 14 Final Tweaks
From here, you can make various adjustments to the shape layer, the Repeaters, and the values to achieve many different effects. Try playing with the Anchor Point, Position, Scale, and Rotation settings within either (or both) of the Repeaters, and feel free to add keyframes to those to change them over time.
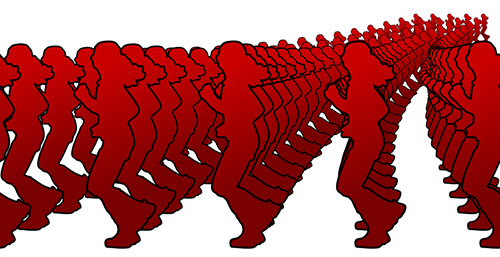
The result here is incredible: the effect of 100+ 3D layers, arranged in perfect alignment and all moving at the same time—something that would have been nigh-on impossible before. Enjoy!
