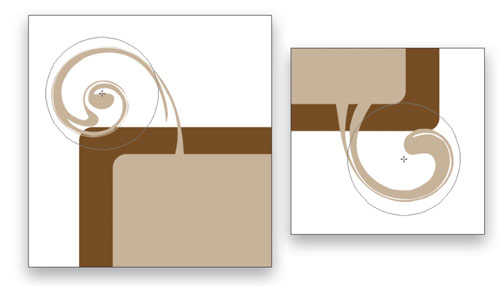
Swirly Border Design in Illustrator CS4
A really cool, swirly border design effect
I couldn’t come up with a super-cool or classy name for this effect, so I just called it what it is: a really cool, swirly border design effect. These swirlys and flourishes have become quite popular lately and you’ve probably seen different ways of creating them. We’re going to show you a way that’s not only easy but also fun. Do enjoy!
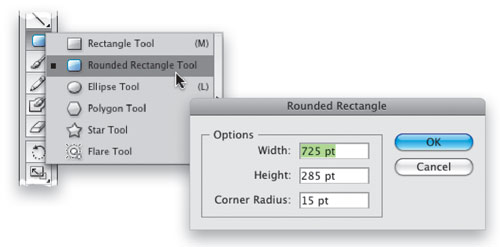
1 [CREATE A ROUNDED RECTANGLE]
Choose File>New, select Basic RGB from the New Document Profile pop-up menu, and click OK. Click-and-hold on the Rectangle tool in the Toolbox, select the Rounded Rectangle tool from the menu, and click once on the artboard. A dialog will open where you can manually enter the dimensions for your rounded rectangle. Enter a Width of 725 pt, a Height of 285 pt, and set the Corner Radius to 15 pt. Click OK.
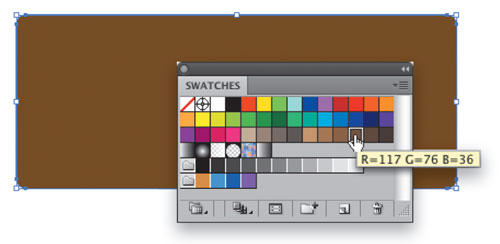
2 [APPLY FILL & STROKE TO SHAPE]
With the shape created, we need to change the color. Open the Swatches panel (Window>Swatches) and choose the brown swatch labeled R=117 G=76 B=36 for the Fill color of the shape. In the Control panel, set the Stroke color to none.
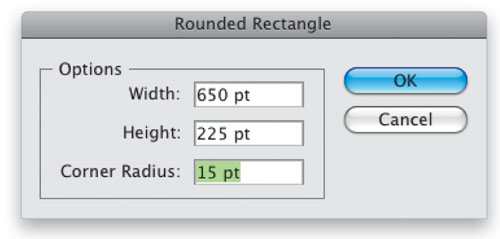
3 [CREATE SMALLER ROUNDED RECTANGLE]
With the Rounded Rectangle tool, click on the artboard once more. This time set the Width to 650 pt, the Height to 225 pt, and keep the Corner Radius at 15. Click OK. This will create a similar shape that’s a bit smaller than the first.
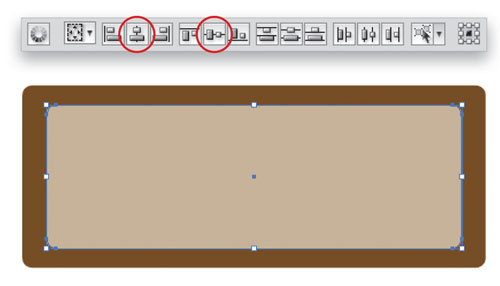
4 [APPLY FILL TO NEW SHAPE; ALIGN SHAPES]
In the Swatches panel, choose the tan swatch labeled R=199 G=178 B=153 for the Fill color of this shape. Set the Stroke color to none. Switch to the Selection tool (V) and select both shapes. Use the alignment icons in the Control panel to center the shapes: Horizontal Align Center and then Vertical Align Center.
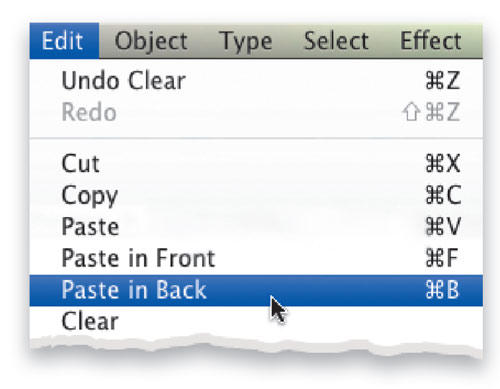
5 [COPY SMALLER RECTANGLE; PASTE IN BACK]
Press Shift-Command-A to deselect the shapes, and then use the Selection tool to select just the front smaller rectangle. Choose Edit>Copy to copy this shape to the Clipboard. Now choose Edit>Paste in Back to place the duplicate one level behind the smaller shape but in front of the larger shape.
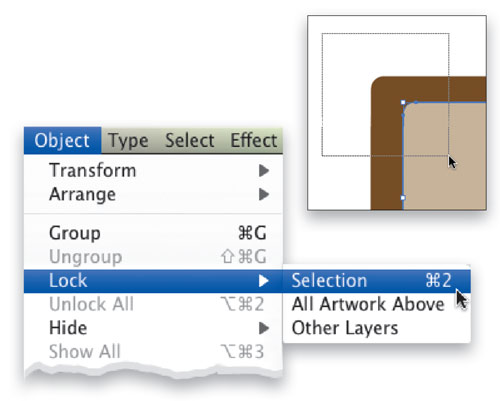
6 [SELECT FIRST TWO SHAPES AND LOCK]
While this new shape is still selected, hold down the Shift key and drag a selection from outside the shapes into all of the shapes. This will select the two other shapes and deselect the one inner shape. Then go under the Object menu, under Lock, and choose Selection. This will lock these shapes in place so we don’t change or move them accidentally.
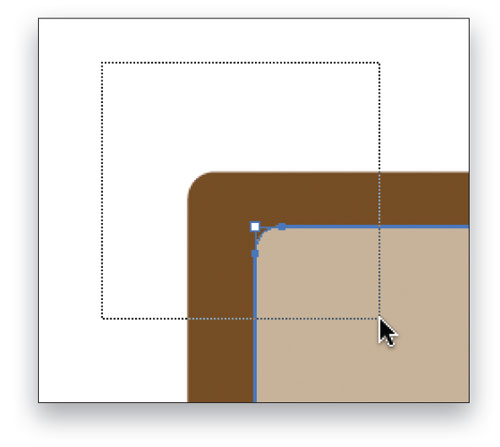
7 [SELECT CENTER SHAPE]
Now drag over the shapes once more. You should only be able to select the inner shape that’s in between the locked shapes. You can test this by dragging the object to the side just a bit to make sure the other shapes are locked. Simply press Command-Z (PC: Ctrl-Z) to undo the move.
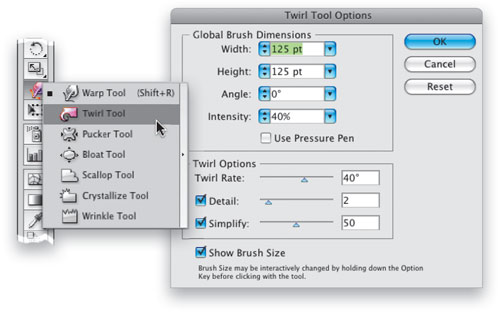
8 [SET OPTIONS FOR TWIRL TOOL]
In the Toolbox, click-and-hold on the Warp tool and select the Twirl tool from the menu. Double-click this tool in the Toolbox to open the Twirl Tool Options dialog. Here you can change the brush size and intensity, among other things. Change the Intensity to 40%. For the brush size, enter a starting value of 125 pt for both the Width and Height. Click OK.
9 [TWIRL THE CENTER SHAPE]
This next step can be a bit tricky and it may take a few tries. It did for me. Anyway, start at the upper-left corner and position the cursor so it’s about two-thirds over the shape. Then click-and-drag the Twirl tool up and to the left. The twirl will start the moment you click and will change as you drag. Try this a few times to get a feel for it. As I said, it may take some practice.
10 [CREATE RANDOM TWIRLS AROUND THE SHAPE]
You’ll notice that the twirl direction is counter-clockwise by default. To reverse the direction, simply click to start the twirl and then immediately hold down the Option key (PC: Alt key). Continue to randomly twirl different areas around the shape, varying the directions as you go. You can also vary the size of the brush by pressing-and-holding the Option key (PC: Alt key) and clicking-and-dragging. Add the Shift key to maintain the brush’s proportions.

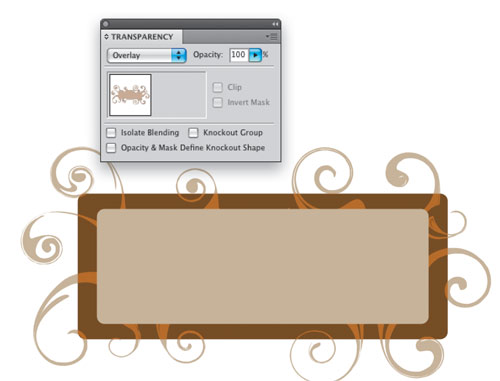
11 [CHANGE TO OVERLAY; ADD DROP SHADOW]
Select the swirly object, and then open the Transparency panel (Window>Transparency). Change this object’s blend mode from Normal to Overlay. As an optional step, go under the Effect menu, under Illustrator Effects, and choose Stylize>Drop Shadow. Depending on the shape and size of your swirls, the shadow settings will vary.
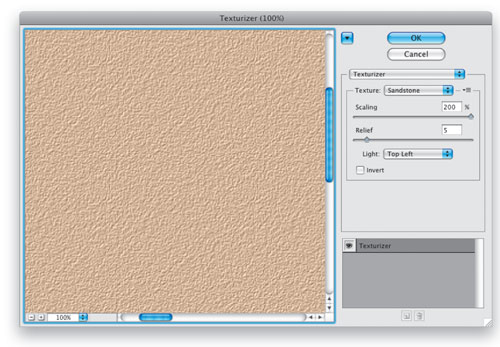
12 [ADD TEXTURE TO FRONT SHAPE]
Go under the Object menu and select Unlock All. Select the front shape. Go under the Effect menu, under Photoshop Effects, and choose Texture>Texturizer. Select Sandstone for the Texture drop-down menu, set the Scaling to 200%, Relief to 5, Light position to the Top Left, and click OK. All that’s left is to add text or whatever elements you would like inside your new really cool, swirly border design.
Final Result