’Toon Your Video in Adobe CS3 Production Premium

Sure, clients want it…that “cartoon look.” But let’s face it; good animation is hard to come by. Unless you have a gaggle of animators locked in your closet, you’ll need to get creative. Sure, you could break out the pencil and paper (or maybe even try shadow puppets), but we’re here to offer you a different solution. By harnessing the power of Adobe CS3 Production Premium, you can convert video frames into vector art into film-resolution movie files. Curious? It’s all possible with the power of the Production Premium. Read on.
(this article was co-authored by Marcus Geduld)
STEP 1 Shoot Video with Good Contrast Levels
To create the cartoon look in this tutorial, you’ll need some video. Be sure your video is properly exposed and try to get a high level of contrast between the subject and background. You’ll want even lighting without a lot of shadows and your subject to be clearly recognizable.
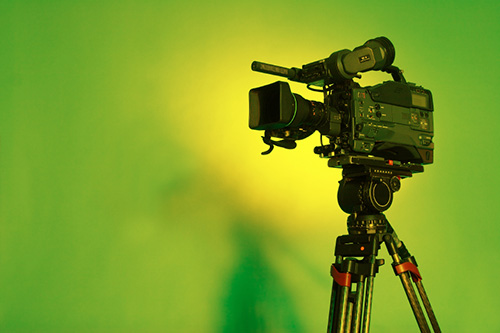
ISTOCKPHOTO/JOZEF_B
STEP 2 Capture Video Clip with Premiere Pro
You’ll need to get the video into the Creative Suite to work with it. Because much of the work is going to happen in After Effects, we’ll start there. After you’ve launched After Effects and saved your project, you can jump to Adobe Premiere Pro to capture video. With Adobe Creative Suite 3 Production Premium, you can launch Premiere Pro from inside After Effects by choosing File>Import>Capture in Adobe Premiere Pro. This can be used to capture footage for your After Effects project. After capturing the video, it will move back into your After Effects project.

CREDIT: RHED PIXEL/LYNDA.COM
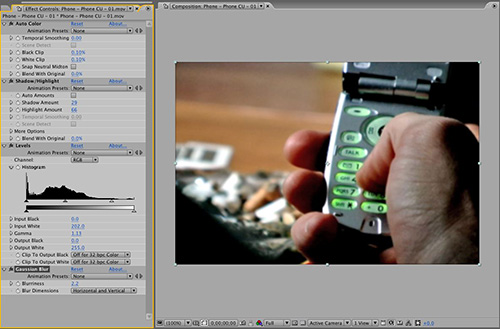
STEP 3 Color Correct in After Effects
For best results, you’ll want to enhance the contrast between the subject and the background. After adding your shot to a composition, be sure to experiment with effects. You’ll want to harness Effect>Color Correction adjustments such as Levels, Color Balance, and Shadow/Highlight. If your video is flickering with different color levels, check out the Color Stabilizer effect. If these effects are new to you, they closely match their Photoshop counterparts. You can also look them up in the online Help menu. It’s not a bad idea to apply a slight Gaussian Blur filter (Effect>Blur & Sharpen) to soften the details in the image.
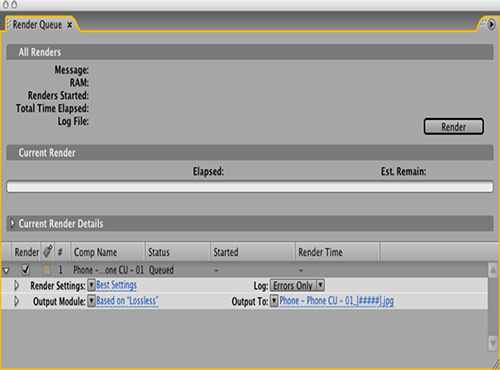
STEP 4 Add to Render Queue
Once your shot is prepped, you’ll need to render and export. What’s needed here is a processed image sequence that can be fed into Adobe Bridge. Choose Composition>Add to Render Queue. In the Render Queue panel, leave Render Settings set to Best Settings. Click on the word “Lossless” to the right of the Output Module to open the Output Module Settings dialog. Change Format to a JPEG Sequence. Make sure Video Output is enabled and remember to render RGB Channels at a Depth of Millions of Colors. Don’t click OK yet.
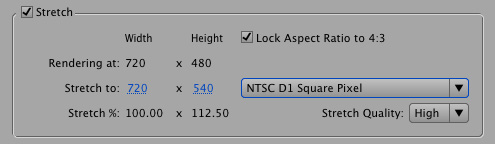
STEP 5 Convert Nonsquare Pixels to Square
Most video clips use nonsquare pixels. These work great in a video environment, but not so well in Adobe Illustrator, which is on our itinerary for this trip. Fortunately, the After Effects Render Queue can compensate. Check the box next to Stretch then pick a square pixel preset from the Stretch To menu (e.g., if working with widescreen footage, choose NTSC D1 Widescreen Square Pixel). It’s better to do the resize in After Effects at the time of export—just be sure the Stretch Quality is set to High and click OK. Pick a destination in the Output To area (be sure to specify a folder), and click Render.
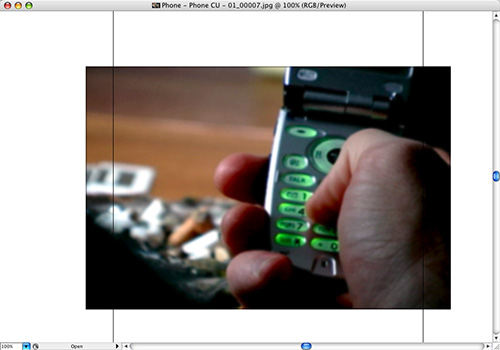
STEP 6 Open One Frame in Adobe Illustrator
Illustrator can easily open the first frame of your image sequence. Launch Illustrator and choose File>Open. Select the first frame in your sequence (it likely has the name of the clip followed by 0000.jpg in the name) then click Open. Because the photo is in RGB mode, your Illustrator document should match. Click with the Selection tool (V) to make your photo the only active object. For best results, make sure you’re viewing the image at 100% magnification in the following steps.
STEP 7 Live Trace, Part One
Illustrator offers a useful command called Live Trace for converting raster artwork into vectors. With your photo active, choose Object>Live Trace>Tracing Options. A new dialog opens where you can tweak the Live Trace settings. Click the Preview box to see your work. Change Mode to Color. Next adjust the Max Colors setting. You can have up to 256 levels of color (which is very realistic, but slow to create). Experiment with options between 20 and 256 colors depending upon your needs. This call is subjective and is based upon the look you want to achieve. Don’t click OK yet.
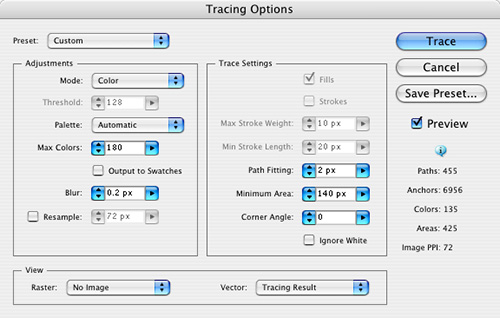
STEP 8 Live Trace, Part Two
There are some other options you can tweak in the Tracing Options dialog. Be sure to try a slight blur. Often values less than 1 will work best (such as .25 pixels). You can dramatically change the look by tweaking the Trace Settings. Path Fitting will control the tightness of the strokes. Increase the Minimum Area slider to simplify the image. Each tweak will take a moment to redraw, so be sure to wait a beat for the screen to refresh. Don’t click OK yet.

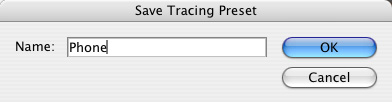
STEP 9 Save a Live Trace Preset
Once you’re happy with a look, you’ll need to store it. Click the Save Preset button and in the dialog that appears, give the Live Trace preset a name that’s easy to remember (perhaps matching it to the footage or project). While you can reuse presets, you’ll get better results by tweaking your settings for each project. Click OK to save the effect and to close the Save Tracing Preset box. You can then click Cancel and skip applying Live Trace for right now.
STEP 10 Set Up in Bridge
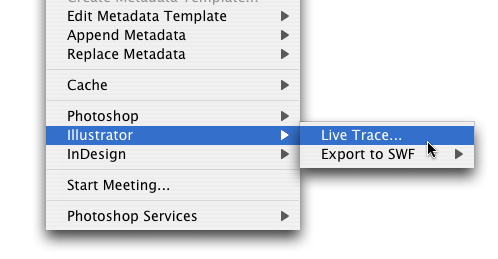
A great place to batch process your images is the new Adobe Bridge CS3. Bridge can quickly perform several tasks of the new Creative Suite including Live Trace. In Bridge, navigate to your folder where you saved your image sequence. Select the first image in the folder then press Command-A (PC: Ctrl-A) to select all the images in the folder. Choose Tools>Illustrator>Live Trace. This will open a Live Trace dialog that you can use to batch process your files.
STEP 11 Tweak the Batch
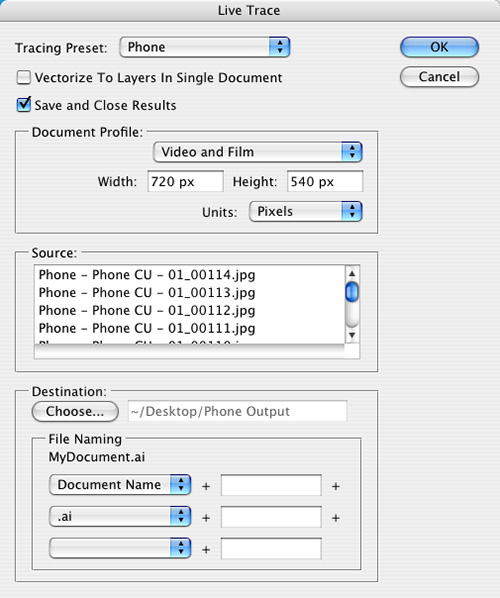
The Live Trace dialog has a few important options you’ll need to fix. First, pick the Tracing Preset that you created earlier from the pop-up menu. From Document Profile, choose Video and Film. The document size should change automatically to match your footage. Next, click the Choose button for a Destination. Be sure to specify a folder to keep your image sequence organized. When ready, click OK to start the conversion (and go away for awhile as the process is a bit intensive).
STEP 12 Import to AE as a Sequential Image
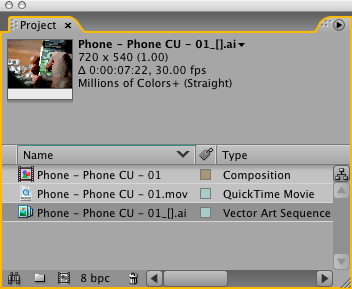
When Illustrator finishes its leg of the mission (thank goodness for batch processing), it’s time to switch back to After Effects. Essentially, each animated frame will come back into After Effects and form a new movie clip. Choose File>Import>File, select the first processed Illustrator file, and be sure to import as footage. Click Open to bring the clip back into After Effects.
STEP 13 Interpret the Footage
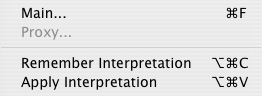
The imported clip will not play at the same speed as the original without a little intervention. Select the original footage clip you created and choose File>Interpret Footage>Remember Interpretation. Then, select the newly created vector clip and choose File>Interpret Footage>Apply Interpretation. If you have advanced options in play (like 3:2 pulldown), just press Command-F (PC: Ctrl-F) on the new clip and change its frame rate to match the original. Both clips now have the same duration and playback speed. Additionally, any audio in the original clip would “sync up” if you placed both clips into a composition together.
STEP 14 Build the Timeline
Select the original clip and drag it onto the Create a New Composition icon at the bottom of the Project window. A new comp is created that matches the footage. Drag the new vector file into the Timeline and place it on top. Press Command-Option-F (PC: Ctrl-Alt-F) to force fit the vector file. Because the clip is vector, you can output at any size. Scale the vector clip up to fit the frame. Be sure to click the Continuously Rasterize switch in the Timeline. When you render, the file will be perfectly clean as vectors scale.