Turn Down the Noise in Photoshop CS3

Noise is the bane of digital photographers. The best way to deal with noise is to try and avoid it in the first place. But sometimes you’re faced with shooting in available darkness and the only way to get the shot is to crank up the ISO. In this tutorial we’ll take a look at various techniques for dealing with noise.
[If you’d like to download the images used in this tutorial to practice these techniques, click here. All files are for practice purposes only.]
1 AVOIDING NOISE: EXPOSURE MATTERS
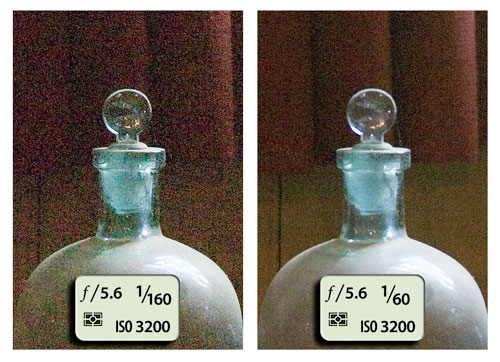
One way to avoid noise, even if you’re forced to shoot with a high ISO setting, is to make sure your shots are well exposed. Underexposed shots are much more likely to suffer from objectionable noise than properly exposed images. Consider the images in this example: Both were shot in low light at 3200 ISO, yet the one on the left is underexposed and the noise levels are dramatically higher. Good exposure matters. (Note: These files have been lightened in Camera Raw to make the noise more visible for this comparison.)
2 NOISE REDUCTION IN CAMERA RAW
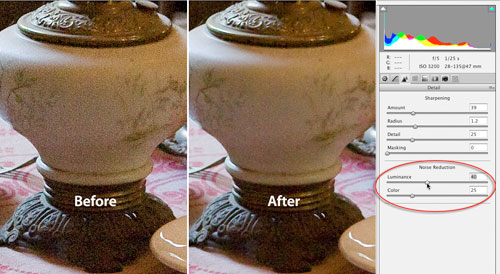
With a RAW file, the first step to reducing noise is in Camera Raw (or Lightroom; both programs have the same noise reduction capabilities). The Detail tab (third icon from the left) contains two sliders for noise reduction. Each addresses a different type of noise: luminance noise and color or chrominance noise. Luminance noise is trickier to reduce because it forms the visible noise structure. Reducing the luminance noise is often a tradeoff between smoothing the noise pattern while trying to preserve delicate details, but when carefully applied to RAW images, it can produce a subtle improvement.
3 CONCEALING COLOR NOISE
Reducing color noise is easier than reducing luminance noise. In Camera Raw, the default is set to 25, so there’s always some amount of color noise reduction applied. Generally this setting is quite good—I only have to raise it up on extremely noisy files.
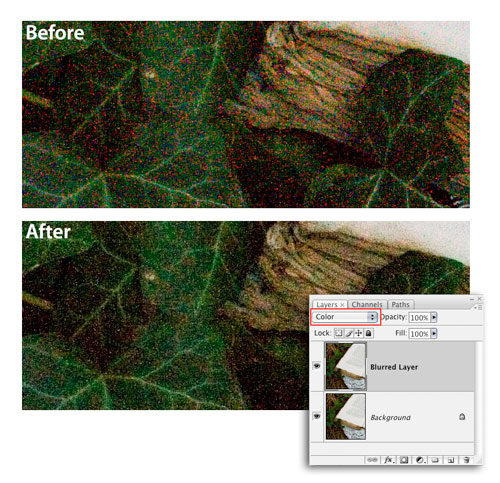
In Photoshop, you can easily hide color noise with a copy layer of the image that has been blurred: Duplicate the Background layer (Command-J [PC: Ctrl-J]) and set its blend mode to Color. Then blur the detail on the layer by choosing Filter>Blur>Gaussian Blur. In the dialog, set the Radius to 5 and click OK.
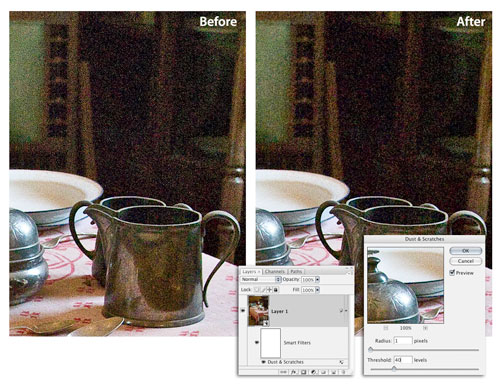
4 A DELICATE TOUCH WITH DUST & SCRATCHES
When used incorrectly, the Dust & Scratches Filter can be heavy-handed and can turn a sharp image into an impressionistic mush. But with a very light touch, it can help reduce the light speckles found in a noise pattern. Choose Filter>Convert for Smart Filters and then Filter>Noise>Dust & Scratches. Set the Radius to 1, Threshold to 40, and click OK. A low Radius and high Threshold are essential for preserving detail and texture in the image.
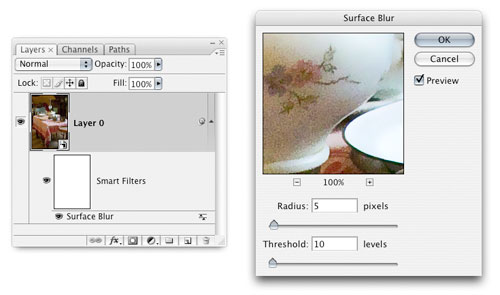
5 THE SURFACE FILTER, PART 1
The Surface Blur filter blurs fine detail while maintaining well-defined edges, making it quite useful for noise reduction. Here’s how: Make a copy of the Background layer (Command-J [PC: Ctrl-J]) or, if you’re using Photoshop CS3, apply the filter as a Smart Filter. Then choose Filter>Blur>Surface Blur. The Radius slider determines how much blur or softening will be applied and the Threshold slider controls the number of tonal values that will be blurred.
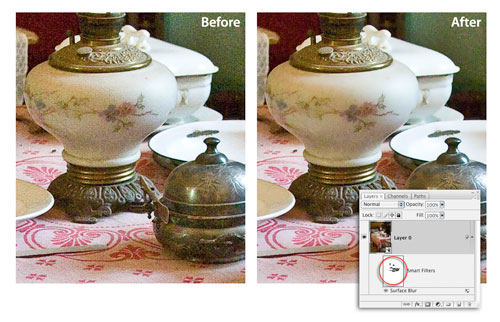
6 THE SURFACE FILTER, PART 2
Start with a low Radius value of 3 or 5 and slowly increase the Threshold slider to minimize the noise. Adjust the Radius and Threshold until you arrive at a balance between the softening of the luminance noise and the preservation of important details. Higher Threshold values will cause more noticeable softening, blurring, and in some cases, posterization. As a general rule, watch for image-degrading artifacts if you raise the Threshold more than 10. Modify as needed with layer opacity or layer masks. In this example we masked the blur effect on the fine details on the lamp.
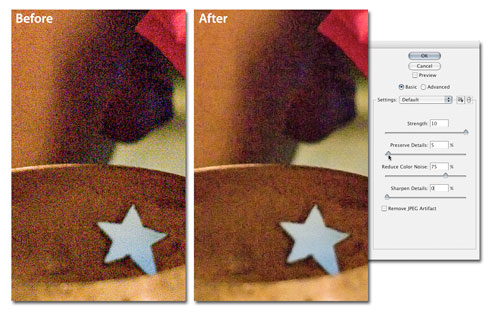
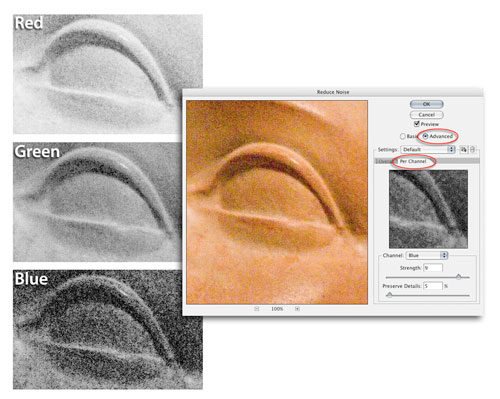
7 NOISE REDUCTION FILTER, PART 1
This filter is found under Filter>Noise>Reduce Noise. It offers controls for minimizing both luminance and color noise, as well as access to noise reduction on a per-channel basis, which can be useful on some images. In the dialog, Strength controls how much luminance noise is removed; and Preserve Details attempts to do what it says, but on very noisy files it can be frustrating to find the right balance. Work with both the Strength and Preserve Detail sliders to find the setting that works best.

8 NOISE REDUCTION FILTER, PART 2
Reduce Color Noise removes color noise mottling and does a very good job of it, too. Try not to go above 50% or the colors may get too desaturated. If you find that you need to use a value higher than 50%, then consider adding a Hue/Saturation adjustment layer after applying the filter to boost the color saturation a bit. Sharpen Details at face value might seem to be a good thing but if you’re not careful, this can cause nasty edge artifacts. It’s better to leave this at 0 and apply input or capture sharpening after noise reduction.
9 NOISE REDUCTION FILTER, PART 3
In Advanced mode (click on the button), you have access to the individual color channels. This can be useful because in some files, luminance noise is much more pronounced in the Blue channel. By targeting specific channels, you can reduce the noise where it’s causing the most problems. Keep in mind, however, that any settings you apply in Advanced mode are applied in addition to any that you’ve already made in the Basic mode.
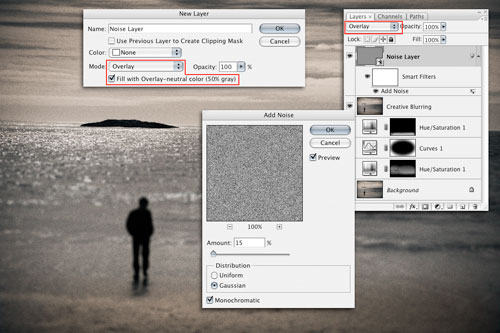
10 CREATIVE NOISE ADDITION
Although most people want to reduce noise, there are times when it’s useful to add noise to an image. To do this in a flexible way, choose Layer>New>Layer. In the dialog, set the mode to Overlay and click the checkbox to fill the layer with 50% gray. Click OK and choose Filter>Convert for Smart Filters. Then use Filter>Noise>Add Noise to add the desired amount of noise. The advantage of adding noise in this way is that it remains totally flexible and can be modified with opacity or a layer mask.