With the cost-cutting mindset in today’s economy, many artists are being asked to do the best they can with two-color printing instead of four. This tutorial discusses the ins and outs of creating mixed ink swatches in InDesign—a feature that makes two colors look like so much more.
1 SET UP A NEW DOCUMENT
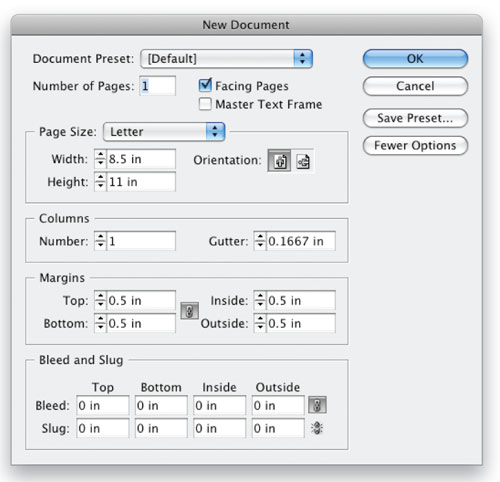
If you’d like to follow along as I go through the steps involved in creating mixed ink, start by setting up a new document. Open InDesign and choose File>New>Document and click OK. A default, one-page document should be fine.
2 OPEN THE NEW COLOR SWATCH DIALOG
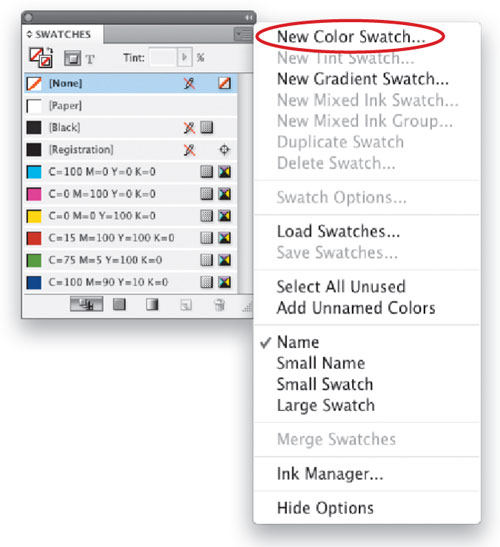
To use mixed ink, first you need to create at least one spot color to be used as part of the mix, or the mixed ink options will be grayed out. To create a new spot color, start by clicking the flyout menu at the top right of the Swatches panel (Window>Swatches) and choosing New Color Swatch.
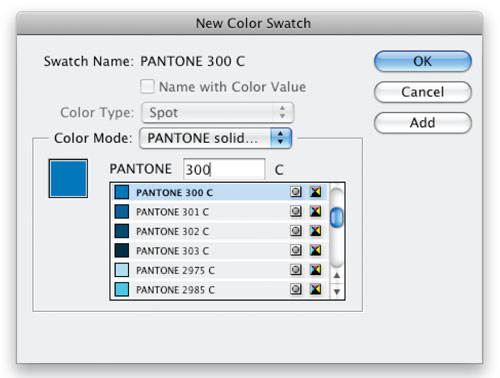
3 CREATE A NEW SPOT SWATCH
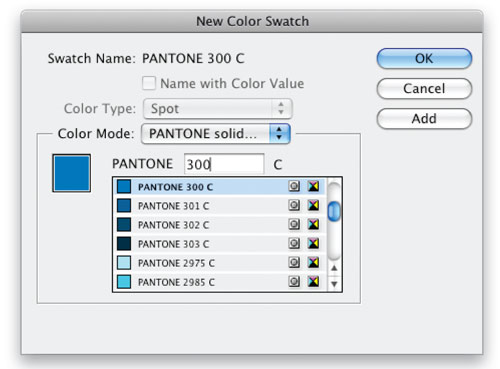
In the resulting New Color Swatch dialog, choose Spot from the Color Type drop-down menu. For the purpose of this tutorial, select PANTONE Solid Coated from the Color Mode drop-down menu, then enter 300 as the PANTONE color, and click OK to add it to the Swatches panel. If you’d like to create more than one spot color, click Add instead and then click Done when you’re finished.
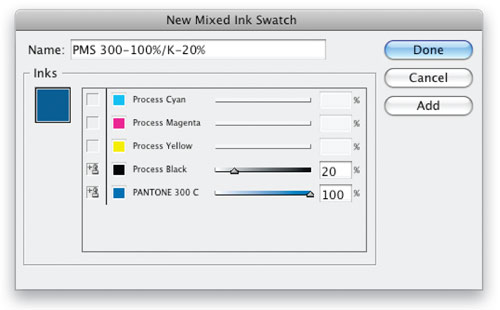
4 MIX A CUSTOM COLOR
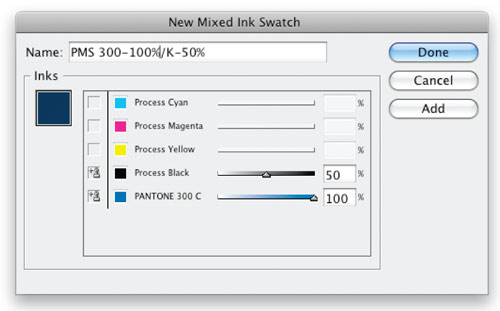
To get started with mixed ink, go back to the Swatches panel’s flyout menu and choose New Mixed Ink Swatch. In the dialog that opens, click the empty checkboxes next to Process Black and PANTONE 300 C. Lower the Black value to 50% by clicking-and-dragging the slider under the tint ramp or by entering an exact value in the percentage field. You’ll see a preview of the color to the upper left of the dialog. Name your swatch and then click OK to create a swatch from this mixture, or to add more than one mixed swatch, proceed to Step 5.
5 MIX ADDITIONAL SWATCHES
To add more than one mixed ink swatch, click the Add button instead of OK. Change the tint value of the two colors and click Add again to add your second color to the Swatches panel. You can press Add after each new color you mix and then click Done when you’re finished. Now that you know how to create an individual mixed ink swatch, let’s take a look at how we can create a whole bunch at one time.
6 A GLOBAL APPROACH TO MIXED INK
A great choice when you’re first developing the look for a two-color design is to start with a mixed ink group. This allows you to see the amazing potential of the two (or more) inks you’d like to use. To follow along, create another new document. Like the manual approach to creating mixed ink mentioned above, New Mixed Ink Group is grayed out when you click the Swatches panel’s flyout menu unless you have at least one spot color swatch available. So set up one or more spot swatches as you did in Steps 2 and 3.
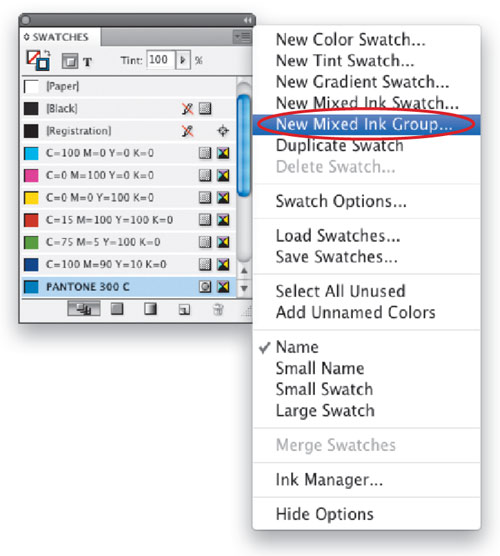
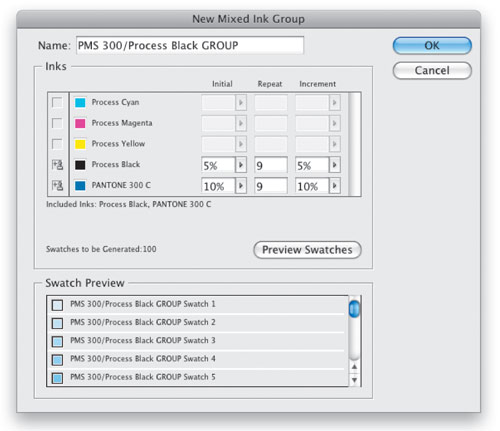
7 CREATE A WHOLE WORLD OF MIXED INK FAST
To create a lot of mixed ink swatches in seconds, select New Mixed Ink Group under the flyout menu of the Swatches panel. In the dialog that opens, start by choosing what colors you’d like to use by clicking in the checkboxes to the left of your new spot color and Process Black (or a second spot color).
8 GROUP DYNAMICS
Next, you have to determine the parameters of your mixed ink group. To keep it simple, set the Initial percentage of Black at 5%, the Repeat (or the number of additional percentages) at 9, and the Increment of each Repeat at 5%. Then for your spot color, set the Initial percentage at 10%, the Repeat at 9, and the Increment of each increase at 10%. Note: If the Repeat value is set too high, you’ll get an error message because there can’t be more than 100% of any particular color in a Swatch.
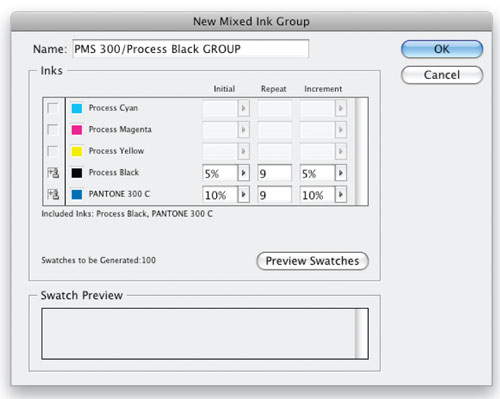
9 SNEAK A PEAK AT THE WHOLE GROUP
If you followed the steps above, you should end up with 100 swatches (one initial percentage and nine repeats for each color). But what will they look like? To take a look at the results of your settings, click the Preview Swatches button. If you’re happy with the colors, name your group at the top of the window and press OK to add the entire mixed ink group to the Swatches panel.
10 GET GRADIENTS IN THE MIX TOO
You can also create mixed ink gradients by selecting New Gradient Swatch from the flyout menu of the Swatches panel. Then, click on one of the color stops under the Gradient Ramp in the dialog and choose Swatches from the Stop Color drop-down menu. Now you can select a mixed ink swatch or spot color for each of the color stops.

11 HAVE YOUR FILL (OR STROKE) OF MIXED INK
Like other swatches, mixed ink can be used to fill or stroke objects. Simply select the object with the Selection tool (V), activate either the Stroke or Fill by clicking on its respective icon in the upper-left corner of the Swatches panel, and select a mixed ink swatch. Even better, click-and-drag the swatch to either the fill or stroke of an unselected object to apply your mixed ink. You can also colorize placed grayscale or bitmap mode PSD or TIFF images by selecting the image with the Direct Selection tool (A) and applying the swatch.

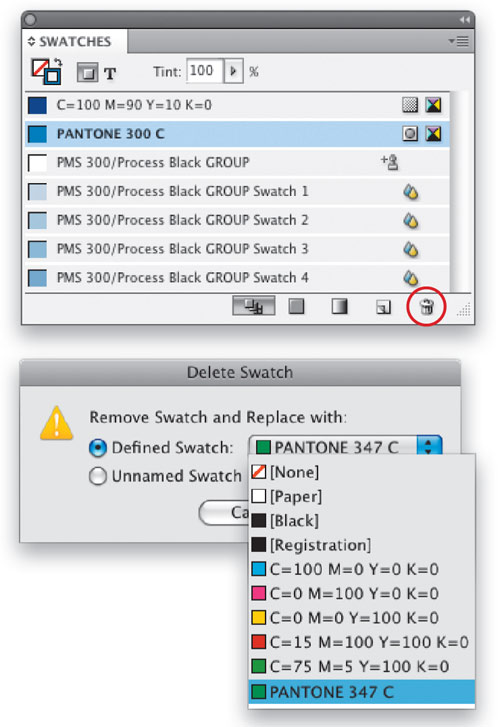
12 CIRCUMVENTING MURPHY’S LAW
As Murphy put it, “If anything can go wrong, it will.” In light of this, what if you’re nearing the completion of a two-color project and a decision is made to use a different spot color? Do you have to redo the swatches throughout your entire document? Thank heavens, no! Simply create a new spot swatch. Then, select your old spot color in the Swatches panel and click the Trash icon at the bottom of the panel. In the resulting Delete Swatch dialog, choose your new spot color from the Define Swatch drop-down menu. This new spot will replace the old spot throughout the document, including all mixed ink swatches.
MIXED INK REALLY DOES MAKE A DIFFERENCE
In the past, my biggest issue with two-color projects was that they always had that “two-color look.” Years ago, my first opportunity to use mixed ink was in a newsletter produced by Aggie Perilli Communications for The Arc of Somerset County (www.thearcofsomerset.org), an amazing nonprofit organization in New Jersey that helps individuals with intellectual and developmental disabilities.
I was floored by how much more I could get out of two colors by using mixed ink in InDesign. Recently, we started producing this award-winning publication using low-cost digital printing, so we could take advantage of color images in the design. Many of the mixed ink swatches in the original two-color design were simply converted to four-color process by double-clicking on the “Group” swatch above all the mixed ink swatches in the Swatches panel and checking Convert Mixed Ink Swatches to Process.