Working with Database Catalogs in Lightroom

The most recent release of Adobe Photoshop Lightroom is a photographer’s dream come true. The new and improved database catalogs add a new level of flexibility, control, and organization. Yet, much of the new Lightroom catalog functionality and strength isn’t being tapped into. In this article, we’ll solve that problem by providing some tips that will improve how you use Lightroom.
1 UNDERSTANDING DATABASE CATALOGS
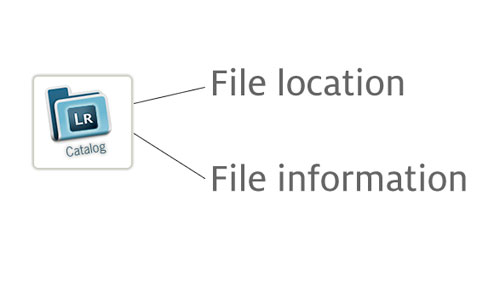
Many of my colleagues say, “The Lightroom database catolog thing is daunting…I don’t even know what a catalog is!” At first glance, it does seem confusing; so let’s dispel this misconception. For starters, a catalog is simply how Lightroom tracks file location and remembers file information—file previews, metadata, Develop module settings, ratings, keywords, and collections. Why have catalogs? They provide flexibility in managing, identifying, and organizing photos and media files. For example, you can transfer files from a laptop to desktop and preserve the changes. Think of a catalog as something that contains file location and information.
2 WHY CATALOGS MATTER
Understanding catalogs is important for two reasons: First (and maybe most importantly) is that certain catalog techniques can optimize performance, i.e., make Lightroom run faster. As your image library grows in size and scale, you’ll need to take specific steps to ensure Lightroom runs quickly. The second benefit is that catalogs allow you to work in Lightroom without any loss of information across multiple computers. In this case, catalogs become instrumental.

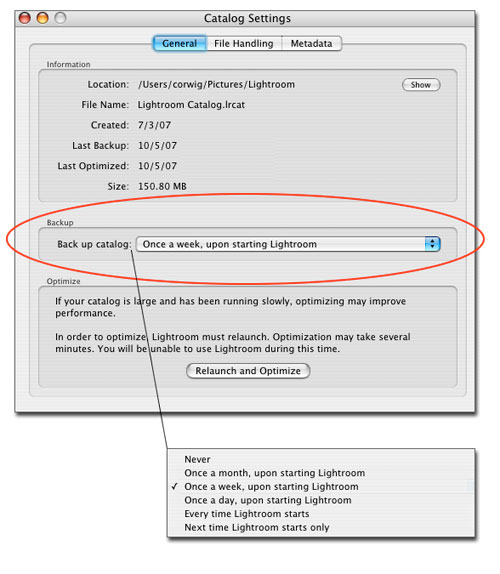
3 CATALOG SETTINGS—BACKUP
Catalogs contain valuable image information; therefore, it’s critical to back up your catalogs frequently. Choose File>Catalog Settings and in the dialog that opens, from the Back Up Catalog drop-down menu (under the General tab), choose how frequently the current catalog is to be backed up. How much you use Lightroom will determine how often the catalog needs to be backed up; for example, power users would choose at least Once a Week. This way, if a catalog is accidentally deleted or becomes corrupt, the backup file may help you recover your data.
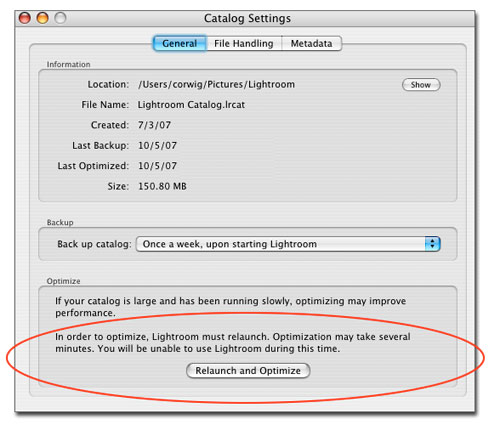
4 CATALOG SETTINGS—OPTIMIZE
One of the main advantages of using Lightroom is that it gives you quick access to large collections of images; however, you may experience performance issues as your database of images grows or if you’ve removed a number of files. If you feel as if Lightroom is “chugging,” your first plan of attack should be to Choose File>Catalog Settings and in the dialog that opens, click the Relaunch and Optimize button. Optimization takes a couple of minutes but it’s well worth the wait!
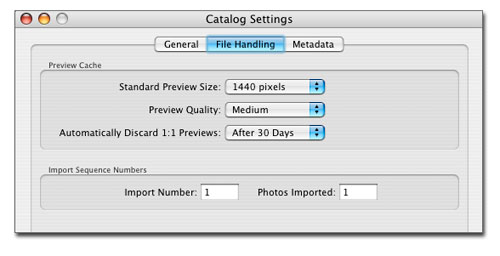
5 CATALOG SETTINGS—FILE HANDLING
To quickly view your images, the Lightroom catalog contains important file previews, and as your image library grows, the number of previews grows as well. So, in the Catalog Settings dialog, first click on the File Handling tab and choose a Standard Preview Size that’s no larger than your monitor resolution; e.g., if your laptop resolution is 1280×800, choose 1280 or less. Next, choose Medium for Preview Quality, which is probably best for most users. Finally, to keep your catalog file lean and mean, choose After 30 Days in the Automatically Discard 1:1 Previews field.
6 ONE COMPUTER, MANY CATALOGS
Another way to increase performance is to use multiple catalogs, thus preventing one catalog from becoming too big. Choose File>New Catalog, name your catalog, and save it in a specific folder. (I recommend saving all your catalogs in one location.) To open a catalog, just choose File>Open Catalog. The number of catalogs you use will be contingent upon how much you shoot. (I know one prolific wedding photographer who creates a new catalog for each wedding; on the other hand, a colleague of mine only creates a new catalog for each calendar year.)

7 ME AND MY COMPUTERS
Working with catalogs is critical when using multiple computers. Consider the following scenario: I use a laptop when traveling or on location, and while on the road, I import and process my images in Lightroom (I also back up the images to two external hard drives). Upon returning to the studio, I need to transfer the files to my studio backup system to, you know, back up the files and access them from my desktop. (Note: The following techniques will be effective when using any type of computer.)

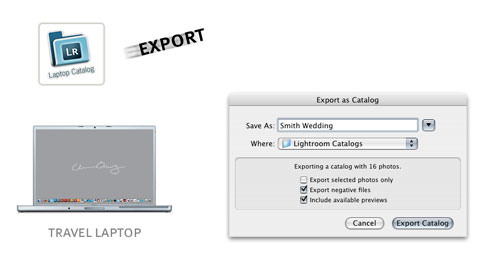
8 LAPTOP TO DESKTOP—EXPORT
To export your catalog choose File>Export as Catalog. (Think of exporting a catalog as similar to taking your images, proof sheets, etc., and boxing them up to be sent to a new location.) Name your catalog and choose a destination folder. Be sure to check the Export Negative Files and Include Available Previews options, as these are the best choices when moving an entire catalog from one computer to another.
9 LAPTOP TO DESKTOP—IMPORT
The catalog is now ready to be imported to the studio backup system so you can access it on your desktop computer. Open Lightroom on the desktop and choose File>Import from Catalog. (I like to think of importing a catalog as a merger.) What literally happens is the laptop and desktop catalogs become one, with the end result a “super” desktop catalog that contains all of the laptop catalog images, previews, information, etc.

10 LET’S SHARE
Other Lightroom workflow scenarios require sharing images and database catalogs, and in these situations, the workflow model is based on teamwork. In the following steps, let’s consider a workflow where a photographer shoots and then imports and processes images in Lightroom. After the photographer has completed her work, an assistant adds keywords to all of the images, then finally, a studio manager will deliver the images to the client.

11 PHOTOGRAPHER—EXPORT
The first step in this scenario is for the photographer to import and process the images in Lightroom. Once she has completed the workflow, she’ll have to export the catalog. This step is identical to Step 8: Choose File>Export as Catalog, then name the catalog, and select a destination folder. Because the catalog will be shared, it’s critical to check the Export Negative Files and Include Available Previews boxes.
12 ASSISTANT—OPEN AND EXPORT
The next step is for the assistant to add keywords to the images. In this case, the assistant will need to open (as opposed to Import) the catalog (File>Open Catalog). The catalog will then remain intact (it won’t be merged with another catalog). When the assistant’s work is complete, he’ll need to export the catalog (File>Export as Catalog)—again choosing a name and destination for the catalog and checking Export Negative Files and Include Available Previews (because the catalog will be shared).

13 STUDIO MANAGER—OPEN
For the final step in this scenario, the studio manager opens the catalog to manage the images and deliver the files to clients, etc. In this case, the process mirrors the initial procedures in Step 12: Choose File>Open Catalog. The process is now complete.
Note: If the studio manager needs the assistant to do some more keywording, the catalog would have to be exported.

14 GOOD OL’ ACHILLES
Now that you’ve learned some Lightroom database skills to improve your overall workflow, let’s not forget about the Achilles’ heel! So what’s our potential weakness? The database catalogs and our images live on hard drives that have a limited lifespan. Therefore, make sure to follow the words of Peter Krogh, digital asset management guru: “Don’t put all your eggs in one basket. Put your files on at least three hard drives.” If you haven’t backed up your files recently, let today be the day—you won’t regret it!