
What, you haven’t checked out Zoomify objects yet in Photoshop CS3? It’s a brand new command in the latest version of Photoshop, so stick around and see what all the buzz is about. Essentially, a Zoomify object is a Flash object that sits within a web page that allows users to zoom in and out on an image, pan around inside it, and otherwise explore it. Imagine a zoomable image of a transit map, a detailed photograph, or a piece of artwork. It’s pretty cool stuff.
The icing on the cake? Photoshop cooks up all the necessary HTML, and builds the Flash object for you, so even with no prior knowledge of HTML or Flash, you can make use of this awesome new command in Photoshop. And if you do have some HTML and Flash under your belt, then you can get customizing things even further to your liking. It’s awesome stuff, and really easy to create in Photoshop. So without further adu, let’s take a look at how it all works.
Step 1.
Open up an image in Photoshop CS3 that you’d like to export as a Zoomify object. It’s gotta be a fairly large image. The image I’m using for this tutorial is 1024 x 768 pixels.
Step 2.
Once the image is open, choose File > Export > Zoomify.
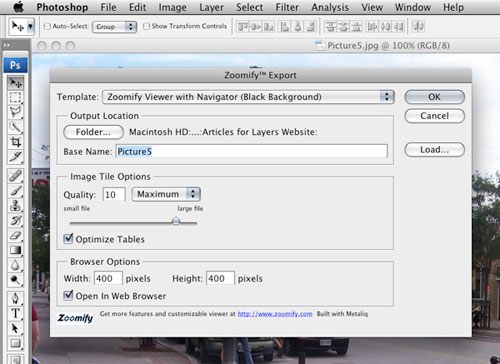
When you choose the Zoomify command, the Zoomify Export dialog appears on your screen. Now it’s time to set up how you’d like your Zoomify object to be created. Let’s take a look at some of the options.
Step 3.
First, from the Template pulldown menu, choose the type of viewer you’d like to use.
The choice you make here really depends on the background that your Zoomify object will sit on. But really, background color doesn’t matter a whole lot, because you can always tweak and adjust your source files later on.
The options towards the bottom of the Template list include something called a Navigator. The Navigator is a small thumbnail of your image inside the Zoomify window’s top left corner—kinda like Photoshop’s Navigator panel.
You’ll have to try it to get an idea of how it works, so go ahead and choose a template that includes a navigator, if you like.
Step 4.
Next, in the Output Location area, click on Folder to choose the directory where you’d like to save your work.
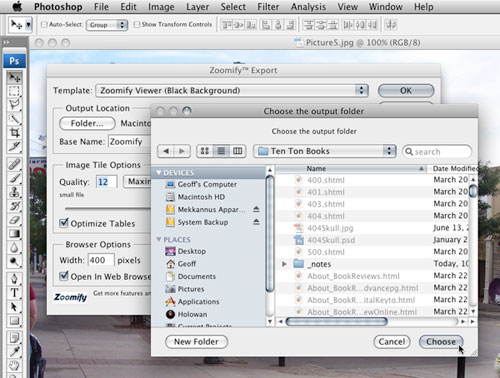
Normally, you’d point to the folder that’s storing the web site that you want to add the Zoomify object to—what seasoned web developers call their site’s local folder.
Step 5.
In the Base Name field, enter in a name for your Zoomify object.
This will also set the filename for the HTML page that Photoshop automatically generates, so keep that in mind. You can, of course, just leave the default Base Name, which is pulled from the filename of the open graphic that you’re exporting as a Zoomify object.
Step 6.
In the Image Tile Options area, set the quality of your Zoomify object.
This is identical to the quality settings when saving JPEG’s outta Photoshop, so for some readers, this’ll be old news. If you’re not too familiar with this stuff, all you have to do is set a value in the Quality field, choose a quality level from the drop-down menu, or use the slider below the Quality field and pull-down menu. They all control the image’s output quality.
Step 7.
Finally, in the Browser Options area, set the size of the Zoomify object. Make sure Open In Web Browser is checked, and the Zoomify object will automatically open so you can give it a try. When you’re finished, click OK.
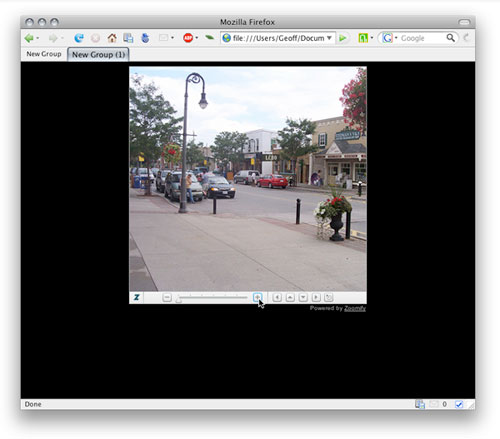
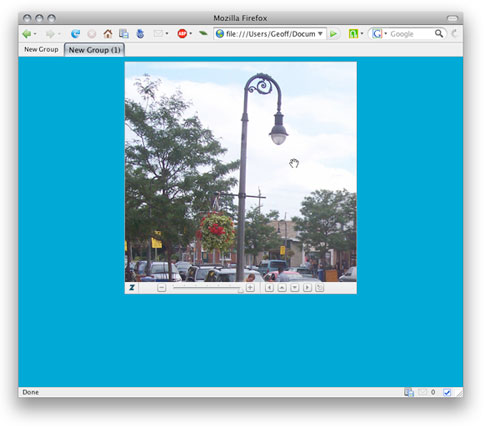
Photoshop automatically opens the page containing the Zoomify object in your web browser. We’ll talk more about the page itself in just a sec. First though, take a moment to play with your nifty new Zoomify object!
Use the slider, and the zoom in and zoom out buttons at the bottom of the object. The direction arrows in the bottom right allow you to pan around inside the image. Even faster, try just clicking within the image to zoom, or clicking-and-dragging to pan around. When you’re zoomed in, try using the arrow keys on your keyboard. Cool!
We still have to talk about a few of the more technical aspects of your Zoomify object, but go ahead and play around in your web browser for a sec. Get it all out of your system, I’ll wait for you!
Alright, now if you’re up for it, let’s take a look at the page and the coding that Photoshop created automatically.
Step 8.
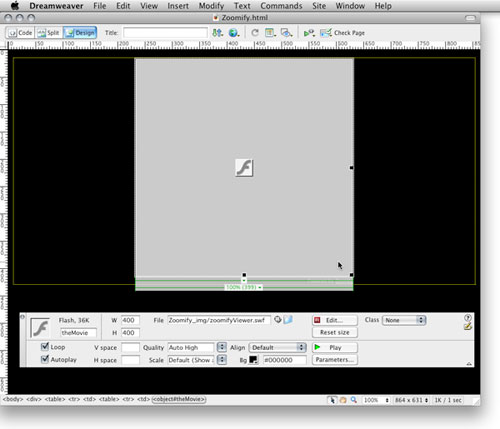
Navigate to the folder where you saved your Zoomify object back in Step 4; then look for the HTML page that Photoshop created. Open this file up in Dreamweaver.
With the page open in Dreamweaver’s Design View, you’ll see a large, seemingly useless gray box, which represents your Zoomify object.
Step 9.
Single-click on the Zoomify object; then on the Properties inspector (Window > Properties), click on the green Play button.
Dreamweaver displays the Zoomify object as it would appear in a web browser. Cool! This gives you a better sense of how your Zoomify object will look in your overall page layout (which may wind up being much more complex than the current, simple, layout) without leaving Dreamweaver.
Click on the red Stop button on the Properties Inspector to turn off the Zoomify object’s preview. Now, how about the coding structure behind your Zoomify object? If you have the stomach for handling background code, let’s take a quick look.
Step 10.
Switch to Dreamweaver’s Code View by clicking on the Code View button in Dreamweaver’s top left corner.
You should now be looking at a screen of code, which isn’t really all that complicated. As you can see towards the top of the page, there’s a background color attribute set for the body element, as indicated by the BGCOLOR of #000000. The next line down tells us that the entire object is contained within a div element, which has a center alignment.
Within the div tag, you can see that the Zoomify object itself is placed within a table. So on your own, you can adjust this structure, create a CSS rule or two to control the table or div element, and so on. So there’s a quick look at the coding structure.
Let’s head back to Design view and do some simple formatting.
Step 11.
Go back to Dreamweaver’s Design View by clicking the Design View button in the top left corner.
Next, we’ll take a look at making some simple customizations to your Zoomify object. First, if you’re not liking the background color of the page, we can easily adjust it, as well as the background color of the Zoomify object in Dreamweaver.
Step 12.
Choose Modify > Page Properties (Ctrl or Cmd+J for you speedsters); then in the Appearance category on the left, choose a color for Background. When you’re done, click OK.
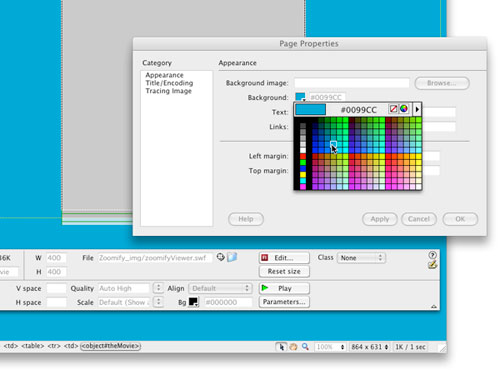
Your page background changes. Easy stuff. Now how about the background of the Zoomify object?
If you were to preview your page in your browser, you’d see that there’s a thin strip at the bottom of the Zoomify object that doesn’t match your new page background. Check it out by choosing File > Preview In Browser. Now, here’s whatcha do to fix it.
Step 13.
Place your cursor in the text that reads Powered by Zoomify; then on the left side of Dreamweaver’s Status Bar, click on table.
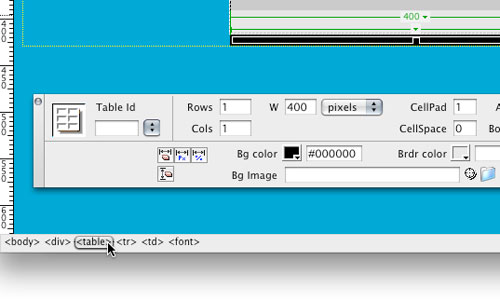
A selection appears underneath the Zoomify object. This little area on Dreamweaver’s Status Bar is called the Tag Selector, and as the name implies, it’s really handy for making tricky selections, such as this one.
Now, notice in the Properties inspector, the BG Color option is set to the background you chose way back in Step 3.
Step 14.
To remove the strip of color from below the Zoomify object, simply clear out this field.
Even better, if you don’t want Powered by Zoomify to appear on your page, just hit Delete on your keyboard. Don’t forget to refresh your browser to see how things are looking.
Of course, we could continue modifying and manipulating the page and the Zoomify object, create CSS rules, etc. But hopefully, this tutorial has given you enough to get started with Zoomify so that you can continue customizing things on your own.
{module:zoomify}
Hope you enjoyed, and happy Zoomifying!
